1. Get started with content management
After installing Foreman, to become productive synchronizing and distributing your content, import initial content into your Foreman server and set up a content delivery pipeline to distribute that content to your hosts.
1.1. Create a product and a repository
A product in Foreman groups repositories, and a repository in Foreman mirrors an upstream content source. Create a product and add a repository so that Foreman has content to synchronize.
This example adds a repository with CentOS content.
-
Your Foreman web UI account has administrative privileges.
-
In the Foreman web UI, navigate to Content > Products.
-
Click Create Product. To configure the new product:
-
In the Name field, enter a name for the product. For example:
CentOS Stream. -
Click Save.
-
-
On the product page, click New Repository. To configure the new repository:
-
In the Name field, enter a name for the repository. For example:
BaseOS. -
From the Type list, select the required repository type. For example:
yum. -
In the Upstream URL field, enter the URL of the upstream repository. For example:
https://mirror.stream.centos.org/10-stream/BaseOS/x86_64/os/. -
From the Download Policy list, select a download policy. For example: Select On Demand to save disk space. With this policy, Foreman downloads only the metadata during synchronization and fetches the actual packages when a host requests them.
-
Click Save.
-
-
In the Foreman web UI, navigate to Content > Products. The Products page now shows the new product. The new product contains the new repository.
-
Follow Synchronize your content to synchronize the new repository so that Foreman downloads its metadata and makes it available for distribution.
1.2. Import a subscription manifest and enable Red Hat repositories
To distribute Red Hat content, you must first import a subscription manifest that entitles your Foreman server to download content from the Red Hat CDN. After that, you enable the specific Red Hat repositories you want to synchronize.
-
You have a Red Hat subscription manifest file exported from the Red Hat Hybrid Cloud Console. For more information, see Obtaining a Red Hat subscription manifest in Managing content.
-
Your Foreman web UI account has administrative privileges.
-
In the Foreman web UI, ensure the context is set to the organization you want to use.
-
Navigate to Content > Subscriptions. To upload the manifest:
-
From the options menu, select Manage Manifest.
-
In the Manage Manifest window, click Choose File. Upload the manifest file.
-
After the manifest imports successfully, close the Manage Manifest window.
-
-
Navigate to Content > Red Hat Repositories. To enable repositories:
-
Search for the repository you want to enable. You can toggle the Recommended Repositories option to view repositories that are used in a typical setup.
-
Expand the repository set and click the Enable icon next to the base architecture and release version that matches your hosts.
-
-
The repository you enabled is listed in the Enabled Repositories list.
-
Follow Synchronize your content to synchronize the new repository so that Foreman downloads its metadata and makes it available for distribution.
1.3. Synchronize your content
Synchronization downloads metadata and packages from an upstream source into Foreman. Until you synchronize a repository, Foreman has no content to distribute to your hosts.
-
In the Foreman web UI, navigate to Content > Products.
-
Select the product that contains the repositories you want to synchronize.
-
Select the checkboxes next to the repositories you want to synchronize.
-
Click Sync Now.
Depending on the repository size and your network speed, the sync can take from a few minutes to over an hour. The first time you synchronize a repository, the sync typically takes longer.
-
In the Foreman web UI, navigate to Content > Sync Status.
-
Expand the product to see the synchronization result for each repository.
-
Verify that the synchronization completed successfully and that the repository shows a package count.
-
After the sync finishes, your content is stored in the Library environment. Library is the default lifecycle environment where all content lands first. Next, follow Define lifecycle environments to create additional lifecycle environments to stage content through a promotion path.
1.4. Define lifecycle environments
Lifecycle environments represent stages in your content promotion pipeline. By adding lifecycle environments, you define the stages through which you will be promoting your content as you test it.
Every Foreman deployment starts with an initial Library lifecycle environment that holds all synchronized content. From there, you create a lifecycle environment path that matches the stages your content passes through before reaching your hosts.
For example, consider a team managing web servers. They want to test package updates in a development environment first, then validate them further in a testing environment, and only then promote the packages to production. The resulting lifecycle environment path looks like this: Library > Development > Testing > Production.
In this example, you create that path.
-
In the Foreman web UI, navigate to Content > Lifecycle > Lifecycle Environments.
-
Add an environment path:
-
Click Create Environment Path to start a new lifecycle environment path.
-
In the Name field, enter
Development. -
Click Save.
-
-
Extend the environment path with a testing stage:
-
Click Add New Environment next to the Development environment.
-
In the Name field, enter
Testing. -
Ensure that the Prior Environment dropdown list value is set to Development.
-
Click Save.
-
-
Extend the environment path with a production stage:
-
Click Add New Environment next to the Testing environment.
-
In the Name field, enter
Production. -
Ensure that the Prior Environment dropdown list value is set to Testing.
-
Click Save.
-
-
In the Foreman web UI, navigate to Content > Lifecycle > Lifecycle Environments. Review your new lifecycle environment path.
-
Follow Publish and promote a content view to create a content view so that you control which repositories are available in the new environments.
1.5. Publish and promote a content view
A content view is a curated collection of your repositories. When you publish a content view, Foreman takes a point-in-time copy of the selected repositories. This snapshot, called a content view version, is delivered to hosts through promotion to a lifecycle environment.
In this example, you create a content view, publish the first version, and promote it to the Development environment.
-
The content you want to publish is synchronized, as described in Synchronize your content.
-
In the Foreman web UI, navigate to Content > Lifecycle > Content Views.
-
Create a content view:
-
Click Create content view.
-
In the Name field, enter a name. For example:
My Content View. -
Ensure Content view is selected as the type.
-
Click Create content view.
-
-
Define the properties of the new content view:
-
On the Repositories tab, select your preferred repository type from the Type list.
-
Click Show repositories, an select the repositories you want to include.
-
Click Add repositories.
-
-
Publish a new version of the content view with the selected repositories:
-
Click Publish new version.
-
Optional: In the Description field, enter
Initial version. -
Toggle Promote, and select the Development lifecycle environment.
-
Click Next, and review the details.
-
Click Finish, and wait for the publishing task to complete.
-
-
In the Foreman web UI, navigate to Content > Lifecycle > Lifecycle Environments. Click the Development lifecycle environment. On the Content Views tab, you can see that My Content View is listed.
-
Navigate to Content > Lifecycle > Content Views. Click the My Content View content view. On the Versions tab, you can see the version of the content view that is published and the environments associated with My Content View. Hosts registered to these environments with this content view will receive exactly the packages from this snapshot.
-
Follow Create an activation key to create an activation key that maps new hosts to this content view and lifecycle environment.
1.6. Create an activation key
An activation key assigns a lifecycle environment, content view, and other settings to hosts during registration. Every time you reuse the key to register a host, Foreman applies the same settings to the host.
In this example, you create an activation key that points to the Development environment and the My Content View content view.
-
In the Foreman web UI, navigate to Content > Lifecycle > Activation Keys.
-
Create an activation key:
-
Click Create Activation Key.
-
In the Name field, enter a name. For example:
My Development Key. -
Ensure the Unlimited hosts checkbox is selected.
-
On the Content view environments card, click Assign content view environments.
-
Select the Development lifecycle environment.
-
Select the content view you created, for example My Content View.
-
Click Save to save the content view environment.
-
-
Click Save to create the activation key.
You now have an activation key that you can use to register hosts. Each host registered with this activation key will automatically receive content from the Development lifecycle environment and the My Content View content view.
1.7. Register a host and test package delivery
Register a host to Foreman and verify that it receives packages from your content view. Registration connects the host to Foreman server and assigns the lifecycle environment and content view from the activation key.
|
Important
|
After registration, all content requests from the host are served by Foreman server rather than by external repositories. |
-
You have root access to the host.
-
The host and your Foreman server can communicate over the network.
-
In the Foreman web UI, navigate to Hosts > Register Host.
-
From the Activation Keys list, select the required activation key.
-
If you have not deployed a CA-signed certificate on Foreman server, select the Insecure option for the purposes of this tutorial.
-
Click Generate to generate the registration command.
-
On your host, run the registration command as the root user.
-
The registration command succeeds.
-
On the host, install a package that is provided through the content view:
# dnf install My_Package_Name
Verify that Foreman server delivers the package instead of external mirrors.
Your content pipeline is now working end to end. Hosts registered with your activation key will receive packages from the content view snapshot most recently promoted to the Development lifecycle environment.
-
Registering hosts by using global registration in Managing hosts
2. Managing Red Hat subscriptions
You can import content from the Red Hat Content Delivery Network (CDN) into Foreman by using a Red Hat subscription manifest. Manage your subscription allocations to ensure each organization can access and download Red Hat repositories.
A Red Hat subscription manifest contains the information about the subscriptions purchased from Red Hat. Foreman uses the information in the manifest to access the Red Hat CDN and find what repositories are available for the associated subscription.
You must have a Red Hat subscription manifest containing a subscription allocation for each organization in Foreman. All subscription information is available on the Red Hat Hybrid Cloud Console.
- Subscription allocations and organizations
-
You can manage more than one organization if you have more than one subscription allocation. Foreman requires a single allocation for each organization configured in Foreman server. The advantage of this is that each organization maintains separate subscriptions so that you can support multiple organizations, each with their own Red Hat accounts.
- Future-dated subscriptions
-
You can use future-dated subscriptions in a subscription manifest. When you add future-dated subscriptions to your manifest before the expiry date of the existing subscriptions, you can have uninterrupted access to repositories.
- Subscriptions service
-
The Subscriptions service on the Red Hat Hybrid Cloud Console helps you track and manage Red Hat subscription usage across connected and disconnected systems. It collects usage data, displays trends in a centralized dashboard, and supports historical analysis for planning and compliance.
2.1. Red Hat subscription manifests in Foreman
You can import a Red Hat subscription manifest into Foreman to provide subscription allocation to your organization in Foreman.
|
Note
|
Simple Content Access (SCA) is set on the organization, not the manifest. Importing a manifest does not change your organization’s Simple Content Access status. |
Simple Content Access simplifies the subscription experience for administrators.
2.1.1. Obtain a Red Hat subscription manifest
You can create and export a Red Hat subscription manifest to prepare subscriptions for import into Foreman.
-
If your Foreman is connected, use the Red Hat Hybrid Cloud Console to create and export the manifest. For more information, see Creating and managing manifests for a connected Satellite Server in Subscription Central.
This manifest does not yet contain any subscriptions. After you import the manifest into Foreman, add subscriptions to the manifest in Foreman.
-
If your Foreman is disconnected, use the Red Hat Customer Portal to create and export the manifest. For more information, see Creating and managing manifests for a disconnected Satellite Server in Subscription Central.
This manifest already contains subscriptions.
2.1.2. Import a Red Hat subscription manifest by using Foreman web UI
You can import a Red Hat subscription manifest into Foreman server by using Foreman web UI. Import the manifest so that you can enable and synchronize Red Hat repositories in your organization.
-
You have a Red Hat subscription manifest file. For more information, see Obtain a Red Hat subscription manifest.
-
In the Foreman web UI, ensure the context is set to the organization you want to use.
-
Navigate to Content > Subscriptions.
-
Click Manage Manifest.
-
In the Manage Manifest window, click Choose File.
-
Navigate to the location that contains the Red Hat subscription manifest file, then click Open.
-
If you use the manifest from the Red Hat Hybrid Cloud Console, add subscriptions to the manifest. For more information, see Adding Red Hat subscriptions to subscription manifests.
2.1.3. Import a Red Hat subscription manifest by using Hammer CLI
You can import a Red Hat subscription manifest into Foreman server by using Hammer CLI. Import the manifest so that you can enable and synchronize Red Hat repositories in your organization.
-
You have a Red Hat subscription manifest file. For more information, see Obtain a Red Hat subscription manifest.
-
Copy the Red Hat subscription manifest file from your local machine to Foreman server:
$ scp ~/manifest_file.zip root@foreman.example.com:~/.
-
Log in to Foreman server over SSH as the
rootuser. -
Import the Red Hat subscription manifest file:
$ hammer subscription upload \
--file ~/manifest_file.zip \
--organization "My_Organization"
-
If you use the manifest from the Red Hat Hybrid Cloud Console, add subscriptions to the manifest. For more information, see Adding Red Hat subscriptions to subscription manifests.
2.2. Locating a Red Hat subscription
You can locate specific Red Hat subscriptions in your Foreman by filtering the results on the Subscriptions page to navigate a high volume of subscriptions.
-
A Red Hat subscription manifest is imported to Foreman. For more information, see Red Hat subscription manifests in Foreman.
-
In the Foreman web UI, ensure the context is set to the organization you want to use.
-
In the Foreman web UI, navigate to Content > Subscriptions.
-
In the Subscriptions window, click the Search field to view the list of search criteria for building your search query.
-
Select search criteria to display further options.
-
When you have built your search query, click the search icon.
2.3. Adding Red Hat subscriptions to subscription manifests
You can add Red Hat subscriptions to your subscription manifest in Foreman to allocate entitlements to Red Hat content in your organization.
If you have exported a new subscription manifest from the Red Hat Hybrid Cloud Console, you have to populate the manifest with subscriptions. Such a manifest does not initially contain any subscriptions.
-
A Red Hat subscription manifest is imported to Foreman. For more information, see Red Hat subscription manifests in Foreman.
-
In the Foreman web UI, ensure the context is set to the organization you want to use.
-
Navigate to Content > Subscriptions.
-
On the Subscriptions page, click Add Subscriptions.
-
On the row of each subscription you want to add, enter the quantity in the Quantity to Allocate column.
-
Click Submit.
2.4. Removing Red Hat subscriptions from subscription manifests
You can remove Red Hat subscriptions from manifests to adjust entitlement allocations or decommission Red Hat products from your organization.
|
Warning
|
Manifests must not be deleted. If you delete the manifest from the Red Hat Customer Portal or in the Foreman web UI, all of the entitlements for all of your hosts will be removed. |
-
A Red Hat subscription manifest is imported to Foreman. For more information, see Red Hat subscription manifests in Foreman.
-
In the Foreman web UI, ensure the context is set to the organization you want to use.
-
Navigate to Content > Subscriptions.
-
On the row of each subscription you want to remove, select the corresponding checkbox.
-
Click Delete, and then confirm deletion.
2.5. Updating and refreshing Red Hat subscription manifests
You can refresh your Red Hat subscription manifests to keep your subscription allocations up to date. Refresh your manifests after renewing, adjusting, or purchasing subscriptions to ensure accurate entitlements in your Foreman.
Every time you change a subscription allocation, you must refresh the manifest to reflect these changes. For example, you must refresh the manifest if you take any of the following actions:
-
Renewing a subscription
-
Adjusting subscription quantities
-
Purchasing additional subscriptions
You can refresh the manifest directly in the Foreman web UI. Alternatively, you can import an updated manifest that contains the changes.
The Foreman web UI provides a notification before the subscription manifest expires.
-
A Red Hat subscription manifest is imported to Foreman. For more information, see Red Hat subscription manifests in Foreman.
-
In the Foreman web UI, ensure the context is set to the organization you want to use.
-
Navigate to Content > Subscriptions.
-
On the Subscriptions page, click Manage Manifest.
-
In the Manage Manifest window, click Refresh.
2.6. Red Hat CDN structure
The Red Hat Content Delivery Network (CDN) is a geographically distributed series of static web servers providing Red Hat software. You can access this content directly through Subscription Manager or Foreman server.
The Red Hat CDN is located at cdn.redhat.com.
Foreman and Subscription Manager configure which content is accessible to your hosts based on your subscription entitlements.
Foreman must authenticate to the Red Hat CDN by using X.509 certificate authentication.
The certificate is part of a subscription manifest.
$ tree -d -L 11
└── content
    ├── beta
    │   └── rhel
    │       └── server
    │           └── 7
    │               └── x86_64
    │                   └── sat-tools
    └── dist
        └── rhel
            └── server
                └── 7
                ├── 7.2
                │   └── x86_64
                │       └── kickstart
                └── 7Server
                    └── x86_64
                        └── os
-
content– Root directory for the content. -
beta– Directory responsible for the lifecycle of the content. Common directories includebeta(for Beta code),dist(for Production) andeus(For Extended Update Support) directories. -
rhel– Directory responsible for the product name. Usuallyrhelfor Red Hat Enterprise Linux. -
server– Directory responsible for the type of the product. For Red Hat Enterprise Linux this might includeserver,workstation, andcomputenodedirectories. -
7– Directory responsible for the release version, such as7,7.2or7Server. -
x86_64– Directory responsible for the base architecture, such asi386orx86_64. -
sat-tools– Directory responsible for the repository name, such assat-tools,kickstart,rhscl.
Some components have additional subdirectories which might vary.
This directory structure is also used in Red Hat subscription manifests.
3. Adding content to Foreman
Start adding content to Foreman by organizing products and repositories, securing upstream connections, and synchronizing or uploading packages for your hosts.
3.1. Products and repositories
Products group related repositories in Foreman. Each repository stores packages or other content that you synchronize from upstream or upload directly.
Content from upstream as well as from Canonical, Oracle, Red Hat, SUSE, and custom content in Foreman have similarities:
-
The relationship between a product and its repositories is the same and the repositories still require synchronization.
-
Products require a subscription for hosts to access, similar to subscriptions to Red Hat products. Foreman creates a subscription for each product you create.
Red Hat content is already organized into products. For example, Red Hat Enterprise Linux Server is a product in Foreman. The repositories for that product consist of different versions, architectures, and add-ons. For Red Hat repositories, products are created automatically after enabling the repository.
Other content can be organized into products however you want. For example, you might create an EPEL (Extra Packages for Enterprise Linux) Product and add an "EPEL 7 x86_64" repository to it.
3.2. Best practices for products and repositories
Follow these recommendations when you organize products and repositories in Foreman to simplify content views and avoid synchronization issues.
-
Use one content type per product and content view, for example, yum content only.
-
Make file repositories available over HTTP. If you set Protected to true, you can only download content using a global debugging certificate.
-
Automate the creation of multiple products and repositories by using a Hammer script or an Ansible Playbook.
-
For Red Hat content, import your Red Hat manifest into Foreman.
-
For SUSE content, use the SCC Manager plugin.
-
For Oracle Linux content, including ULN repositories, set the mirroring policy to Additive and the Retain package versions to either one or two. This mitigates out-of-memory issues on Foreman server when synchronizing the content from Oracle. For more information, see Repository definitions for Oracle Linux on public yum servers and Repository definitions for Oracle Linux on ULN.
-
Avoid uploading content to repositories with an Upstream URL. Instead, create a repository to synchronize content and upload content to without setting an Upstream URL.
If you upload content to a repository that already synchronizes another repository, the content might be overwritten, depending on the mirroring policy and content type.
3.3. Authenticating and securing content with content credentials
Upstream content often uses HTTPS and signed metadata or packages. Import SSL certificates when upstream servers use custom or private certificate authorities so Foreman can connect securely. Import GPG keys so Foreman and registered hosts can verify signatures on RPM packages or metadata of Deb content.
3.3.1. Extract GPG keys from RPM packages
Extract GPG public keys from vendor RPM packages without installing them when upstream repositories ship keys inside a release package.
-
You know the download URL for the RPM that ships the vendor GPG keys.
-
Download the RPM to your local machine:
$ wget http://www.example.com/9.5/example-9.5-2.noarch.rpm
-
Extract the RPM file without installing it:
$ rpm2cpio example-9.5-2.noarch.rpm | cpio -idmv
-
Locate the GPG public key files under the extracted
etc/pki/rpm-gpg/directory, for exampleetc/pki/rpm-gpg/RPM-GPG-KEY-EXAMPLE-95.
-
Use the extracted key file when you import a GPG key into Foreman. For more information, see Import content credentials by using Foreman web UI.
3.3.2. Extract GPG public key fingerprints from Release files
Extract GPG key fingerprints from Debian Release files when you need to verify Deb repository signatures.
This example verifies the signature for the Release file from Debian 11.
-
Download the
ReleaseandRelease.gpgfiles:$ wget https://deb.debian.org/debian/dists/bullseye/Release $ wget https://deb.debian.org/debian/dists/bullseye/Release.gpg
-
Verify the signature:
$ gpg --verify Release.gpg Release
Note the GPG key fingerprint for any missing public GPG keys above the
Can’t check signature: No public keymessage. These fingerprints will be used in the next step. -
If you cannot verify the signature, import the missing GPG public keys based on their fingerprint:
$ gpg --keyserver hkps://keyserver.ubuntu.com --recv-keys A7236886F3CCCAAD148A27F80E98404D386FA1D9
$ gpg --keyserver hkps://keyserver.ubuntu.com --recv-keys 4CB50190207B4758A3F73A796ED0E7B82643E131
$ gpg --keyserver hkps://keyserver.ubuntu.com --recv-keys A4285295FC7B1A81600062A9605C66F00D6C9793
-
Optional: Verify the signature again:
$ gpg --verify Release.gpg Release
-
Export the ASCII-armored GPG public keys to a file:
$ gpg --armor --export A7236886F3CCCAAD148A27F80E98404D386FA1D9 4CB50190207B4758A3F73A796ED0E7B82643E131 A4285295FC7B1A81600062A9605C66F00D6C9793 > debian_11.txt
Ensure that
gpgreturns aGood signaturemessage for each signature.Upload the .txt file to Foreman. For more information, see Import content credentials by using Foreman web UI into Foreman.
3.3.3. Import content credentials by using Foreman web UI
Import SSL certificates and GPG keys into Foreman. Use SSL certificates to secure synchronization and authenticate content sources. Use GPG keys to validate content signatures on hosts or during synchronization.
You can import two types of content credentials into Foreman:
- SSL certificates
-
Import SSL certificates when upstream servers use HTTPS or client authentication. This might include client certificates and keys or CA certificates.
- GPG keys
-
For Deb content, import GPG keys so Foreman validates signatures on repository metadata when it synchronizes content from upstream.
For Yum content, import GPG keys so hosts validate signatures when they install signed content from authorized sources.
-
If you are importing a GPG key for Yum content, have a copy of the GPG key used to sign the RPM content that you want to use and manage in Foreman. Most RPM distribution vendors provide their GPG key on their website. You can also extract GPG key files from an RPM package. For more information, see Extract GPG keys from RPM packages.
-
If you are importing a GPG key for Deb content, you have extracted the GPG public key fingerprints from a signed
Releasefile. For more information, see Extract GPG public key fingerprints from Release files.
-
In the Foreman web UI, navigate to Content > Content Credentials.
-
Click Create new.
-
Enter a name for the content credential.
-
From the Type list, select GPG Key or Certificate.
-
In the Content field, paste the GPG key or SSL certificate. Alternatively, click Choose file to upload the file.
If you are importing a GPG key and your repository contains content signed by multiple GPG keys, enter all required GPG keys in the Content field with new lines between each key. For example:
-----BEGIN PGP PUBLIC KEY BLOCK-----

mQINBFy/HE4BEADttv2TCPzVrre+aJ9f5QsR6oWZMm7N5Lwxjm5x5zA9BLiPPGFN
4aTUR/g+K1S0aqCU+ZS3Rnxb+6fnBxD+COH9kMqXHi3M5UNzbp5WhCdUpISXjjpU
XIFFWBPuBfyr/FKRknFH15P+9kLZLxCpVZZLsweLWCuw+JKCMmnA
=F6VG
-----END PGP PUBLIC KEY BLOCK-----

-----BEGIN PGP PUBLIC KEY BLOCK-----

mQINBFw467UBEACmREzDeK/kuScCmfJfHJa0Wgh/2fbJLLt3KSvsgDhORIptf+PP
OTFDlKuLkJx99ZYG5xMnBG47C7ByoMec1j94YeXczuBbynOyyPlvduma/zf8oB9e
Wl5GnzcLGAnUSRamfqGUWcyMMinHHIKIc1X1P4I=
=WPpI
-----END PGP PUBLIC KEY BLOCK-----
-
Click Create.
3.3.4. Import custom SSL certificates by using Hammer CLI
Import SSL certificates and keys into content credentials before synchronizing content from upstream servers that use HTTPS or client authentication. This might include client certificates and keys or CA certificates.
-
Copy the SSL certificate to your Foreman server:
$ scp My_SSL_Certificate root@foreman.example.com:~/.
Or download the SSL certificate to your Foreman server from an online source:
$ wget -P ~ http://upstream-foreman.example.com/pub/katello-server-ca.crt
-
Upload the SSL Certificate to Foreman:
$ hammer content-credential create \
--content-type cert \
--name "My_SSL_Certificate" \
--organization "My_Organization" \
--path ~/My_SSL_Certificate
3.3.5. Import a GPG key by using Hammer CLI
For Deb content, import a vendor GPG key into Foreman so Foreman validates signatures on repository metadata when it synchronizes content from upstream. For Yum content, import a vendor GPG key into Foreman so hosts validate signatures when they install signed content from authorized sources.
-
You have a copy of the GPG key used to sign the RPM content that you want to use and manage in Foreman. Most RPM distribution vendors provide their GPG Key on their website. You can also extract GPG key files from an RPM package. For more information, see Extract GPG keys from RPM packages.
-
You have extracted the GPG public key fingerprints from a signed
Releasefile for Deb content. For more information, see Extract GPG public key fingerprints from Release files.
-
Copy the GPG key to your Foreman server:
-
For Deb content:
$ scp ~/My_GPG_Public_Key root@foreman.example.com:~/.
-
For Yum content:
$ scp ~/etc/pki/rpm-gpg/RPM-GPG-KEY-EXAMPLE-95 root@foreman.example.com:~/.
-
-
Upload the GPG key to Foreman:
-
For Deb content:
$ hammer content-credentials create \
--content-type gpg_key \
--name "My_GPG_Key" \
--organization "My_Organization" \
--path ~/My_GPG_Public_Key
-
For Yum content:
$ hammer content-credentials create \
--content-type gpg_key \
--name "My_GPG_Key" \
--organization "My_Organization" \
--path ~/RPM-GPG-KEY-EXAMPLE-95
-
3.4. Creating products
A product in Foreman groups related repositories. Create a product before you add repositories.
|
Note
|
For Red Hat content, Foreman automatically creates a product when you enable a repository. |
3.4.1. Creating a product by using Foreman web UI
Create a product to group repositories you add manually before you define repositories or upload packages.
-
In the Foreman web UI, navigate to Content > Products, click Create Product.
-
In the Name field, enter a name for the product. Foreman automatically completes the Label field based on what you have entered for Name.
-
Optional: From the GPG Key list, select the GPG key for the product.
-
Optional: From the SSL CA Cert list, select the SSL CA certificate for the product.
-
Optional: From the SSL Client Cert list, select the SSL client certificate for the product.
-
Optional: From the SSL Client Key list, select the SSL client key for the product.
-
Optional: From the Sync Plan list, select an existing sync plan or click Create Sync Plan and create a sync plan for your product requirements.
-
In the Description field, enter a description of the product.
-
Click Save.
3.5. Creating repositories
Repositories hold synchronized or uploaded content for a product. Add repository definitions for Deb and Yum content, or enable Red Hat repositories or SUSE repositories, then synchronize or upload packages as required.
3.5.1. Adding RPM repositories by using Foreman web UI
Add RPM repositories from an upstream URL to distribute Yum content to your hosts. Use Repo Discovery to import multiple repositories from one source.
The Products window in the Foreman web UI also provides a Repo Discovery function that finds all repositories from a URL and you can select which ones to add to your product.
For example, you can use the Repo Discovery to search https://download.postgresql.org/pub/repos/yum/16/redhat/ and list all repositories for different Enterprise Linux versions and architectures.
This helps you save time importing multiple repositories from a single source.
-
You have imported the GPG key that you want to use to verify signatures of the RPM packages. For more information, see Import content credentials by using Foreman web UI.
-
In the Foreman web UI, navigate to Content > Products and select the product that you want to use, and then click New Repository.
-
In the Name field, enter a name for the repository. Foreman automatically completes the Label field based on what you have entered for Name.
-
Optional: In the Description field, enter a description for the repository.
-
From the Type list, select
yumas type of repository. -
Optional: From the Restrict to Architecture list, select an architecture. If you want to make the repository available to all hosts regardless of the architecture, ensure to select No restriction.
-
Optional: From the Restrict to OS Version list, select the operating system version. If you want to make the repository available to all hosts regardless of the operating system version, ensure to select No restriction.
-
Optional: In the Upstream URL field, enter the URL of the external repository to use as a source. Foreman supports three protocols:
http://,https://, andfile://. If you are using afile://repository, you have to place it under/var/lib/pulp/sync_imports/directory.If you do not enter an upstream URL, you can manually upload packages.
-
Optional: Check the Ignore SRPMs checkbox to exclude source RPM packages from being synchronized to Foreman.
-
Optional: Check the Ignore treeinfo checkbox if you receive the error
Treeinfo file should have INI format. All files related to Kickstart will be missing from the repository iftreeinfofiles are skipped. -
Select the Verify SSL checkbox if you want to verify that the upstream repository’s SSL certificates are signed by a trusted CA.
-
Optional: In the Upstream Username field, enter the user name for the upstream repository if required for authentication. Clear this field if the repository does not require authentication.
-
Optional: In the Upstream Password field, enter the corresponding password for the upstream repository. Clear this field if the repository does not require authentication.
-
Optional: In the Upstream Authentication Token field, provide the token of the upstream repository user for authentication. Leave this field empty if the repository does not require authentication.
-
From the Download Policy list, select the type of synchronization Foreman server performs. For more information, see Download policies overview.
-
From the Mirroring Policy list, select the type of content synchronization Foreman server performs. For more information, see Mirroring policies overview.
-
Optional: In the Retain package versions field, enter the number of versions you want to retain per package. This field is available only if you are using the additive download policy.
-
Optional: In the HTTP Proxy Policy field, select an HTTP proxy.
-
From the Checksum list, select the checksum type for the repository.
-
Optional: You can clear the Unprotected checkbox to require a subscription entitlement certificate for accessing this repository. By default, the repository is published through HTTP.
-
Optional: From the GPG Key list, select the GPG key for the product.
-
Optional: In the SSL CA Cert field, select the SSL CA Certificate for the repository.
-
Optional: In the SSL Client cert field, select the SSL Client Certificate for the repository.
-
Optional: In the SSL Client Key field, select the SSL Client Key for the repository.
-
Click Save to create the repository.
3.5.2. Adding RPM repositories by using Hammer CLI
Add RPM repositories from an upstream URL to distribute Yum content to your hosts.
-
You have imported the GPG key that you want to use to verify signatures of the RPM packages. For more information, see Import a GPG key by using Hammer CLI.
-
Create a Yum repository:
$ hammer repository create \
--arch "My_Architecture" \
--content-type "yum" \
--gpg-key-id My_GPG_Key_ID \
--name "My_Repository" \
--organization "My_Organization" \
--os-version "My_Operating_System_Version" \
--product "My_Product" \
--publish-via-http true \
--url My_Upstream_URL
3.5.3. Adding Deb repositories by using Foreman web UI
Add Deb repositories with upstream URLs and GPG verification so you can synchronize Debian or Ubuntu content in Foreman.
-
You have extracted and imported the GPG key that you want to use to verify signatures of the
Releasefiles. For more information, see Extract GPG public key fingerprints from Release files.
-
In the Foreman web UI, navigate to Content > Products and select the product that you want to use, and then click New Repository.
-
In the Name field, enter a name for the repository. Foreman automatically completes the Label field based on what you have entered for Name.
-
Optional: In the Description field, enter a description for the repository.
-
From the Type list, select
debas type of repository. -
Optional: In the Upstream URL field, enter the URL of the external repository to use as a source. You can find the upstream URLs on Debian-based systems in
/etc/apt/sources.list.If you do not enter an upstream URL, you can manually upload packages.
-
In the Releases/Distributions field, set one or multiple releases separated by whitespace. The distributions specify the path from the repository root to the
Releasefile. Repositories that omit thedistsdirectory are using the deprecated flat repository structure. To synchronize a flat repository, you must specify exactly one distribution that ends with a/.For official Debian repositories, set a codename in the Releases/Distributions field, for example
trixiefor Debian 13 orbookwormfor Debian 12. Avoid usingstableortestingbecause the codename they reference changes over time. This helps to avoid drastic changes once a new Debian version is released and the reference is changed. To keep things easy to manage and to avoid potential performance and network issues during synchronization, create one repository per release in Foreman. For official Ubuntu repositories, use the Ubuntu suite, for exampleresoluteorresolute-updates. -
Optional: In the Components field, enter a component. This indicates the licensing terms of the software packages.
In Debian, it is divided into
main,contrib, andnon-free. For official Debian or Ubuntu repositories, Foreman community recommends leaving this field empty to synchronize all available components. Note that some third party Debian repositories use the components in ways that may require setting an explicit selection.CautionEnsure that you enter both Releases and Components exactly as they are in an
/etc/apt/sources.listfile. -
Optional: In the Architectures field, enter one or multiple architectures separated with spaces.
Foreman always synchronizes packages of architecture
allregardless of your architecture selection.If you want to make the repository available to all hosts regardless of the architecture, ensure to select No restriction.
-
Optional: Select the Verify SSL checkbox if you want to verify that the upstream repository’s SSL certificates are signed by a trusted CA.
-
Optional: In the Upstream Username field, enter the user name for the upstream repository if required for authentication. Clear this field if the repository does not require authentication.
-
Optional: In the Upstream Password field, enter the corresponding password for the upstream repository. Clear this field if the repository does not require authentication.
-
Optional: In the Upstream Authentication Token field, provide the token of the upstream repository user for authentication. Leave this field empty if the repository does not require authentication.
-
From the Download Policy list, select the type of synchronization Foreman server performs. For more information, see Download policies overview.
-
From the Mirroring Policy list, select the type of content synchronization Foreman server performs. For more information, see Mirroring policies overview.
-
Optional: In the HTTP Proxy Policy field, select an HTTP proxy.
-
Optional: You can clear the Unprotected checkbox to require a subscription entitlement certificate for accessing this repository. By default, the repository is published through HTTP.
-
Optional: From the GPG Key list, select the GPG key if you want to verify the signatures of the
Releasefiles associated with the Debian repository. -
Optional: In the SSL CA Cert field, select the SSL CA Certificate for the repository.
-
Optional: In the SSL Client cert field, select the SSL Client Certificate for the repository.
-
Optional: In the SSL Client Key field, select the SSL Client Key for the repository.
-
Click Save to create the repository.
3.5.4. Adding Deb repositories by using Hammer CLI
Add Deb repositories with upstream URLs and GPG verification so you can synchronize Debian or Ubuntu content in Foreman.
-
You have extracted and imported the GPG key that you want to use to verify signatures of the
Releasefiles. For more information, see Extract GPG public key fingerprints from Release files.
-
Create a Deb repository:
$ hammer repository create \
--content-type "deb" \
--deb-architectures "My_Deb_Architectures" \
--deb-components "My_Deb_Components" \
--deb-releases "My_Deb_Releases" \
--gpg-key-id "My_GPG_Key_ID" \
--name "My_Repository" \
--organization "My_Organization" \
--product "My_Product" \
--publish-via-http true \
--url My_Upstream_URL
3.5.5. Enabling Red Hat repositories by using Foreman web UI
Enable the Red Hat repositories that match the release and architecture of your hosts so Foreman can synchronize the content from the Red Hat CDN.
To select the repositories to synchronize, you must first identify the product that contains the repository, and then enable that repository based on the relevant release version and base architecture.
-
If outside network access requires usage of an HTTP proxy, a default HTTP proxy for your Foreman server is configured. For more information, see Add a default HTTP proxy by using Foreman web UI.
-
Your Red Hat subscription manifest is imported to your organization and contains subscriptions.
-
In the Foreman web UI, navigate to Content > Red Hat Repositories.
-
From the package type list, select the required package types, such as RPM or Kickstart.
-
To find repositories, either enter the repository name, or toggle the Recommended Repositories button to the on position to view a list of repositories that you require.
-
In the Available Repositories pane, click a repository to expand the repository set.
-
Click the Enable icon next to the base architecture and release version that you want.
3.5.6. Enabling Red Hat repositories by using Hammer CLI
Enable the Red Hat repositories that match the release and architecture of your hosts so Foreman can synchronize the content from the Red Hat CDN.
To select the repositories to synchronize, you must first identify the product that contains the repository, and then enable that repository based on the relevant release version and base architecture.
-
If outside network access requires usage of an HTTP proxy, a default HTTP proxy for your Foreman server is configured. For more information, see Add a default HTTP proxy by using Hammer CLI.
-
Your Red Hat subscription manifest is imported to your organization and contains subscriptions.
-
List Red Hat products:
$ hammer product list --organization "My_Organization"
-
List the repository set for the product:
$ hammer repository-set list \
--product "Red Hat Enterprise Linux Server" \
--organization "My_Organization"
-
Enable the repository using either the name or ID number. Include the release version, such as
7Server, and base architecture, such asx86_64.$ hammer repository-set enable \ --name "Red Hat Enterprise Linux 7 Server (RPMs)" \ --releasever "7Server" \ --basearch "x86_64" \ --product "Red Hat Enterprise Linux Server" \ --organization "My_Organization"
3.6. Uploading content to repositories
You can upload content to repositories to distribute content that you cannot synchronize from an upstream URL.
3.6.1. Uploading content to a RPM repository by using Foreman web UI
You can upload individual RPM packages to a RPM repository to distribute Yum content that you cannot synchronize.
You must use Hammer CLI to upload source RPM packages. For more information, see Uploading content to a RPM repository by using Hammer CLI.
-
In the Foreman web UI, navigate to Content > Products.
-
Click the name of the product.
-
In the Repositories tab, click the name of the RPM repository.
-
Under Upload Package, click Browse… and select the RPM you want to upload.
-
Click Upload.
-
To view all RPMs in this repository, click the number next to Packages under Content Counts.
-
If the upload times out when uploading very large files on a slow network, raise the Sync task timeout setting value. In the Foreman web UI, navigate to Administer > Settings. The Sync task timeout setting is located on the Tasks tab.
-
Add your RPM repository to a content view.
-
If your RPM is unprotected, hosts can consume its content by using the Published At URL.
In the Default Organization View content view, the URL consists of your Smart Proxy FQDN,
/pulp/content/, your organization label,/Library/custom/, your product label,/, your repository label, and a trailing/, for example,https://foreman.example.com/pulp/content/Example/Library/custom/my-software/my-app/.
3.6.2. Uploading content to a RPM repository by using Hammer CLI
You can upload individual RPM packages to a RPM repository to distribute Yum content that you cannot synchronize. Use Hammer CLI to upload source RPM packages.
-
Upload an RPM package:
$ hammer repository upload-content \
--id My_Repository_ID \
--path /path/to/example-package.rpm
-
Upload a source RPM package:
$ hammer repository upload-content \
--content-type srpm \
--id My_Repository_ID \
--path /path/to/example-package.src.rpm
-
After the upload is complete, you can view information about a source RPM by using the commands
hammer srpm listandhammer srpm info --id srpm_ID.
-
If the upload times out when uploading very large files on a slow network, raise the Sync task timeout setting value:
$ hammer settings set --name foreman_tasks_sync_task_timeout --value seconds
-
Add your RPM repository to a content view.
-
If your RPM is unprotected, hosts can consume its content by using the Published At URL.
In the Default Organization View content view, the URL consists of your Smart Proxy FQDN,
/pulp/content/, your organization label,/Library/custom/, your product label,/, your repository label, and a trailing/, for example,https://foreman.example.com/pulp/content/Example/Library/custom/my-software/my-app/.
3.6.3. Uploading content to a file type repository by using Foreman web UI
If you cannot create a PULP_MANIFEST and synchronize your content from a local or remote repository to Foreman, you can manually upload content to a file type repository.
-
In the Foreman web UI, navigate to Content > Products.
-
Select a product by name.
-
Select a file type repository by name.
-
Click Browse to search and select the file you want to upload.
-
Click Upload to upload the selected file to Foreman server.
-
Visit the URL where the repository is published to see the file.
3.6.4. Uploading content to a file type repository by using Hammer CLI
If you cannot create a PULP_MANIFEST and synchronize your content from a local or remote repository to Foreman, you can manually upload content to a file type repository.
-
Upload files to your file type repository:
$ hammer repository upload-content \
--id My_Repository_ID \
--organization-id My_Organization_ID \
--path My_Example_File
The
--pathoption can indicate a file, a directory of files, or a glob expression of files. Globs must be escaped by single or double quotes.
3.6.5. Uploading content to a Deb repository by using Foreman web UI
You can upload individual Deb packages to a Deb repository to distribute Deb content that you cannot synchronize.
-
In the Foreman web UI, navigate to Content > Products.
-
Select your product.
-
Select the Deb repository that you want to upload packages to. Do not upload packages to a repository if you have set the Upstream URL.
-
Under Upload Package, click Browse… and select the Deb package that you want to upload.
-
Click Upload.
-
To view all Deb packages in this repository, click the number next to Packages under Content Counts.
-
If the upload times out when uploading very large files on a slow network, raise the Sync task timeout setting value. In the Foreman web UI, navigate to Administer > Settings. The Sync task timeout setting is located on the Tasks tab.
-
Add your Deb repository to a content view.
-
If your Deb repository is unprotected, hosts can consume its content by using the Published At URL.
In the Default Organization View content view, the URL consists of your Smart Proxy FQDN,
/pulp/content/, your organization label,/Library/custom/, your product label,/, your repository label, and a trailing/, for example,https://foreman.example.com/pulp/content/Example/Library/custom/my-software/my-app/. Usekatelloas the distribution to set up the repository on your host.
3.6.6. Uploading content to a Deb repository by using Hammer CLI
You can upload individual Deb packages to a Deb repository to distribute Deb content that you cannot synchronize.
-
Upload a Deb package:
$ hammer repository upload-content \
--content-type deb \
--id My_Repository_ID \
--path /path/to/example-package.deb
-
Verify that your Deb repository contains the Deb package that you have uploaded:
$ hammer deb list --repository-id My_Repository_ID
-
If the upload times out when uploading very large files on a slow network, raise the Sync task timeout setting value:
$ hammer settings set --name foreman_tasks_sync_task_timeout --value seconds
-
Add your Deb repository to a content view.
-
If your Deb repository is unprotected, hosts can consume its content by using the Published At URL.
In the Default Organization View content view, the URL consists of your Smart Proxy FQDN,
/pulp/content/, your organization label,/Library/custom/, your product label,/, your repository label, and a trailing/, for example,https://foreman.example.com/pulp/content/Example/Library/custom/my-software/my-app/. Usekatelloas the distribution to set up the repository on your host.
3.7. Repository definitions for client operating systems
Use these repository definitions when you create repositories in Foreman to synchronize client operating system content from upstream sources.
3.7.1. Repository definitions for AlmaLinux
Upstream repositories for AlmaLinux include BaseOS, AppStream, extras, and the optional Foreman Client.
| Repository name | Upstream URL |
|---|---|
|
|
|
|
|
|
|
| Repository name | Upstream URL |
|---|---|
|
|
|
|
|
|
|
| Repository name | Upstream URL |
|---|---|
|
|
|
|
|
|
|
3.7.2. Repository definitions for CentOS Stream
Upstream repositories for CentOS Stream include BaseOS, AppStream, extras, and the optional Foreman Client.
| Repository name | Upstream URL |
|---|---|
|
|
|
|
|
|
|
| Repository name | Upstream URL |
|---|---|
|
|
|
|
|
|
|
3.7.3. Repository definitions for Debian
Upstream repositories for Debian include main, updates, security, and the Foreman Client.
| Repository name | Upstream URL | Releases/Distributions | Components | Architectures |
|---|---|---|---|---|
|
|
|
|
|
|
|
|
|
|
|
|
|
|
|
|
|
|
|
| Repository name | Upstream URL | Releases/Distributions | Components | Architectures |
|---|---|---|---|---|
|
|
|
|
|
|
|
|
|
|
|
|
|
|
|
|
|
|
|
| Repository name | Upstream URL | Releases/Distributions | Components | Architectures |
|---|---|---|---|---|
|
|
|
|
|
|
|
|
|
|
|
|
|
|
|
|
|
|
|
3.7.4. Repository definitions for Oracle Linux on public yum servers
Upstream repositories for Oracle Linux include BaseOS, AppStream, and addons on yum.oracle.com, and the Foreman Client.
|
Important
|
Oracle adds packages to repositories for Oracle Linux and ULN without removing old versions. Content synchronization with the Content only mirroring policy might lead to out-of-memory issues on Foreman server. You can mitigate this by setting the mirroring policy to Additive and the Retain package versions to either one or two. This means that each time Foreman synchronizes content from Oracle, new packages are added and old packages are removed. Note that this does not affect any published content views. |
| Repository name | Upstream URL |
|---|---|
|
|
|
|
|
|
|
| Repository name | Upstream URL |
|---|---|
|
|
|
|
|
|
|
| Repository name | Upstream URL |
|---|---|
|
|
|
|
|
|
|
3.7.5. Repository definitions for Oracle Linux on ULN
Use these ULN channel labels and credentials when you create Oracle Linux repositories that synchronize content from Oracle Unbreakable Linux Network.
There are two main differences compared to generic Yum content:
-
The Upstream URL field consists of a protocol prefix
uln://and anULN Channel Label, for example,ol7_x86_64_MySQL80_community. Combined,uln://ol7_x86_64_MySQL80_communityis a valid upstream URL for a Yum repository. -
Authentication against the repository through an Upstream Username and Upstream Password is mandatory. Use your single sign-on user name and token of your Oracle account to authenticate from Foreman.
To obtain a list of available ULN channel labels, log in to Oracle Unbreakable Linux Network. Navigate to the channels tab and select an operating system release version and architecture. Copy the required ULN Channel Label from the list of available content.
Adding ULN repositories is different compared to Yum repositories for Enterprise Linux, for example, https://yum.oracle.com/oracle-linux-9.html, which you can add as Yum-type content.
Foreman community recommends that you limit the number of retained packages on Foreman.
Oracle Unbreakable Linux Network (ULN) channel labels for Oracle Linux releases on x86_64.
Combine each label with the uln:// prefix to form the Upstream URL for a Yum repository, for example uln://ol9_x86_64_baseos_latest.
Authentication with an Upstream Username and Upstream Password is mandatory.
|
Important
|
Oracle adds packages to repositories for Oracle Linux and ULN without removing old versions. Content synchronization with the Content only mirroring policy might lead to out-of-memory issues on Foreman server. You can mitigate this by setting the mirroring policy to Additive and the Retain package versions to either one or two. This means that each time Foreman synchronizes content from Oracle, new packages are added and old packages are removed. Note that this does not affect any published content views. |
| Repository | Upstream URL |
|---|---|
Addons |
|
AppStream |
|
BaseOS latest |
|
Unbreakable Enterprise Kernel Release 8 |
|
kSplice |
|
| Repository | Upstream URL |
|---|---|
Addons |
|
AppStream |
|
BaseOS latest |
|
Unbreakable Enterprise Kernel Release 7 |
|
kSplice |
|
| Repository | Upstream URL |
|---|---|
Addons |
|
AppStream |
|
BaseOS latest |
|
Unbreakable Enterprise Kernel Release 6 |
|
kSplice |
|
3.7.6. Repository definitions for Rocky Linux
Upstream repositories for Rocky Linux include BaseOS, AppStream, extras, and the optional Foreman Client.
| Repository name | Upstream URL |
|---|---|
|
|
|
|
|
|
|
| Repository name | Upstream URL |
|---|---|
|
|
|
|
|
|
|
| Repository name | Upstream URL |
|---|---|
|
|
|
|
|
|
|
3.7.7. Repository definitions for SUSE Linux Enterprise Server
You can use the SCC Manager plugin to set up repository definitions for SUSE Linux Enterprise Server.
| Products in SCC Manager | Content on Foreman |
|---|---|
|
|
|
| Products in SCC Manager | Content on Foreman |
|---|---|
|
|
|
| Products in SCC Manager | Content on Foreman |
|---|---|
|
|
|
| Products in SCC Manager | Content on Foreman |
|---|---|
|
|
|
| Products in SCC Manager | Content on Foreman |
|---|---|
|
|
| Products in SCC Manager | Content on Foreman |
|---|---|
|
|
|
3.7.8. Repository definitions for Ubuntu
Upstream repositories for Ubuntu include main, updates, and security repositories under Standard Security Maintenance, and the Foreman Client repository, for supported LTS releases.
| Repository name | Upstream URL | Releases/Distributions | Components | Architectures |
|---|---|---|---|---|
|
|
|
|
|
|
|
|
|
|
|
|
|
|
|
|
|
|
|
| Repository name | Upstream URL | Releases/Distributions | Components | Architectures |
|---|---|---|---|---|
|
|
|
|
|
|
|
|
|
|
|
|
|
|
|
|
|
|
|
| Repository name | Upstream URL | Releases/Distributions | Components | Architectures |
|---|---|---|---|---|
|
|
|
|
|
|
|
|
|
|
|
|
|
|
|
|
|
|
|
| Repository name | Upstream URL | Releases/Distributions | Components | Architectures |
|---|---|---|---|---|
|
|
|
|
|
|
|
|
|
|
|
|
|
|
|
|
|
|
|
3.7.9. Repository definitions for Ubuntu under ESM
Ubuntu Expanded Security Maintenance (ESM) provides extended security updates for selected releases through authenticated Deb repositories. Extract the values from your subscribed Ubuntu host to create Ubuntu ESM repositories in Foreman.
|
Important
|
Providing Ubuntu ESM repositories requires a subscription from Canonical. Ensure that you have valid licenses for all Canonical products you mirror or distribute. Using insufficient, invalid, or otherwise inadequate licenses might violate your terms with Canonical. |
On a dedicated host running the target Ubuntu ESM release, attach your subscription by running ua attach My_Token_from_Canonical and install the ubuntu-advantage-tools package.
- GPG public key
-
Use the key material supplied for ESM, for example from the
ubuntu-advantage-esm-infra-trusty.gpgfile on Ubuntu 14.04. Convert the key to ASCII-armored form for a content credential, for example:$ gpg --import ubuntu-advantage-esm-infra-trusty.gpg $ gpg --export --armor 4067E40313CB4B13
Import the GPG key to Foreman. For more information, see Import content credentials by using Foreman web UI or Import a GPG key by using Hammer CLI.
- Authentication
-
Extract user name and password from the credentials that Ubuntu Advantage writes to
/etc/apt/auth.conf.d/90ubuntu-advantageon your dedicated Ubuntu host. Use the values for Upstream Username and Upstream Password when adding the ESM repository. - Repository definition
-
Extract Upstream URL, Releases, Components, and Architectures from
/etc/apt/sources.list.d/ubuntu-esm-infra.list.Table 28. Example ESM Infra definitions (Ubuntu 14.04 LTS and 16.04 LTS) Repository name Upstream URL Releases/Distributions Components Architectures Ubuntu 14.04 ESM Infratrusty-infra-securitymainamd64Ubuntu 16.04 ESM Infraxenial-infra-securitymainamd64Use the values when adding the ESM repository.
3.8. GPG public keys for AlmaLinux
You can download the GPG public key from repo.almalinux.org.
3.9. GPG public keys for Amazon Linux
You can download the GPG public key from amazonlinux.com.
3.10. GPG public keys for CentOS
You can download the GPG public keys from centos.org.
3.11. GPG public keys for Debian
You can download the GPG public keys from debian.org.
Alternatively, you can check which GPG public key is required to verify the Release.gpg file.
$ wget https://ftp.debian.org/debian/dists/trixie/Release && wget https://ftp.debian.org/debian/dists/trixie/Release.gpg
$ gpg --verify Release.gpg Release
$ gpg --keyserver keys.gnupg.net --recv-key 4CB50190207B4758A3F73A796ED0E7B82643E131
$ gpg --keyserver keys.gnupg.net --recv-key B8E5F13176D2A7A75220028078DBA3BC47EF2265
$ gpg --keyserver keys.gnupg.net --recv-key 41587F7DB8C774BCCF131416762F67A0B2C39DE4
$ gpg --armor --export 4CB50190207B4758A3F73A796ED0E7B82643E131 B8E5F13176D2A7A75220028078DBA3BC47EF2265 41587F7DB8C774BCCF131416762F67A0B2C39DE4 > debian_trixie_main.txt
$ wget https://ftp.debian.org/debian/dists/trixie-updates/Release && wget https://ftp.debian.org/debian/dists/trixie-updates/Release.gpg
$ gpg --verify Release.gpg Release
$ gpg --keyserver keys.gnupg.net --recv-key 4CB50190207B4758A3F73A796ED0E7B82643E131
$ gpg --keyserver keys.gnupg.net --recv-key B8E5F13176D2A7A75220028078DBA3BC47EF2265
$ gpg --armor --export 4CB50190207B4758A3F73A796ED0E7B82643E131 B8E5F13176D2A7A75220028078DBA3BC47EF2265 > debian_trixie_updates.txt
$ wget https://security.debian.org/debian-security/dists/trixie-security/Release && wget https://security.debian.org/debian-security/dists/trixie-security/Release.gpg
$ gpg --verify Release.gpg Release
$ gpg --keyserver keys.gnupg.net --recv-key B0CAB9266E8C3929798B3EEEBDE6D2B9216EC7A8
$ gpg --keyserver keys.gnupg.net --recv-key 89C87ACEA5DD6B8E6A7068808E9F831205B4BA95
$ gpg --armor --export B0CAB9266E8C3929798B3EEEBDE6D2B9216EC7A8 89C87ACEA5DD6B8E6A7068808E9F831205B4BA95 > debian_trixie_security.txt
$ wget http://ftp.debian.org/debian/dists/bookworm/Release && wget http://ftp.debian.org/debian/dists/bookworm/Release.gpg
$ gpg --verify Release.gpg Release
$ gpg --keyserver keys.gnupg.net --recv-key 4CB50190207B4758A3F73A796ED0E7B82643E131
$ gpg --keyserver keys.gnupg.net --recv-key B8E5F13176D2A7A75220028078DBA3BC47EF2265
$ gpg --keyserver keys.gnupg.net --recv-key 4D64FEC119C2029067D6E791F8D2585B8783D481
$ gpg --armor --export 4CB50190207B4758A3F73A796ED0E7B82643E131 B8E5F13176D2A7A75220028078DBA3BC47EF2265 4D64FEC119C2029067D6E791F8D2585B8783D481 > debian_bookworm_main.txt
$ wget http://ftp.debian.org/debian/dists/bookworm-updates/Release && wget http://ftp.debian.org/debian/dists/bookworm-updates/Release.gpg
$ gpg --verify Release.gpg Release
$ gpg --keyserver keys.gnupg.net --recv-key 4CB50190207B4758A3F73A796ED0E7B82643E131
$ gpg --keyserver keys.gnupg.net --recv-key B8E5F13176D2A7A75220028078DBA3BC47EF2265
$ gpg --armor --export 4CB50190207B4758A3F73A796ED0E7B82643E131 B8E5F13176D2A7A75220028078DBA3BC47EF2265 > debian_bookworm_updates.txt
$ wget https://security.debian.org/debian-security/dists/bookworm-security/Release && wget https://security.debian.org/debian-security/dists/bookworm-security/Release.gpg
$ gpg --verify Release.gpg Release
$ gpg --keyserver keys.gnupg.net --recv-key ED541312A33F1128F10B1C6C54404762BBB6E853
$ gpg --keyserver keys.gnupg.net --recv-key B0CAB9266E8C3929798B3EEEBDE6D2B9216EC7A8
$ gpg --armor --export ED541312A33F1128F10B1C6C54404762BBB6E853 B0CAB9266E8C3929798B3EEEBDE6D2B9216EC7A8 > debian_bookworm_security.txt
$ wget http://ftp.debian.org/debian/dists/bullseye/Release && wget http://ftp.debian.org/debian/dists/bullseye/Release.gpg
$ gpg --verify Release.gpg Release
$ gpg --keyserver keys.gnupg.net --recv-key 4CB50190207B4758A3F73A796ED0E7B82643E131
$ gpg --keyserver keys.gnupg.net --recv-key A4285295FC7B1A81600062A9605C66F00D6C9793
$ gpg --keyserver keys.gnupg.net --recv-key A7236886F3CCCAAD148A27F80E98404D386FA1D9
$ gpg --armor --export 4CB50190207B4758A3F73A796ED0E7B82643E131 A4285295FC7B1A81600062A9605C66F00D6C9793 A7236886F3CCCAAD148A27F80E98404D386FA1D9 > debian_bullseye_main.txt
$ wget http://ftp.debian.org/debian/dists/bullseye-updates/Release && wget http://ftp.debian.org/debian/dists/bullseye-updates/Release.gpg
$ gpg --verify Release.gpg Release
$ gpg --keyserver keys.gnupg.net --recv-key 4CB50190207B4758A3F73A796ED0E7B82643E131
$ gpg --keyserver keys.gnupg.net --recv-key A7236886F3CCCAAD148A27F80E98404D386FA1D9
$ gpg --armor --export 4CB50190207B4758A3F73A796ED0E7B82643E131 A7236886F3CCCAAD148A27F80E98404D386FA1D9 > debian_bullseye_updates.txt
$ wget https://security.debian.org/debian-security/dists/bullseye-security/Release && wget https://security.debian.org/debian-security/dists/bullseye-security/Release.gpg
$ gpg --verify Release.gpg Release
$ gpg --keyserver keys.gnupg.net --recv-key B0CAB9266E8C3929798B3EEEBDE6D2B9216EC7A8
$ gpg --keyserver keys.gnupg.net --recv-key ED541312A33F1128F10B1C6C54404762BBB6E853
$ gpg --armor --export B0CAB9266E8C3929798B3EEEBDE6D2B9216EC7A8 ED541312A33F1128F10B1C6C54404762BBB6E853 > debian_bullseye_security.txt
3.12. GPG public keys for Oracle Linux
You can download the GPG public keys from oracle.com.
3.13. GPG public keys for Red Hat Enterprise Linux
You can download the GPG public key from redhat.com.
3.14. GPG public keys for Rocky Linux
You can download the GPG public key from dl.rockylinux.org.
3.15. GPG public keys for SUSE Linux Enterprise Server
You can download the GPG public keys from suse.com.
3.16. GPG public keys for Ubuntu
You can download the GPG public keys from ubuntu.com.
Alternatively, download and extract the ubuntu-keyring package from ubuntu.com.
$ gpg --keyserver keyserver.ubuntu.com --recv-key F6ECB3762474EDA9D21B7022871920D1991BC93C
$ gpg --armor --export F6ECB3762474EDA9D21B7022871920D1991BC93C > ubuntu_2604_gpg_keys.txt
$ gpg --keyserver keyserver.ubuntu.com --recv-key F6ECB3762474EDA9D21B7022871920D1991BC93C
$ gpg --armor --export F6ECB3762474EDA9D21B7022871920D1991BC93C > ubuntu_2404_gpg_keys.txt
$ gpg --keyserver keyserver.ubuntu.com --recv-key 871920D1991BC93C
$ gpg --armor --export 871920D1991BC93C > ubuntu_2204_gpg_keys.txt
$ gpg --keyserver keyserver.ubuntu.com --recv-key 3B4FE6ACC0B21F32 D94AA3F0EFE21092 871920D1991BC93C
$ gpg --armor --export 3B4FE6ACC0B21F32 D94AA3F0EFE21092 871920D1991BC93C > ubuntu_2004_gpg_keys.txt
$ gpg --keyserver keyserver.ubuntu.com --recv-key 871920D1991BC93C 3B4FE6ACC0B21F32
$ gpg --armor --export 871920D1991BC93C 3B4FE6ACC0B21F32 > ubuntu_1804_gpg_keys.txt
4. Synchronizing content to Foreman
Synchronize added repositories to download content into Foreman, then keep it current with ad hoc runs or recurring sync plans. Configure network access and HTTP proxies for restricted environments, and use advanced synchronization to troubleshoot issues.
4.1. Configuring network for content synchronization
Content synchronization requires outbound access to upstream URLs. Adjust SELinux, HTTP proxies, and per-product or per-repository HTTP proxy policies if your environment restricts or inspects that traffic.
4.1.1. Configuring SELinux to permit content synchronization on custom ports
Add a TCP port to the SELinux http_port_t type when upstream content servers use a port that Foreman cannot reach by default for synchronization.
By default, connecting to web servers running on the following ports is permitted: 80, 81, 443, 488, 8008, 8009, 8443, and 9000.
-
On Foreman server, verify the ports that are permitted by SELinux for content synchronization:
# semanage port -l | grep ^http_port_t
http_port_t     tcp      80, 81, 443, 488, 8008, 8009, 8443, 9000
-
Configure SELinux to permit a custom port for content synchronization, for example 10011:
# semanage port -a -t http_port_t -p tcp 10011
4.1.2. Adding an HTTP proxy by using Foreman web UI
You can add HTTP proxies to Foreman. You can then specify which HTTP proxy to use for products, repositories, and supported compute resources.
-
Your HTTP proxy must allow access to the following hosts:
Host name Port Protocol subscription.rhsm.redhat.com
443
HTTPS
cdn.redhat.com
443
HTTPS
-
If Foreman server uses an HTTP proxy to communicate with
subscription.rhsm.redhat.comandcdn.redhat.com, then your HTTP proxy must not perform SSL inspection on these communications.
-
In the Foreman web UI, navigate to Infrastructure > HTTP Proxies.
-
Select New HTTP Proxy.
-
In the Name field, enter a name for the HTTP proxy.
-
In the URL field, enter the URL for the HTTP proxy, including the port number.
-
If your HTTP proxy requires authentication, enter a Username and Password.
-
In the Cacert field, enter the SSL CA certificate if your HTTP proxy requires authentication.
-
Optional: In the Test URL field, enter a URL, then click Test Connection to ensure that Foreman server can connect to the URL through your HTTP proxy.
-
Optional: Select the Default content HTTP proxy option to set your HTTP proxy as default to synchronize content.
-
Click the Locations tab and add a location.
-
Click the Organization tab and add an organization.
-
Click Submit.
4.1.3. Adding an HTTP proxy by using Hammer CLI
You can add HTTP proxies to Foreman. You can then specify which HTTP proxy to use for products, repositories, and supported compute resources.
-
Your HTTP proxy must allow access to the following hosts:
Host name Port Protocol subscription.rhsm.redhat.com
443
HTTPS
cdn.redhat.com
443
HTTPS
-
If Foreman server uses an HTTP proxy to communicate with
subscription.rhsm.redhat.comandcdn.redhat.com, then your HTTP proxy must not perform SSL inspection on these communications.
-
Add your HTTP proxy to Foreman:
$ hammer http-proxy create \
--name My_HTTP_Proxy \
--url http-proxy.example.com:8080
Optional: To set the HTTP proxy as default for content synchronization, add the
--content-default-http-proxy trueoption.If your HTTP proxy requires authentication, add the
--username My_User_Nameand--password My_Passwordoptions.
4.1.4. Changing the HTTP proxy policy for a product
For granular control over network traffic, you can set an HTTP proxy policy for each product. An HTTP proxy policy of a product applies to all repositories in the product, unless you set a different policy for individual repositories.
To set an HTTP proxy policy for individual repositories, see Changing the HTTP proxy policy for a repository by using Foreman web UI.
-
In the Foreman web UI, navigate to Content > Products and select the products that you want to change.
-
From the Select Action list, select Manage HTTP Proxy.
-
Select an HTTP Proxy Policy from the list:
-
Global Default: Use the global default proxy setting.
-
No HTTP Proxy: Do not use an HTTP proxy, even if a global default proxy is configured.
-
Use specific HTTP Proxy: Select an HTTP Proxy from the list. You must add HTTP proxies to Foreman before you can select a proxy from this list. For more information, see Adding an HTTP proxy by using Foreman web UI.
-
-
Click Update.
4.1.5. Changing the HTTP proxy policy for a repository by using Foreman web UI
You can set an HTTP proxy policy to synchronize repositories to Foreman server. Use an HTTP proxy for repository synchronization if your network restricts access to the internet.
-
In the Foreman web UI, navigate to Content > Products and click the name of the product that contains the repository.
-
In the Repositories tab, click the name of the repository.
-
Locate the HTTP Proxy field and click the edit icon.
-
Select an HTTP Proxy Policy from the list:
-
Global Default: Use the global default HTTP proxy setting.
-
No HTTP Proxy: Do not use an HTTP proxy, even if a global default HTTP proxy is configured.
-
Use specific HTTP Proxy: Select an HTTP Proxy from the list. You must add HTTP proxies to Foreman before you can select a proxy from this list.
-
-
Click Save.
4.1.6. Changing the HTTP proxy policy for a repository by using Hammer CLI
You can set an HTTP proxy policy to synchronize repositories to Foreman server. Use an HTTP proxy for repository synchronization if your network restricts access to the internet.
-
Specify the HTTP proxy policy you want to use:
$ hammer repository update \
--http-proxy-policy My_HTTP_Proxy_Policy \
--id My_Repository_ID
Specify one of the following options for
--http-proxy-policy:-
none: Do not use an HTTP proxy, even if a global default HTTP proxy is configured. -
global_default_http_proxy: Use the global default HTTP proxy setting. -
use_selected_http_proxy: Specify an HTTP proxy using either--http-proxy My_HTTP_Proxy_Nameor--http-proxy-id My_HTTP_Proxy_ID.
-
4.2. Synchronizing repositories ad hoc
You must synchronize repositories to download content into Foreman. Use ad hoc synchronization for the initial download or whenever you need to update repositories manually.
The synchronization duration depends on the size of each repository and the speed of your network connection. The following table provides estimates of how long it would take to synchronize content, depending on the available internet bandwidth:
| Single Package (10Mb) | Minor Release (750Mb) | Major Release (6Gb) | |
|---|---|---|---|
256 Kbps |
5 Mins 27 Secs |
6 Hrs 49 Mins 36 Secs |
2 Days 7 Hrs 55 Mins |
512 Kbps |
2 Mins 43.84 Secs |
3 Hrs 24 Mins 48 Secs |
1 Day 3 Hrs 57 Mins |
T1 (1.5 Mbps) |
54.33 Secs |
1 Hr 7 Mins 54.78 Secs |
9 Hrs 16 Mins 20.57 Secs |
10 Mbps |
8.39 Secs |
10 Mins 29.15 Secs |
1 Hr 25 Mins 53.96 Secs |
100 Mbps |
0.84 Secs |
1 Min 2.91 Secs |
8 Mins 35.4 Secs |
1000 Mbps |
0.08 Secs |
6.29 Secs |
51.54 Secs |
Schedule product synchronization by creating a sync plan to ensure updates on a regular basis.
4.2.1. Synchronizing repositories by using Foreman web UI
Run an ad hoc synchronization for selected repositories to download the latest upstream content into Foreman.
-
In the Foreman web UI, navigate to Content > Products.
-
Select the product that contains the repositories that you want to synchronize.
-
Select the repositories that you want to synchronize and click Sync Now.
-
In the Foreman web UI, navigate to Content > Sync Status.
-
Expand the corresponding product or repository tree.
-
Verify that the synchronization is complete.
4.2.2. Synchronizing repositories by using Hammer CLI
Run an ad hoc synchronization for a product or individual repository to download the latest upstream content into Foreman.
-
Synchronize an entire product:
$ hammer product synchronize \
--name "My_Product" \
--organization "My_Organization"
-
Synchronize an individual repository:
$ hammer repository synchronize \
--name "My_Repository" \
--organization "My_Organization" \
--product "My_Product"
4.2.3. Synchronizing all repositories in an organization
Run an asynchronous Hammer CLI script to synchronize every repository in an organization when you need to refresh all content at once.
-
Log in to your Foreman server using SSH.
-
Run the following Bash script:
ORG="My_Organization"

for i in $(hammer --no-headers --csv repository list --organization $ORG --fields Id)
do
  hammer repository synchronize --id ${i} --organization $ORG --async
done
4.3. Scheduling product synchronization
Sync plans run repository synchronization on a schedule. Assign a sync plan to one or more products so updates are fetched automatically.
4.3.1. Best practices for sync plans
Apply sync plan scheduling and automation patterns that keep content current without overloading Foreman during large synchronizations.
-
Add sync plans to products and regularly synchronize content to keep the load on Foreman low during synchronization. Synchronize content rather more often than less often. For example, setup a sync plan to synchronize content every day rather than only once a month.
-
Automate the creation and update of sync plans by using a Hammer script or an Ansible Playbook.
-
Distribute synchronization tasks over several hours to reduce the task load by creating multiple sync plans with the Custom Cron option.
| Cron expression | Explanation |
|---|---|
|
every day at 22:00 from Monday to Friday |
|
at 03:30 every Saturday and Sunday |
|
at 02:30 every day between the 8th and the 14th days of the month |
4.3.2. Creating a sync plan by using Foreman web UI
A sync plan checks and updates the content at a scheduled date and time. In Foreman, you can create a sync plan and assign products to the plan.
-
In the Foreman web UI, navigate to Content > Sync Plans.
-
Click New Sync Plan.
-
In the Name field, enter a name for the plan.
-
Optional: In the Description field, enter a description of the plan.
-
From the Interval list, select the interval at which you want the plan to run.
-
From the Start Date and Start Time lists, select when to start running the sync plan.
-
Click Save.
4.3.3. Creating a sync plan by using Hammer CLI
A sync plan checks and updates the content at a scheduled date and time. In Foreman, you can create a sync plan and assign products to the plan.
-
Create a sync plan:
$ hammer sync-plan create \
--description "My_Description" \
--enabled true \
--interval daily \
--name "My_Products" \
--organization "My_Organization" \
--sync-date "2023-01-01 01:00:00"
-
View the available sync plans for an organization to verify that the sync plan has been created:
$ hammer sync-plan list --organization "My_Organization"
4.3.4. Assigning a sync plan to a product by using Foreman web UI
A sync plan checks and updates the content at a scheduled date and time. In Foreman, you can assign a sync plan to products to update content regularly.
-
In the Foreman web UI, navigate to Content > Products.
-
Select a product.
-
On the Details tab, select a Sync Plan from the drop down menu.
4.3.5. Assigning a sync plan to a product by using Hammer CLI
A sync plan checks and updates the content at a scheduled date and time. In Foreman, you can assign a sync plan to products to update content regularly.
-
Assign a sync plan to a product:
$ hammer product set-sync-plan \
--name "My_Product_Name" \
--organization "My_Organization" \
--sync-plan "My_Sync_Plan_Name"
4.3.6. Assigning a sync plan to multiple products
Assign one sync plan to every product in an organization that has been synchronized at least once and has repositories by using a Hammer script.
-
Run the following Bash script:
ORG="My_Organization" SYNC_PLAN="daily_sync_at_3_a.m" hammer sync-plan create --name $SYNC_PLAN --interval daily --sync-date "2023-04-5 03:00:00" --enabled true --organization $ORG for i in $(hammer --no-headers --csv --csv-separator="|" product list --organization $ORG --per-page 999 | grep -vi not_synced | awk -F'|' '$5 != "0" { print $1}') do hammer product set-sync-plan --sync-plan $SYNC_PLAN --organization $ORG --id $i done -
After executing the script, view the products assigned to the sync plan:
$ hammer product list --organization $ORG --sync-plan $SYNC_PLAN
4.4. Refreshing content counts on Smart Proxy
Refresh content counts on your Smart Proxy that mirrors content so you can verify which content views and repositories are available to hosts.
-
In the Foreman web UI, navigate to Infrastructure > Smart Proxies, and select the Smart Proxy where you want to see the synchronized content.
-
Select the Overview tab.
-
Under Content Sync, toggle the Synchronize button to do an Optimized Sync or a Complete Sync to synchronize the Smart Proxy which refreshes the content counts.
-
Select the Content tab.
-
Choose an Environment to view content views available to those Smart Proxies by clicking >.
-
Expand the content view by clicking > to view repositories available to the content view and the specific version for the environment.
-
View the number of content counts under Packages specific to yum repositories.
-
View the number of errata, package groups, files, container tags, container manifests, and Ansible collections under Additional content.
-
Click the options icon in the column to the right next to the environment and click Refresh counts to refresh the content counts synchronized on the Smart Proxy under Packages.
4.5. Advanced synchronization options
Use advanced synchronization when standard synchronization leaves packages missing or corrupted on Foreman server.
Advanced synchronization has the following options:
- Optimized Sync
-
Synchronizes the repository bypassing packages that have no detected differences from the upstream packages.
- Complete Sync
-
Synchronizes all packages regardless of detected changes. Use this option if specific packages could not be downloaded to the local repository even though they exist in the upstream repository.
- Verify Content Checksum
-
Synchronizes all packages and then verifies the checksum of all packages locally. If the checksum of an RPM differs from the upstream, it re-downloads the RPM. This option is relevant only for Yum content. Use this option if you have one of the following errors:
-
Specific packages cause a
404error while synchronizing withyum. -
Package does not match intended downloaderror, which means that specific packages are corrupted.
-
5. Optimize content synchronization for bandwidth
You can accelerate content synchronization for your Foreman server and Smart Proxy servers by creating alternate content sources. Use an alternate content source on your local filesystem or nearby network to download content faster while still receiving metadata from the upstream source.
An alternate content source (ACS) defines an alternate path to download content during synchronization. The content itself is downloaded from the ACS, while the metadata is downloaded from the Foreman server or the upstream URL, depending on the configuration. You can use ACS to accelerate synchronization if the content is located on the local filesystem or on a nearby network. You can set up ACS for Foreman server and Smart Proxy servers.
You must refresh the alternate content source after creation or after making any changes. A weekly cron job refreshes all alternate content sources. You can also refresh the alternate content sources manually by using the Foreman web UI or Hammer CLI. Alternate content sources associated with your Foreman server, or Smart Proxy servers attached to multiple organizations, affect all organizations.
There are the following types of alternate content sources:
- Custom
-
Custom alternate content sources download the content from any upstream repository on the network or filesystem.
- Simplified
-
Simplified alternate content sources copy the upstream repository information from your Foreman server for the selected products. Simplified alternate content sources are ideal for situations where the connection from your Smart Proxy server to the upstream repository is faster than to your Foreman server.
- RHUI
-
RHUI alternate content sources download content from a Red Hat Update Infrastructure (RHUI) server. Foreman web UI provides examples to help you find the network paths and to import authentication credentials.
5.1. Create a custom alternate content source by using Foreman web UI
You can create a custom alternate content source (ACS) to accelerate content synchronization by downloading from your local network or filesystem instead of remote upstream servers.
-
If the repository requires SSL authentication, the SSL certificate and key must be imported into Foreman.
-
You have the base URL and subpaths of your alternate content source. For example, if your base URL is
https://server.example.comand your subpaths areenterprise-linux-9/andenterprise-linux-8/, then Foreman will searchhttps://server.example.com/enterprise-linux-9/andhttps://server.example.com/enterprise-linux-8/.
-
In the Foreman web UI, navigate to Content > Alternate Content Sources.
-
Click Add source.
-
Set the Source type to Custom.
-
Select the Content type from the drop-down list.
-
In the Name field, enter a name for your custom ACS.
-
Optional: In the Description field, provide a description for the ACS.
-
Select Smart Proxies to which you want to synchronize content from your alternate content source.
-
If you require synchronizing content through the HTTP proxy of your Smart Proxies, select Use HTTP proxies.
-
In the Base URL field, enter the base URL of the alternate content source.
-
In the Subpaths field, provide a comma-separated list of subpaths.
-
If your alternate content source requires authentication, select the Manual authentication or Content credentials.
-
If SSL verification is required, enable Verify SSL and select the SSL CA certificate.
-
Click Add.
-
Navigate to Content > Alternate Content Sources.
-
Open the options menu next to the newly created alternate content source and click Refresh.
-
In the Foreman web UI, navigate to Monitor > Foreman Tasks > Tasks.
-
Search for
Refresh Alternate Content Source. -
Verify that the task finished successfully.
5.2. Create a custom alternate content source by using Hammer CLI
You can create a custom alternate content source (ACS) to accelerate content synchronization by downloading from your local network or filesystem instead of remote upstream servers.
-
If the repository requires SSL authentication, the SSL certificate and key must be imported into Foreman.
-
You have the base URL and subpaths of your alternate content source. For example, if your base URL is
https://server.example.comand your subpaths areenterprise-linux-9/andenterprise-linux-8/, then Foreman will searchhttps://server.example.com/enterprise-linux-9/andhttps://server.example.com/enterprise-linux-8/.
-
Create a custom alternate content source:
$ hammer alternate-content-source create \
--alternate-content-source-type custom \
--base-url "https://local-repo.example.com:port" \
--name "My_ACS_Name" \
--smart-proxy-ids My_Smart_Proxy_ID_1,My_Smart_Proxy_ID_2 \
--subpaths "My_Subpath_1/,_My_Subpath_2/," \
--verify-ssl _true
-
Refresh your alternate content source:
$ hammer alternate-content-source refresh --name "My_ACS_Name"
-
Verify that the task ran successfully:
$ hammer task list --search "Refresh Alternate Content Source"
5.3. Create a simplified alternate content source by using Foreman web UI
You can create a simplified alternate content source (ACS) when your Smart Proxy servers have faster connections to the upstream repository than to your Foreman server. This accelerates synchronization by downloading content directly from the upstream source.
-
You have created the products that will use the alternate content source.
-
In the Foreman web UI, navigate to Content > Alternate Content Sources.
-
Click Add source.
-
Set the Source type to Simplified.
-
Select the Content type from the drop-down list.
-
In the Name field, enter a name for your simplified ACS.
-
Optional: In the Description field, provide a description for the ACS.
-
Select Smart Proxies to which you want to synchronize content from your alternate content source.
-
If you require synchronizing content through the HTTP proxy of your Smart Proxies, select Use HTTP proxies.
-
Select the products that should use the alternate content source.
-
Click Add.
-
Navigate to Content > Alternate Content Sources.
-
Open the options menu next to the newly created alternate content source and click Refresh.
-
In the Foreman web UI, navigate to Monitor > Foreman Tasks > Tasks.
-
Search for
Refresh Alternate Content Source. -
Verify that the task finished successfully.
5.4. Create a simplified alternate content source by using Hammer CLI
You can create a simplified alternate content source (ACS) when your Smart Proxy servers have faster connections to the upstream repository than to your Foreman server. This accelerates synchronization by downloading content directly from the upstream source.
-
You have created the products that will use the alternate content source.
-
Create a simplified alternate content source:
$ hammer alternate-content-source create \
--alternate-content-source-type simplified \
--content-type yum \
--name "My_ACS_Name" \
--product-ids My_Product_ID_1,My_Product_ID_2 \
--smart-proxy-ids My_Smart_Proxy_ID_1,My_Smart_Proxy_ID_2
Use
--content-type fileif you want to create a simplified ACS for a product with file-type repositories. -
Refresh your alternate content source:
$ hammer alternate-content-source refresh --name "My_ACS_Name"
-
Verify that the task ran successfully:
$ hammer task list --search "Refresh Alternate Content Source"
5.5. Synchronize Smart Proxy directly from Red Hat CDN by using Foreman web UI
You can configure your Smart Proxy servers to sync Red Hat content directly from the Red Hat CDN to reduce load on your Foreman server and accelerate content synchronization.
-
The required Red Hat repositories are enabled in Foreman.
-
In the Foreman web UI, navigate to Content > Alternate Content Sources.
-
Click Add source.
-
Set the Source type as Simplified.
-
Set the Content type to Yum.
-
In the Name field, enter a name for the alternate content source.
-
Optional: In the Description field, provide a description for the alternate content source.
-
Select Smart Proxies that you want to sync directly from Red Hat CDN.
-
If you require synchronizing content through the HTTP proxy of your Smart Proxies, select Use HTTP proxies.
-
Select the Red Hat products that should be synced to the Smart Proxy from Red Hat CDN.
-
Review details and click Add.
-
Navigate to Content > Alternate Content Sources, click the options icon next to the newly created alternate content source, and select Refresh.
5.6. Create an RHUI alternate content source by using Foreman web UI
You can create an RHUI alternate content source (ACS) to synchronize content from your Red Hat Update Infrastructure (RHUI) server. Leverage your existing RHUI investment and accelerate content synchronization.
Foreman searches content paths that combine a base URL with subpaths.
For example, if your base URL is https://server.example.com and your subpaths are rhel10/ and rhel9/, then Foreman searches https://server.example.com/rhel10/ and https://server.example.com/rhel9/.
-
The client entitlement certificates for the required repositories are generated on the RHUA node. For more information, see Creating a client entitlement certificate with the Red Hat Update Infrastructure Management Tool in Configuring and Managing Red Hat Update Infrastructure 4.
-
The client entitlement certificates are imported into Foreman. For more information, see Import content credentials by using Foreman web UI in Managing content.
-
You have the base URL of the Red Hat Update Infrastructure CDS node.
-
On your RHUA server, display details for the required repositories:
# rhui-manager repo info --repo_id My_Repo_ID
Record the relative paths from the command output to use as subpaths.
-
In the Foreman web UI, navigate to Content > Alternate Content Sources.
-
Click Add source.
-
Set the Source type to RHUI.
-
Generate RHUI certificates using the command provided in the Foreman web UI. Ensure that you pass the repo labels of the desired repositories.
-
In the Name field, enter a name for your RHUI ACS.
-
Optional: In the Description field, provide a description for the ACS.
-
Select Smart Proxies to which you want to synchronize content from your alternate content source.
-
If you require synchronizing content through the HTTP proxy of your Smart Proxies, select Use HTTP proxies.
-
In the Base URL field, enter the base URL of the Red Hat Update Infrastructure CDS node.
-
In the Subpaths field, provide a comma-separated list of subpaths.
-
If your alternate content source requires authentication, provide the SSL client certificate and SSL client key.
-
If SSL verification is required, enable Verify SSL and select the SSL CA certificate.
-
Click Add.
-
Navigate to Content > Alternate Content Sources.
-
Open the options menu next to the newly created alternate content source and click Refresh.
5.7. Create an RHUI alternate content source by using Hammer CLI
You can create an RHUI alternate content source (ACS) to synchronize content from your Red Hat Update Infrastructure (RHUI) server. Leverage your existing RHUI investment and accelerate content synchronization.
Foreman searches content paths that combine a base URL with subpaths.
For example, if your base URL is https://server.example.com and your subpaths are rhel10/ and rhel9/, then Foreman searches https://server.example.com/rhel10/ and https://server.example.com/rhel9/.
-
The client entitlement certificates for the required repositories are generated on the RHUA node. For more information, see Creating a client entitlement certificate with the Red Hat Update Infrastructure Management Tool in Configuring and Managing Red Hat Update Infrastructure 4.
-
The client entitlement certificates are imported into Foreman. For more information, see Import content credentials by using Foreman web UI in Managing content.
-
You have the base URL of the Red Hat Update Infrastructure CDS node.
-
On your RHUA server, display details for the required repositories:
# rhui-manager repo info --repo_id My_Repo_ID
Record the relative paths from the command output to use as subpaths.
-
Create a RHUI alternate content source:
$ hammer alternate-content-source create \
--alternate-content-source-type rhui \
--base-url "https://rhui-cds-node.example.com/pulp/content" \
--name "My_ACS_Name" \
--smart-proxy-ids My_Smart_Proxy_ID_1,My_Smart_Proxy_ID_2 \
--ssl-client-cert-id My_SSL_Client_Certificate_ID \
--ssl-client-key-id My_SSL_Client_Key_ID \
--subpaths path/to/repo/1/,path/to/repo/2/ \
--verify-ssl true
-
Refresh the alternate content source:
$ hammer alternate-content-source refresh --name "My_ACS_Name"
-
Verify that the task ran successfully:
$ hammer task list --search "Refresh Alternate Content Source"
5.8. Permissions required to manage alternate content sources
User accounts must have a role that grants the following permissions to view and manage alternate content sources in Foreman.
- Permissions to view ACS
-
-
view_content_credentials -
view_organizations -
view_products -
view_smart_proxies
-
- Permissions to manage ACS
-
-
create_alternate_content_sources -
destroy_alternate_content_sources -
edit_alternate_content_sources -
view_alternate_content_sources
-
6. Optimizing content synchronization and storage
Use download and mirroring policies, sync concurrency limits, and package retention to balance local storage, bandwidth, and upstream alignment on Foreman server and Smart Proxy servers. Configure defaults for new repositories or adjust individual repositories as needed.
6.1. Download policies overview
Download policies control when Foreman stores Deb, Yum, and container image content during synchronization versus fetching it on request from Smart Proxies or hosts.
Foreman server has the following policies:
- Immediate
-
Foreman server downloads all metadata and packages during synchronization.
- On Demand
-
Foreman server downloads only the metadata during synchronization. Foreman server only fetches and stores packages on the file system when Smart Proxies or directly connected clients request them. This setting has no effect if you set a corresponding repository on a Smart Proxy to Immediate because Foreman server is forced to download all the packages.
The On Demand policy acts as a Lazy Synchronization feature because they save time synchronizing content. The lazy synchronization feature must be used only for Deb and Yum repositories. You can add the packages to content views and promote to lifecycle environments as normal.
Smart Proxy server has the following policies:
- Immediate
-
Smart Proxy server downloads all metadata and packages during synchronization. Do not use this setting if the corresponding repository on Foreman server is set to On Demand as Foreman server is forced to download all the packages.
- On Demand
-
Smart Proxy server only downloads the metadata during synchronization. Smart Proxy server fetches and stores packages only on the file system when directly connected clients request them. When you use an On Demand download policy, content is downloaded from Foreman server if it is not available on Smart Proxy server.
- Inherit
-
Smart Proxy server inherits the download policy for the repository from the corresponding repository on Foreman server.
- Streamed
-
Streamed download policy for Smart Proxies permits Smart Proxies to avoid caching any content. When content is requested from the Smart Proxy, it functions as a proxy and requests the content directly from the Foreman.
You can configure the global default download policies in Content settings.
6.2. Updating the default download policy by using Foreman web UI
Set the default download policy so new repositories inherit immediate or on-demand behavior without updating existing repositories.
Depending on whether it is a Red Hat, SUSE, or repository, Foreman uses separate settings. Changing the default value does not change the setting in existing repositories, but only the default setting for new repositories.
-
In the Foreman web UI, navigate to Administer > Settings.
-
Click the Content tab.
-
Change the default download policy depending on your requirements:
-
To change the default download policy for a Red Hat repository, change the value of the Default Red Hat Repository download policy setting.
-
To change the default download policy for a non-Red Hat repository, change the value of the Default Custom Repository download policy setting.
-
6.3. Updating the default download policy by using Hammer CLI
Set the default download policy so new repositories inherit immediate or on-demand behavior without updating existing repositories.
Depending on whether it is a Red Hat, SUSE, or repository, Foreman uses separate settings. Changing the default value does not change the setting in existing repositories, but only the default setting for new repositories.
-
To change the default download policy for Red Hat repositories to one of
immediateoron_demand, enter the following command:$ hammer settings set \ --name default_redhat_download_policy \ --value immediate
-
To change the default download policy for a repository to one of
immediateoron_demand, enter the following command:$ hammer settings set \ --name default_download_policy \ --value immediate
6.4. Updating the download policy for a repository by using Foreman web UI
Change the download policy for an existing repository when you need immediate full downloads or on-demand storage.
-
In the Foreman web UI, navigate to Content > Products.
-
Select the required product name.
-
On the Repositories tab, click the required repository name, locate the Download Policy field, and click the edit icon.
-
From the list, select the required download policy and then click Save.
6.5. Updating the download policy for a repository by using Hammer CLI
Update the download policy for a specific repository when you need immediate full downloads or on-demand lazy synchronization for that repository.
-
List the repositories for an organization:
$ hammer repository list \
--organization-label My_Organization_Label
-
Change the download policy for a repository to
immediateoron_demand:$ hammer repository update \ --download-policy immediate \ --name "My_Repository" \ --organization-label My_Organization_Label \ --product "My_Product"
6.6. Mirroring policies overview
Mirroring policies control whether synchronized repositories add only new content, mirror repodata, or fully mirror upstream changes including deletions. Use them to match upstream behavior and storage needs for each repository.
Foreman server has the following mirroring policies:
- Additive
-
Neither the content nor the repodata is mirrored. Thus, only new content added since the last synchronization is added to the local repository and nothing is removed.
- Content Only
-
Mirrors only content and not the repodata. Some repositories do not support metadata mirroring, in such cases you can set the mirroring policy to content only to only mirror the content.
- Complete Mirroring
-
Mirrors content as well as repodata. This is the fastest method. This mirroring policy is only available for Yum content.
WarningAvoid republishing metadata for repositories with Complete Mirror mirroring policy. This also applies to content views containing repositories with the Complete Mirror mirroring policy.
6.7. Updating the default mirroring policy by using Foreman web UI
Set default mirroring policies for new repositories so they inherit additive, content-only, or complete mirroring without affecting existing repositories.
Depending on whether it is a Yum or non-Yum repository, Foreman uses separate settings.
Only Yum repositories support the mirror_complete mirroring policy.
Red Hat repositories use the mirror_complete policy by default and are not affected by these settings.
Changing the default value does not change existing mirroring policy settings per repository.
For more information on mirroring policies, see Mirroring policies overview.
-
In the Foreman web UI, navigate to Administer > Settings.
-
Click the Content tab.
-
Change the default mirroring policy depending on your requirements:
-
To change the default mirroring policy for a Yum repository, change the value of the Default custom yum repository mirroring policy setting.
-
To change the default mirroring policy for a non-Yum repository, change the value of the Default custom non-yum repository mirroring policy setting.
-
6.8. Updating the default mirroring policy by using Hammer CLI
Set default mirroring policies for new repositories so they inherit additive, content-only, or complete mirroring without affecting existing repositories.
Depending on whether it is a Yum or non-Yum repository, Foreman uses separate settings.
Only Yum repositories support the mirror_complete mirroring policy.
Red Hat repositories use the mirror_complete policy by default and are not affected by these settings.
Changing the default value does not change existing mirroring policy settings per repository.
For more information on mirroring policies, see Mirroring policies overview.
-
Change the default mirroring policy for a Yum repository to
additive,mirror_content_only, ormirror_complete:$ hammer settings set \ --name default_yum_mirroring_policy \ --value mirror_complete
-
Change the default mirroring policy for a non-Yum repository to
additiveormirror_content_only:$ hammer settings set \ --name default_non_yum_mirroring_policy \ --value additive
6.9. Updating the mirroring policy for a repository by using Foreman web UI
Update the mirroring policy for an existing repository to control whether synchronization adds content only, mirrors repodata, or removes content deleted upstream.
-
In the Foreman web UI, navigate to Content > Products.
-
Select the product name.
-
On the Repositories tab, click the repository name, locate the Mirroring Policy field, and click the edit icon.
-
From the list, select a mirroring policy and click Save.
6.10. Updating the mirroring policy for a repository by using Hammer CLI
Update the mirroring policy for a specific repository to control whether synchronization adds content only, mirrors repodata, or removes content deleted upstream.
-
List the repositories for an organization:
$ hammer repository list \
--organization-label My_Organization_Label
-
Change the mirroring policy for a repository to
additive,mirror_complete, ormirror_content_only:$ hammer repository update \ --id My_Repository_ID \ --mirroring-policy mirror_complete
6.11. Limiting synchronization concurrency
Adjust per-repository download concurrency when sync jobs fail because upstream servers reject parallel requests, or raise the limit cautiously to improve sync performance.
Increasing the limit may improve performance, but can cause the upstream server to be overloaded or start rejecting requests. If you are seeing repository syncs fail due to the upstream servers rejecting requests, you may want to try lowering the limit.
-
Define a value for synchronization concurrency:
$ hammer repository update \
--download-concurrency 5 \
--id Repository_ID \
--organization "My_Organization"
6.12. Limiting growth of synchronized content by using Foreman web UI
Limit how many package versions Foreman keeps in the Library by setting an additive mirroring policy and a retain count, reducing disk growth from repeated synchronizations.
-
In the Foreman web UI, navigate to Content > Products.
-
Select your product.
-
On the Repository tab, select your repository.
-
Set the Mirroring Policy to
Additive. -
Define the number of retained package versions:
-
Set Retain package versions to
1to only keep the latest synchronized package version on Foreman. -
Set Retain package versions to
2or higher to keep multiple package versions on Foreman.
-
6.13. Limiting growth of synchronized content by using Hammer CLI
Limit how many package versions Foreman keeps in the Library by setting an additive mirroring policy and a retain count, reducing disk growth from repeated synchronizations.
-
Configure your repository to retain a limited number of package versions in Foreman:
$ hammer repository update \
--id My_Repository_ID \
--mirroring-policy additive \
--retain-package-versions-count My_Package_Versions_Count
-
Set My_Package_Versions_Count to
1to only keep the latest synchronized package version on Foreman. -
Set My_Package_Versions_Count to
2or higher to keep multiple package versions on Foreman.
-
7. Content access control for hosts
You can cap host access to repositories and packages with content view environments, overrides, composite content views, and strict architecture or release rules that you evaluate in a deliberate order. Use activation keys at registration time and optional operating system or architecture limits on repositories to keep hosts on the intended content.
7.1. Content access strategies
You narrow which repositories and packages registered hosts consume from Foreman by combining content views, lifecycle environments, overrides, and tighter rules where needed. Evaluate those options from lifecycle environments through overrides toward the strictest architecture or release limits.
Foreman community recommends considering implementing the strategies in the order as listed here:
- Content views and lifecycle environments
-
Use content views and lifecycle environments, incorporating content view filters as needed.
- Content overrides
-
By default, content hosted by Foreman can be either enabled or disabled. In custom products, repositories are always disabled by default, while Red Hat products can be either enabled or disabled by default depending on the specific repository. Enabling a repository gives the host access to the repository packages or other content, allowing hosts to download and install the available content.
If a repository is disabled, the host is not able to access the repository content. A content override provides you with the option to override the default enablement value of either Enabled or Disabled for any repository. You can add content overrides to hosts or activation keys.
For more information about adding content overrides to hosts, see Enabling and disabling repositories on hosts in Managing hosts.
For more information about adding content overrides to activation keys, see Enabling and disabling repositories on activation key.
- Content view environments
-
Assign hosts to multiple content view environments to provide access to content from more than one content view.
- Composite content views
-
You can use composite content views to combine and give hosts access to the content from multiple content views.
- Architecture and operating system version restrictions
-
In custom products, you can set restrictions on the architecture and operating system versions for
yumrepositories on which the product will be available. For example, if you restrict a custom repository to Enterprise Linux 9, it is only available on hosts running Enterprise Linux 9. Architecture and operating system version restrictions hold the highest priority among all other strategies. They cannot be overridden or invalidated by content overrides, changes to content views, or changes to lifecycle environments. For this reason, Foreman community recommends considering the other strategies mentioned before that use architecture or operating system version restrictions. Red Hat repositories set architecture and operating system version restrictions automatically. - Release version
-
Certain Red Hat repositories, such as the Red Hat Enterprise Linux dot release repositories, include a Release version in their repository metadata. The release version is then compared with the release version specified in the System purpose properties of the host. Access to content may be limited or restricted based on this comparison.
7.2. Conditions for content availability
A host can access a repository only when that repository is in a content view environment of the host, passes filters, is enabled, and matches any architecture or operating system version restrictions. When any requirement fails, packages stay unavailable to the host even though Foreman still publishes the repository.
A host can access a package or repository only if all of the following conditions are true:
-
The repository is included in the content view environments of the host.
-
The content view of the host has been published after the repository was added to it.
-
The repository has not been filtered out by a content view filter.
-
The repository is enabled by default or overridden to Enabled by using a content override.
-
The repository has no architecture or operating system version restrictions or it has architecture or operating system version restrictions that match the host.
-
For certain Red Hat repositories either no release version is set or the release version matches that of the host.
7.3. Activation keys and content access
During registration, you use activation keys to assign content view environments and attach content overrides so hosts inherit the repository access you intend. After registration, adjust access per host or through bulk actions instead of changing the activation keys.
You can use activation keys to perform the following actions:
-
Assign hosts to content view environments.
-
Add content overrides to hosts.
-
Set system purpose attributes on hosts, including a release version.
Activation keys only affect hosts during registration. If a host is already registered, you can change the content access individually for each host or through host bulk actions.
7.4. Restricting a repository to a specific operating system version or architecture
You restrict access to a repository so only matching hosts consume the repository from Foreman. For example, expose the repository only to Enterprise Linux 9 hosts.
-
In the Foreman web UI, navigate to Content > Products.
-
Click the product that contains the repository sets you want to restrict.
-
In the Repositories tab, click the repository you want to restrict.
-
In the Publishing Settings section, set the following options:
-
Set Restrict to OS version to restrict the operating system version.
-
Set Restrict to architecture to restrict the architecture.
-
8. Managing application lifecycles
Lifecycle environments in Foreman separate content into ordered stages from development to production and link content views, hosts, and Smart Proxy server synchronization. You can create environment paths to stage applications and promote content views to deliver new versions to hosts.
8.1. Introduction to application lifecycle
The application lifecycle organizes how hosts and software appear at each stage of delivery. In Foreman, each stage is a lifecycle environment backed by a content view that selects repositories and packages for hosts registered to that stage.
The application lifecycle defines how a particular system and its software look at a particular stage. For example, an application lifecycle might be simple; you might only have a development stage and production stage. In this case the application lifecycle might look like this:
-
Development
-
Production
However, a more complex application lifecycle might have further stages, such as a phase for testing or a beta release. This adds extra stages to the application lifecycle:
-
Development
-
Testing
-
Beta Release
-
Production
Foreman provides methods to customize each application lifecycle stage so that it suits your specifications.
Each stage in the application lifecycle is called an environment in Foreman. Each environment uses a specific collection of content. Foreman defines these content collections as a content view. Each content view acts as a filter where you can define what repositories, and packages to include in a particular environment. This provides a method for you to define specific sets of content to designate to each environment.
For example, an email server might only require a simple application lifecycle where you have a production-level server for real-world use and a test server for trying out the latest mail server packages. When the test server passes the initial phase, you can set the production-level server to use the new packages.
Another example is a development lifecycle for a software product. To develop a new piece of software in a development environment, test it in a quality assurance environment, pre-release as a beta, then release the software as a production-level application.
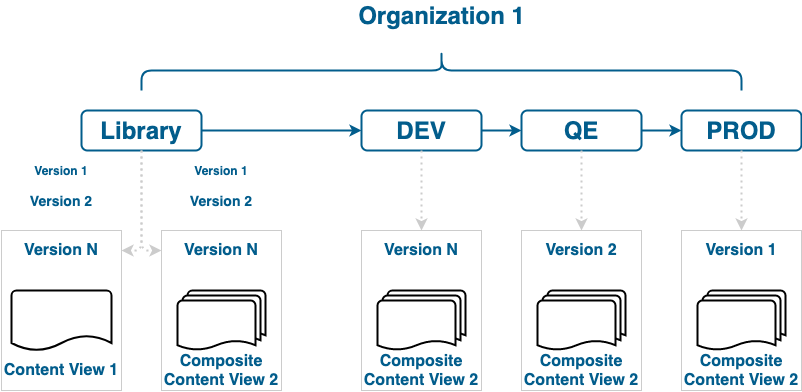
8.2. Lifecycle environments and environment paths
Application lifecycles are divided into lifecycle environments which represent each stage of the application lifecycle. By linking lifecycle environments, you create an environment path.
You can promote content along the environment path to the next lifecycle environment when required. When you promote a content view from one environment to the next environment in the application lifecycle, Foreman updates the repository and publishes the packages. For example, if development ends on a particular version of an application, you can promote this version to the testing environment and start development on the next version.

8.3. Content promotion across the application lifecycle
In the application lifecycle chain, moving content from one environment to the next is called promotion. Promotion updates repositories of the target environment so hosts registered to that environment can use the new versions.
Each environment contains a set of systems registered to Foreman. These systems only have access to repositories relevant to their environment. When you promote packages from one environment to the next, the target environment’s repositories receive new package versions. As a result, each system in the target environment can update to the new package versions.
This example uses a .rpm package, but you can promote any type of content across the application lifecycle.
| Development | Testing | Production |
|---|---|---|
example_software-1.1-0.noarch.rpm |
example_software-1.0-0.noarch.rpm |
example_software-1.0-0.noarch.rpm |
After completing development on the patch, you promote the package to the Testing environment so the Quality Engineering team can review the patch. The application lifecycle then contains the following package versions in each environment:
| Development | Testing | Production |
|---|---|---|
example_software-1.1-0.noarch.rpm |
example_software-1.1-0.noarch.rpm |
example_software-1.0-0.noarch.rpm |
While the Quality Engineering team reviews the patch, the Development team starts work on example_software 2.0. This results in the following application lifecycle:
| Development | Testing | Production |
|---|---|---|
example_software-2.0-0.noarch.rpm |
example_software-1.1-0.noarch.rpm |
example_software-1.0-0.noarch.rpm |
The Quality Engineering team completes their review of the patch. Now example_software 1.1 is ready to release. You promote 1.1 to the Production environment:
| Development | Testing | Production |
|---|---|---|
example_software-2.0-0.noarch.rpm |
example_software-1.1-0.noarch.rpm |
example_software-1.1-0.noarch.rpm |
The Development team completes their work on example_software 2.0 and promotes it to the Testing environment:
| Development | Testing | Production |
|---|---|---|
example_software-2.0-0.noarch.rpm |
example_software-2.0-0.noarch.rpm |
example_software-1.1-0.noarch.rpm |
Finally, the Quality Engineering team reviews the package. After a successful review, promote the package to the Production environment:
| Development | Testing | Production |
|---|---|---|
example_software-2.0-0.noarch.rpm |
example_software-2.0-0.noarch.rpm |
example_software-2.0-0.noarch.rpm |
8.4. Best practices for lifecycle environments
Design lifecycle environment paths, plan promotions, and configure Smart Proxy server content synchronization for predictable staging from development to production.
-
Use multiple lifecycle environment paths to implement multiple sequential stages of content consumption. Each stage contains a defined set of content, for example in the Production lifecycle environment.
-
Automate the creation of lifecycle environments by using a Hammer script or an Ansible Playbook.
-
Default use case: Fixed stages in each lifecycle environment paths, for example Development, Test, and Production.
-
Promote content views to lifecycle environments, for example, from Test to Production. All hosts consuming this content view or composite content view are able to install packages from the Production lifecycle environment. Note that these packages are not installed or updated automatically.
-
If you encounter errors during patching hosts, attach the host to a previous version of the content view. This only affects the availability of packages but does not downgrade installed packages.
-
-
Alternative use case: Using stages in lifecycle environments for fixed content, for example, quarterly updates, and only publishing new minor versions with incremental updates from errata.
-
When patching hosts, change the lifecycle environment from
2023-Q4to2024-Q1using the Foreman web UI, Foreman API, Hammer CLI, or an activation key. -
Advantage: You can directly see which software packages a hosts receives by looking at its lifecycle environment.
-
Disadvantage: Promoting content is less dynamic without clearly defined stages such as Development, Test, and Production.
-
-
Use multiple lifecycle environment paths to define multiple stages for different environments, for example to decouple web server and database hosts.
-
Smart Proxy servers use lifecycle environments to synchronize content. They synchronize content more efficiently if you split content into multiple lifecycle environment paths. If a specific Smart Proxy server only serves content for one operating system in a single lifecycle environment path, it only synchronizes required content.
8.5. Creating a lifecycle environment path by using Foreman web UI
Create a lifecycle environment path starting from the Library environment to stage content from development through release. Optionally chain additional environments for testing, beta, or production stages.
-
In the Foreman web UI, navigate to Content > Lifecycle > Lifecycle Environments.
-
Click New Environment Path to start a new application lifecycle.
-
In the Name field, enter a name for your environment.
-
In the Description field, enter a description for your environment.
-
Click Save.
-
Optional: To add an environment to the environment path, click Add New Environment, complete the Name and Description fields, and select the prior environment from the Prior Environment list.
8.6. Creating a lifecycle environment path by using Hammer CLI
Create a lifecycle environment path starting from the Library environment to stage content from development through release. Optionally chain additional environments for testing, beta, or production stages.
-
Create a lifecycle environment path by tying your first environment to Library:
$ hammer lifecycle-environment create \
--name "My First Lifecycle Environment" \
--description "Environment Path Description" \
--prior "Library" \
--organization "My_Organization"
-
Optional: Add another environment to the environment path by tying it to the prior environment:
$ hammer lifecycle-environment create \
--name "My Second Lifecycle Environment" \
--description "Environment Description" \
--prior "My First Lifecycle Environment" \
--organization "My_Organization"
-
View the chain of the lifecycle environment path:
$ hammer lifecycle-environment paths --organization "My_Organization"
8.7. Removing lifecycle environments from Foreman server by using Foreman web UI
Remove a lifecycle environment from Foreman server when it is empty and no longer needed so your content paths stay accurate and easier to manage.
-
In the Foreman web UI, navigate to Content > Lifecycle Environments.
-
Click the name of the lifecycle environment that you want to remove, and then click Remove Environment.
-
Click Remove to remove the environment.
8.8. Removing lifecycle environments from Foreman server by using Hammer CLI
Remove a lifecycle environment from Foreman server when it is empty and no longer needed so your content paths stay accurate and easier to manage.
-
List the lifecycle environments for your organization and note the name of the lifecycle environment you want to remove:
$ hammer lifecycle-environment list \
--organization "My_Organization"
-
Use the
hammer lifecycle-environment deletecommand to remove an environment:$ hammer lifecycle-environment delete \ --name "My_Environment" \ --organization "My_Organization"
9. Managing content views and content view environments
Use content views to curate the content that hosts consume. You can create and promote content views, configure filters, work with rolling and composite views, manage versions, and assign content view environments to hosts.
9.1. Workflow for creating content views
Follow this sequence to add repositories, optionally refine content with filters and dependency resolution, publish and promote the content view, and attach hosts.
The general workflow for creating content views for filtering and creating snapshots is as follows:
-
Create a content view.
-
Add one or more repositories that you want to the content view.
-
Optional: Create one or more filters to refine the content of the content view.
-
Optional: Resolve any package dependencies for a content view.
-
Publish the content view.
-
Optional: Promote the content view to another environment.
-
Attach the host to the content view.
-
On Enterprise Linux hosts: If a repository is not associated with the content view, the file
/etc/yum.repos.d/redhat.reporemains empty and hosts registered to it cannot receive updates. -
On Debian/Ubuntu hosts: If a repository is not associated with the content view, the file
/etc/apt/sources.list.d/rhsm.sourcesremains empty and hosts registered to it cannot receive updates. -
On openSUSE/SUSE Linux Enterprise Server hosts: If a repository is not associated with the content view, the directory
/etc/zypp/repos.d/remains empty and hosts registered to it cannot receive updates.
-
Hosts can only be associated with a single content view. To associate a host with multiple content views, create a composite content view.
9.2. Managing content views
Foreman uses content views to allow your hosts access to a deliberately curated subset of content. To do this, you must define which repositories to use and then apply certain filters to the content.
9.2.1. Content views in Foreman
A content view is a deliberately curated subset of content that your hosts can access. By creating a content view, you can define the software versions used by a particular environment or Smart Proxy server.
Each content view creates a set of repositories across each environment. Your Foreman server stores and manages these repositories. For example, you can create content views in the following ways:
-
A content view with older package versions for a production environment and another content view with newer package versions for a Development environment.
-
A content view with a package repository required by an operating system and another content view with a package repository required by an application.
-
A composite content view for a modular approach to managing content views. For example, you can use one content view for content for managing an operating system and another content view for content for managing an application. By creating a composite content view that combines both content views, you create a new repository that merges the repositories from each of the content views. However, the repositories for the content views still exist and you can keep managing them separately as well.
- Default Organization View
-
A Default Organization View is an application-controlled content view for all content that is synchronized to Foreman. You can register a host to the Library environment on Foreman to consume the Default Organization View without configuring content views and lifecycle environments.
You can access unprotected repositories in the Default Organization View content view. The URL consists of your Smart Proxy FQDN,
/pulp/content/, your organization label,/Library/custom/, your product label,/, your repository label, and a trailing/, for example,https://foreman.example.com/pulp/content/Example/Library/custom/AlmaLinux_9/BaseOS/. - Promoting a content view across environments
-
When you promote a content view from one environment to the next environment in the application lifecycle, Foreman updates the repository and publishes the packages.
The repositories for Testing and Production contain the my-software-1.0-0.noarch.rpm package:
| Development | Testing | Production | |
|---|---|---|---|
Version of the content view |
Version 2 |
Version 1 |
Version 1 |
Contents of the content view |
my-software-1.1-0.noarch.rpm |
my-software-1.0-0.noarch.rpm |
my-software-1.0-0.noarch.rpm |
If you promote Version 2 of the content view from Development to Testing, the repository for Testing updates to contain the my-software-1.1-0.noarch.rpm package:
| Development | Testing | Production | |
|---|---|---|---|
Version of the content view |
Version 2 |
Version 2 |
Version 1 |
Contents of the content view |
my-software-1.1-0.noarch.rpm |
my-software-1.1-0.noarch.rpm |
my-software-1.0-0.noarch.rpm |
This ensures hosts are designated to a specific environment but receive updates when that environment uses a new version of the content view.
With Distribute archived content view versions enabled, you can access unprotected repositories in published content view versions.
The URL consists of your Smart Proxy FQDN, /pulp/content/, your organization label, /content_views/, your content view, your content view version, /custom/, your product label, /, your repository label, and a trailing /, for example, https://foreman.example.com/pulp/content/Example/content_views/AlmaLinux_9/2.1/custom/AlmaLinux_9/BaseOS/.
If you want to access the latest published content view, the URL consists of your Smart Proxy FQDN, /pulp/content/, your organization label, your lifecycle, your content view, /custom/, your product label, /, your repository label, and a trailing /, for example, https://foreman.example.com/pulp/content/Example/Production/AlmaLinux_9/custom/AlmaLinux_9/AlmaLinux_9/.
9.2.2. Best practices for content views
Foreman community recommends you apply these practices when you plan, publish, and maintain content views to reduce administrative overhead and keep host content consistent.
-
Content views that bundle content, such as Enterprise Linux and additional software like
Apache-2.4orPostgreSQL-16.2, are easier to maintain. Content views that are too small require more maintenance. -
If you require daily updated content, use the content view
Default Organization View, which contains the latest synchronized content from all repositories and is available in the Library lifecycle environment. -
If you require daily updated content for hosts registered to a specific Smart Proxy server, use rolling content views and assign them to a lifecycle environment other than Library.
-
To give hosts access to content from multiple content views, such as when you update one content view weekly and another monthly, you have two options:
-
Assign multiple content view environments to hosts. For more information, see Assigning content view environments to hosts in bulk.
-
Assign composite content views to hosts.
For more information, see Comparison of content view environments and composite content views.
-
-
If you use composite content views, first publish the content views and then publish the composite content views. The more content views you bundle into composite content views, the more effort is needed to change or update content.
-
Setting a lifecycle environment for content views is unnecessary if they are solely bundled to a composite content view.
-
Automate creating and publishing composite content views and lifecycle environments by using a Hammer script or an Ansible Playbook. Use cron jobs, systemd timers, or recurring logics for more visibility.
-
Add the changes and date to the description of each published content view or composite content view version. The most recent activity, such as moving content to a new lifecycle environment, is displayed by date in the Foreman web UI, regardless of the latest changes to the content itself.
-
Publishing a new content view or composite content view creates a new major version. Incremental errata updates increment the minor version. Note that you cannot change or reset this counter.
9.2.3. Creating a content view by using Foreman web UI
Create a content view to define which repositories and content your hosts can access through lifecycle environments.
While you can stipulate whether you want to resolve any package dependencies on a content view by content view basis, you might want to change the default Foreman settings to enable or disable package resolution for all content views. For more information, see Dependency solving for content views.
-
At least one repository is available in your organization.
-
In the Foreman web UI, navigate to Content > Lifecycle > Content Views.
-
Click Create content view.
-
In the Name field, enter a name for the view. Foreman automatically completes the Label field from the name you enter.
-
In the Description field, enter a description of the view.
-
In the Type field, select a Content view or a Composite content view.
-
Optional: If you want to solve dependencies automatically every time you publish this content view, select the Solve dependencies checkbox. Dependency solving slows the publishing time and might ignore any content view filters you use. This can also cause errors when resolving dependencies for errata.
-
Click Create content view.
-
On the Repositories tab, select the repository from the Type list that you want to add to your content view, select the checkbox next to the available repositories you want to add, then click Add repositories.
-
Click Publish new version and in the Description field, enter information about the version to log changes.
-
Optional: Enable a promotion path by clicking Promote and select one or more lifecycle environments to promote the new version to.
-
Click Next.
-
On the Review details page, review the environments you are trying to publish.
-
Click Finish.
-
To register a host to your content view, see Registering hosts by using global registration in Managing hosts.
9.2.4. Creating a content view by using Hammer CLI
Create a content view to define which repositories and content your hosts can access through lifecycle environments.
While you can stipulate whether you want to resolve any package dependencies on a content view by content view basis, you might want to change the default Foreman settings to enable or disable package resolution for all content views. For more information, see Dependency solving for content views.
-
At least one repository is available in your organization.
-
Obtain a list of repository IDs:
$ hammer repository list --organization "My_Organization"
-
Create the content view and add repositories:
$ hammer content-view create \
--description "My_Content_View" \
--name "My_Content_View" \
--organization "My_Organization" \
--repository-ids My_Repository_ID_1,My_Repository_ID_2
-
Optional: Add another repository to your content view:
$ hammer content-view add-repository \
--name "My_Content_View" \
--organization "My_Organization" \
--repository-id My_Repository_ID_3
-
Publish the content view:
$ hammer content-view publish \
--description "My_Content_View" \
--name "My_Content_View" \
--organization "My_Organization"
Foreman server creates the new version of the view and publishes it to the Library environment.
9.2.5. Copying a content view by using Foreman web UI
Copy an existing content view to create a content view based on its repositories and filters without reconfiguring them from scratch.
|
Note
|
A copied content view does not have the same history as the original content view. Version 1 of the copied content view begins at the last version of the original content view. As a result, you cannot promote an older version of a content view from the copied content view. |
-
In the Foreman web UI, navigate to Content > Lifecycle > Content Views.
-
Select the content view you want to copy.
-
Open the options menu and click Copy.
-
In the Name field, enter a name for the new content view and click Copy content view.
-
The copied content view appears on the Content views page.
9.2.6. Copying a content view by using Hammer CLI
Copy an existing content view to create a content view based on its repositories and filters without reconfiguring them from scratch.
|
Note
|
A copied content view does not have the same history as the original content view. Version 1 of the copied content view begins at the last version of the original content view. As a result, you cannot promote an older version of a content view from the copied content view. |
-
Copy the content view by using Hammer:
$ hammer content-view copy \
--name My_original_CV_name \
--new-name My_new_CV_name
9.2.7. Synchronizing a content view to a Smart Proxy server
In the Foreman web UI, you can only synchronize all selected lifecycle environments simultaneously. If you need to synchronize smaller items, such as individual lifecycle environments, single content views, and single repositories, use the Hammer CLI.
-
The content view is published and promoted to a lifecycle environment that the Smart Proxy server synchronizes.
-
Synchronize a content view to your Smart Proxy server:
$ hammer proxy content synchronize \
--content-view "My_Content_View_Name" \
--id My_Smart_Proxy_Server_ID
9.2.8. Viewing module streams by using Foreman web UI
View module streams in your content views to verify which modular Yum content is included before you publish or promote a content view.
-
The content view has at least one published version that includes modular repositories.
-
In the Foreman web UI, Content > Lifecycle > Content Views.
-
Select your content view.
-
Click on a published version.
-
Click Module Streams to view the module streams that are available for the Content Types.
-
Use the Search field to search for specific modules.
-
To view the information about the module, click the module and its corresponding tabs to include Details, Repositories, Profiles, and Artifacts.
9.2.9. Viewing module streams by using Hammer CLI
View module streams in your content views to verify which modular Yum content is included before you publish or promote a content view.
-
Your organization includes repositories with module streams.
-
List all organizations:
$ hammer organization list
-
View all module streams for your organization:
$ hammer module-stream list \
--organization-id My_Organization_ID
9.2.10. Promoting a content view by using Foreman web UI
Promote a content view to the next lifecycle environment to make its published content available to hosts in that environment.
-
Your Foreman account has a role that grants the
promote_or_remove_content_viewsandpromote_or_remove_content_views_to_environmentpermissions. -
The content view has at least one published version.
-
In the Foreman web UI, navigate to Content > Lifecycle > Content Views.
-
Select the content view that you want to promote.
-
Select the version that you want to promote, click the options icon, and click Promote.
-
Select the environment where you want to promote the content view and click Promote.
-
To register a host to your content view, see Registering hosts by using global registration in Managing hosts.
9.2.11. Promoting a content view by using Hammer CLI
Promote a content view to the next lifecycle environment to make its published content available to hosts in that environment.
-
Your Foreman account has a role that grants the
promote_or_remove_content_viewsandpromote_or_remove_content_views_to_environmentpermissions. -
The content view has at least one published version.
-
Promote the content view to a lifecycle environment:
$ hammer content-view version promote \
--content-view "My_Content_View_Name" \
--version 1 \
--to-lifecycle-environment "My_Lifecycle_Environment_Name" \
--organization "My_Organization"
Repeat the command for each lifecycle environment to promote the content view to.
-
Display information about your content view version to verify that it is promoted to the required lifecycle environment:
$ hammer content-view version info --id My_Content_View_Version_ID
-
To register a host to your content view, see Registering hosts by using global registration in Managing hosts.
9.2.12. Publishing and promoting a content view by using MCP
You can use your AI application to publish and promote content views across different lifecycle environments.
|
Warning
|
Review the output generated by AI before using it in production. |
|
Important
|
The MCP server for Foreman is a Technology Preview feature only. Technology Preview features are not supported by Foreman community. Foreman community does not recommend using them in production. These features provide early access to upcoming product features, enabling customers to test functionality and provide feedback during the development process. |
-
The MCP server for Foreman is deployed and configured to allow content view publish and promote actions. For more information, see Deploying the MCP server for Foreman in Managing hosts.
-
Allow the MCP server to trigger content view publish and promote actions:
$ podman run --interactive --tty --publish 127.0.0.1:8080:8080 \
  --volume Path_to_My_CA_Bundle:/app/ca.pem:ro,Z \
  quay.io/foreman/foreman-mcp-server:latest \
  --foreman-url https://foreman.example.com \
  --allowed-cv-actions "publish,promote"
For more information, see Deploying the MCP server for Foreman in Managing hosts.
-
Type a prompt in your AI application to list content views:
Show a list of content views on my Foreman. -
The MCP server will return a list of content views to the AI application. Review the information.
-
Type a prompt in your AI application to publish a new version of the content view or to promote the content view to an environment. Review all the steps that the AI application performs.
9.2.13. Promoting a content view to all environments in an organization
You can promote content views across all lifecycle environments within an organization by using the following Bash script.
-
Your Foreman account has a role that grants the
promote_or_remove_content_viewsandpromote_or_remove_content_views_to_environmentpermissions. -
The content view version that you want to promote is published.
-
Promote content views across all lifecycle environments within an organization:
ORG="My_Organization"
CVV_ID=My_Content_View_Version_ID

for i in $(hammer --no-headers --csv lifecycle-environment list --organization $ORG | awk -F, {'print $1'} | sort -n)
do
   hammer content-view version promote --organization $ORG --to-lifecycle-environment-id $i --id $CVV_ID
done
9.3. Configuring content view filters
After you add repositories to a content view, you can refine what content hosts receive by configuring include and exclude filters and optional dependency resolution.
9.3.1. Content filter overview
Use content view filters to include or exclude specific Deb and Yum packages, errata, and other content types from a published view. Without filters, a content view includes all content from its selected repositories.
- Filter types
-
There are two types of content filters:
Table 30. Filter types Filter Type Description Include
You start with no content, then select which content to add from the selected repositories. Use this filter to combine multiple content items.
Exclude
You start with all content from selected repositories, then select which content to remove. Use this filter when you want to use most of a particular content repository while excluding certain packages. The filter uses all content in the repository except for the content you select.
- Include and Exclude filter combinations
-
If using a combination of Include and Exclude filters, publishing a content view triggers the include filters first, then the exclude filters. In this situation, select which content to include, then which content to exclude from the inclusive subset.
- Content types
-
You can filter content based on the following content types:
Table 31. Content types Content Type Description RPM
Filter packages based on their name and version number. The RPM option filters non-modular RPM packages and errata. Source RPMs are not affected by this filter and will still be available in the content view.
Deb
Filter packages based on their name. The Deb option filters Deb packages.
Package Group
Filter packages based on package groups. The list of package groups is based on the repositories added to the content view.
Erratum (by ID)
Select which specific errata to add to the filter. The list of Errata is based on the repositories added to the content view.
Erratum (by Date and Type)
Select a issued or updated date range and errata type (Bugfix, Enhancement, or Security) to add to the filter.
Module Streams
Select whether to include or exclude specific module streams. The Module Streams option filters modular RPMs and errata, but does not filter non-modular content that is associated with the selected module stream.
Container Image Tag
Select whether to include or exclude specific container image tags.
9.3.2. Content filter examples
These examples show common content filter configurations for package groups, errata, and module streams that you can adapt when refining a content view.
|
Note
|
Filters can significantly increase the time to publish a content view. For example, if a content view publish task completes in a few minutes without filters, it can take 30 minutes after adding an exclude or include errata filter. |
Create a repository with the base Enterprise Linux packages. This filter requires a Enterprise Linux repository added to the content view.
Filter:
-
Inclusion Type: Include
-
Content Type: Package Group
-
Filter: Select only the Base package group
Create a repository that excludes all errata, except for security updates, after a certain date. This is useful if you want to perform system updates on a regular basis with the exception of critical security updates, which must be applied immediately. This filter requires a Enterprise Linux repository added to the content view.
Filter:
-
Inclusion Type: Exclude
-
Content Type: Erratum (by Date and Type)
-
Filter: Select only the Bugfix and Enhancement errata types, and clear the Security errata type. Set the Date Type to Updated On. Set the Start Date to the date you want to restrict errata. Leave the End Date blank to ensure any new non-security errata is filtered.
A combination of Example 1 and Example 2 where you only require the operating system packages and want to exclude recent bug fix and enhancement errata. This requires two filters attached to the same content view. The content view processes the Include filter first, then the Exclude filter.
Filter 1:
-
Inclusion Type: Include
-
Content Type: Package Group
-
Filter: Select only the Base package group
Filter 2:
-
Inclusion Type: Exclude
-
Content Type: Erratum (by Date and Type)
-
Filter: Select only the Bugfix and Enhancement errata types, and clear the Security errata type. Set the Date Type to Updated On. Set the Start Date to the date you want to restrict errata. Leave the End Date blank to ensure any new non-security errata is filtered.
Filter a specific module stream in a content view.
Filter 1:
-
Inclusion Type: Include
-
Content Type: Module Stream
-
Filter: Select only the specific module stream that you want for the content view, for example ant, and click Add Module Stream.
Filter 2:
-
Inclusion Type: Exclude
-
Content Type: Package
-
Filter: Add a rule to filter any non-modular packages that you want to exclude from the content view. If you do not filter the packages, the content view filter includes all non-modular packages associated with the module stream ant. Add a rule to exclude all
*packages, or specify the package names that you want to exclude.
9.3.3. Creating a content view filter by using Foreman web UI
Create content view filters to include or exclude specific packages, errata, and other content types from a content view. Package filters match content by name, version, and architecture.
For examples of how to build a filter, see Content filter examples.
-
You have created a content view with the repositories you want to filter. For more information, see Creating a content view by using Foreman web UI.
-
In the Foreman web UI, navigate to Content > Lifecycle > Content Views.
-
Select a content view.
-
On the Filters tab, click Create filter.
-
Enter a name.
-
From the Content type list, select a content type.
-
From the Inclusion Type list, select either Include filter or Exclude filter.
-
Optional: In the Description field, enter a description for the filter.
-
Click Create filter to create your content filter.
-
Add a filter rule:
-
For Deb content, click Add DEB rule.
-
For Yum content, click Add RPM rule.
-
-
Enter a name, architecture, and version.
-
Click Add rule.
-
Select if you want the filter to Apply to subset of repositories or Apply to all repositories in the CV.
-
Click Publish new version to publish the filtered content view.
-
Optional: In the Description field, enter a description of the changes.
-
Optional: Select Promote to promote your filtered content view to a lifecycle environment.
-
Click Finish to publish a new version of the content view.
9.3.4. Creating a content view filter by using CLI
You can use Hammer CLI to create content view filters to include or exclude specific content units like packages, errata, or container image tags.
-
You have created a content view with the repositories you want to filter. For more information, see Creating a content view by using Hammer CLI.
-
Add a filter to the content view. Use the
--inclusion falseoption to set the filter to an Exclude filter:$ hammer content-view filter create \ --name "Errata Filter" \ --type erratum --content-view "Example_Content_View" \ --description "My latest filter" \ --inclusion false \ --organization "My_Organization"
-
Add a rule to the filter:
$ hammer content-view filter rule create \
--content-view "Example_Content_View" \
--content-view-filter "Errata Filter" \
--start-date "YYYY-MM-DD" \
--types enhancement,bugfix \
--date-type updated \
--organization "My_Organization"
-
Publish the content view:
$ hammer content-view publish \
--name "Example_Content_View" \
--description "Adding errata filter" \
--organization "My_Organization"
-
Promote the view across all environments:
$ hammer content-view version promote \
--content-view "Example_Content_View" \
--version 1 \
--to-lifecycle-environment "Development" \
--organization "My_Organization"
$ hammer content-view version promote \
--content-view "Example_Content_View" \
--version 1 \
--to-lifecycle-environment "Testing" \
--organization "My_Organization"
$ hammer content-view version promote \
--content-view "Example_Content_View" \
--version 1 \
--to-lifecycle-environment "Production" \
--organization "My_Organization"
9.4. Dependency solving for content views
Foreman can add dependencies of packages in a content view to the dependent repository when publishing the content view. To configure this, you can enable dependency solving.
For example, dependency solving is useful when you incrementally add a single package to a content view version. You might need to enable dependency solving to install that package.
However, dependency solving is unnecessary in most situations. For example:
-
When incrementally adding a security erratum to a content view, enabling dependency solving causes significant delays to content view publication without major benefits.
-
Packages from a newer erratum might have dependencies that are incompatible with packages from an older content view version. Enabling dependency solving for the erratum might result in the inclusion of unwanted packages. As an alternative, consider updating the content view.
|
Note
|
Dependency solving only considers packages within the repositories of the content view. It does not consider packages installed on clients. For example, if a content view includes only AppStream, dependency solving does not include dependent BaseOS content at publish time. |
Dependency solving can lead to the following problems:
- Significant delay in content view publication
-
Foreman examines every repository in a content view for dependencies. Therefore, publish time increases with more repositories.
To mitigate this problem, use multiple content views with fewer repositories and combine them into composite content views.
- Ignored content view filters on dependent packages
-
Foreman prioritizes resolving package dependencies over the rules in your filter.
For example, if you create a filter for security purposes but enable dependency solving, Foreman can add packages that you might consider insecure.
To mitigate this problem, carefully test filtering rules to determine the required dependencies. If dependency solving includes unwanted packages, manually identify the core basic dependencies that the extra packages and errata need.
9.4.1. Enabling dependency solving for a content view
Enable dependency solving on a content view when you need Foreman to include package dependencies during publication, such as when adding a single package incrementally.
-
You have reviewed Dependency solving for content views to determine whether dependency solving is appropriate for your content view.
-
In the Foreman web UI, navigate to Content > Lifecycle > Content Views.
-
From the list of content views, select the required content view.
-
On the Details tab, toggle Solve dependencies.
9.5. Managing content view versions
Each time you publish a content view, Foreman creates a new version. You can compare versions to review changes, delete unused versions to reclaim storage, and distribute archived versions for debugging.
9.5.1. Comparing content view versions
Compare two content view versions to identify added, removed, or changed packages, errata, and other content between versions.
-
The content view has at least two published versions.
-
In the Foreman web UI, navigate to Content > Lifecycle > Content Views.
-
Select a content view whose versions you want to compare.
-
On the Versions tab, select the checkbox next to any two versions you want to compare.
-
Click Compare.
The Compare screen has the pre-selected versions in the version dropdown menus and tabs for all content types found in either version. You can filter the results to show only the same, different, or all content types. You can compare different content view versions by selecting them from the dropdown menus.
9.5.2. Distributing archived content view versions
Enable distribution of archived content view versions when you need access to repositories from published versions that are not currently promoted, such as for debugging.
-
Your Foreman account has a role that grants the
view_settingsandedit_settingspermissions.
-
In the Foreman web UI, navigate to Administer > Settings.
-
Click the Content tab.
-
Set the Distribute archived content view versions parameter to Yes.
-
Click Submit.
This enables the repositories of content view versions without lifecycle environments to be distributed at
foreman.example.com/pulp/content/My_Organization/content_views/My_Content_View/My_Content_View_Version/.NoteOlder non-promoted content view versions are not distributed once the setting is enabled. Only new content view versions become distributed.
9.5.3. Deleting multiple content view versions by using Foreman web UI
Delete multiple content view versions at once to remove obsolete snapshots and free storage on Foreman server.
-
Your Foreman account has a role that grants the
promote_or_remove_content_viewspermission.
-
In the Foreman web UI, navigate to Content > Lifecycle > Content Views.
-
Select the content view you want to delete versions of.
-
On the Versions tab, select the checkbox of the version or versions you want to delete.
-
Open the options menu at the top of the list of content views.
-
Click Delete to open the deletion wizard that shows any affected environments.
-
If there are no affected environments, review the details and click Delete.
-
If there are any affected environments, reassign any hosts or activation keys before deletion.
-
Review the details of the actions.
-
Click Delete.
9.5.4. Deleting multiple content view versions by using Hammer CLI
You can delete multiple content view versions simultaneously by using Hammer CLI.
-
List versions of your content view:
$ hammer content-view info \
--name "My_Content_View_Name" \
--organization-id My_Organization_ID
-
Delete content view versions:
$ hammer content-view remove \
--content-view-version-ids My_Content_View_Version_ID_1,My_Content_View_Version_ID_2 \
--id My_Content_View_ID
-
Verify that Foreman deleted the content view versions:
$ hammer content-view info \
--name "My_Content_View_Name" \
--organization-id My_Organization_ID
9.5.5. Deleting multiple content view versions by using Ansible
You can delete multiple content view versions simultaneously by using Foreman Ansible collection.
-
Use the
theforeman.foreman.content_view_versionmodule.For more information, see the Ansible module documentation with
ansible-doc theforeman.foreman.content_view_version.
9.5.6. Purging content view versions by using Hammer CLI
You can purge excess numbers of content view versions on Foreman to limit disk space usage. By default, Foreman keeps every version of a content view. Removing content view versions is a tradeoff between disk space and possibly bandwidth during content synchronizations to Smart Proxy servers and the possibility to roll back to older content snapshots.
Foreman only considers deleting content view versions that are not part of any lifecycle environment.
-
Optional: View your content view versions:
$ hammer content-view info \
--name "My_Content_View_Name" \
--organization-id My_Organization_ID
-
Clean up content view versions:
$ hammer content-view purge \
--name "My_Content_View_Name" \
--organization-id My_Organization_ID \
--versions-to-keep My_Number_Of_Versions_To_Keep
-
Verify that Foreman deleted the content view versions:
$ hammer content-view info \
--name "My_Content_View_Name" \
--organization-id My_Organization_ID
9.6. Using composite content views
Use composite content views when you need to merge content from multiple content views for hosts to consume.
9.6.1. Composite content views overview
A composite content view combines repositories from several content views for hosts to consume content. Use it when hosts need content from multiple content views, such as an operating system and an application, managed separately.
You want to develop an application that supports different database servers. The example_application appears as:
| example_software |
|---|
Application |
Database |
Operating System |
Example of four separate content views:
-
Enterprise Linux (Operating System)
-
PostgreSQL (Database)
-
MariaDB (Database)
-
example_software (Application)
From the previous content views, you can create two composite content views.
Example composite content view for a PostgreSQL database:
| Composite content view 1 – example_software on PostgreSQL |
|---|
example_software (Application) |
PostgreSQL (Database) |
Enterprise Linux (Operating System) |
Example composite content view for a MariaDB:
| Composite content view 2 – example_software on MariaDB |
|---|
example_software (Application) |
MariaDB (Database) |
Enterprise Linux (Operating System) |
Each content view is then managed and published separately. When you create a version of the application, you publish a new version of the composite content views. You can also select the Auto Publish option when creating a composite content view, and then the composite content view is automatically republished when a content view it includes is republished.
- Repository restrictions
-
Docker repositories cannot be included more than once in a composite content view. For example, if you attempt to include two content views that contain the same docker repository in a composite content view, Foreman server reports an error.
9.6.2. Creating a composite content view by using Foreman web UI
Create a composite content view to combine repositories from multiple content views for your hosts to consume.
-
The content views that you want to combine are published.
-
In the Foreman web UI, navigate to Content > Lifecycle > Content Views.
-
Click Create content view.
-
In the Create content view window, enter a name for the view in the Name field. Foreman automatically completes the Label field from the name you enter.
-
Optional: In the Description field, enter a description of the view.
-
On the Type tab, select Composite content view.
-
Optional: If you want to automatically publish a new version of the composite content view when a content view is republished, select the Auto publish checkbox.
-
Click Create content view.
-
On the Content views tab, select the content views that you want to add to the composite content view, and then click Add content views.
-
In the Add content views window, select the version of each content view.
-
Optional: If you want to automatically update the content view to the latest version, select the Always update to latest version checkbox.
-
Click Add, then click Publish new version.
-
Optional: In the Description field, enter a description of the content view.
-
In the Publish window, set the Promote switch, then select the lifecycle environment.
-
Click Next, then click Finish.
9.6.3. Creating a composite content view by using Hammer CLI
Create a composite content view to combine repositories from multiple content views for your hosts to consume.
-
The content views that you want to combine are published.
-
Before you create the composite content views, list the version IDs for your existing content views:
$ hammer content-view version list \
--organization "My_Organization"
-
Create a new composite content view. When the
--auto-publishoption is set toyes, the composite content view is automatically republished when a content view it includes is republished:$ hammer content-view create \ --composite \ --auto-publish yes \ --name "Example_Composite_Content_View" \ --description "Example composite content view" \ --organization "My_Organization"
-
Add a content view to the composite content view. You can identify content view, content view version, and Organization in the commands by either their ID or their name. To add multiple content views to the composite content view, repeat this step for every content view you want to include.
-
If you have the Always update to latest version option enabled for the content view:
$ hammer content-view component add \
--component-content-view-id Content_View_ID \
--composite-content-view "Example_Composite_Content_View" \
--latest \
--organization "My_Organization"
-
If you have the Always update to latest version option disabled for the content view:
$ hammer content-view component add \
--component-content-view-id Content_View_ID \
--composite-content-view "Example_Composite_Content_View" \
--component-content-view-version-id Content_View_Version_ID \
--organization "My_Organization"
-
-
Publish the composite content view:
$ hammer content-view publish \
--name "Example_Composite_Content_View" \
--description "Initial version of composite content view" \
--organization "My_Organization"
-
Promote the composite content view across all environments:
$ hammer content-view version promote \
--content-view "Example_Composite_Content_View" \
--version 1 \
--to-lifecycle-environment "Development" \
--organization "My_Organization"
$ hammer content-view version promote \
--content-view "Example_Composite_Content_View" \
--version 1 \
--to-lifecycle-environment "Testing" \
--organization "My_Organization"
$ hammer content-view version promote \
--content-view "Example_Composite_Content_View" \
--version 1 \
--to-lifecycle-environment "Production" \
--organization "My_Organization"
9.7. Using rolling content views
Use rolling content views when you need hosts to consume the latest synchronized content without publishing and promoting new content view versions.
9.7.1. Rolling content views
A rolling content view is a curated subset of Library content that hosts can access without publishing or promoting new content view versions. Use it to provide a continuous stream of the latest synchronized content from one or more repositories.
When you synchronize repositories to Foreman, all rolling content views that contain them get automatically updated to include the latest changes. You do not have to publish and/or promote a rolling content view compared to content views or composite content views.
Instead, you can assign rolling content views to one or multiple lifecycle environments. By doing so, you can synchronize subsets of the Library content from Foreman server to Smart Proxy servers that are configured to consume content from the assigned lifecycle environments.
9.7.2. Creating a rolling content view by using Foreman web UI
Create a rolling content view to give hosts continuous access to the latest synchronized content without publishing new content view versions.
-
At least one populated repository exists in your organization.
-
In the Foreman web UI, navigate to Content > Lifecycle > Content Views.
-
Click Create content view.
-
In the Create content view window, enter a name for the content view in the Name field. Foreman automatically completes the Label field from the name you enter.
-
Optional: In the Description field, enter a description of the content view.
-
On the Type tab, select Rolling content view.
-
Optional: In the Lifecycle Environments field, assign your rolling content view to your lifecycle environments.
-
Click Create content view.
-
Click Show repositories.
-
Select the repositories that you want to add to your rolling content view.
-
Click Add repositories to add all selected repositories to your rolling content view.
-
You cannot publish or promote your rolling content view. Instead, continue by adding it to your activation key. For more information, see Creating an activation key by using Foreman web UI.
-
To register a host to your rolling content view, see Registering hosts to Foreman in Managing hosts.
9.7.3. Creating a rolling content view by using Hammer CLI
Create a rolling content view to give hosts continuous access to the latest synchronized content without publishing new content view versions.
-
At least one repository is synchronized to your organization.
-
List all available lifecycle environments:
$ hammer lifecycle-environment list \
--fields id,name \
--organization "My_Organization"
-
List all available repositories to identify IDs of repositories to add to your rolling content view:
$ hammer repository list \
--fields id,name,product \
--organization "My_Organization"
-
Create your rolling content view:
$ hammer content-view create \
--lifecycle-environment-ids My_List_Of_Lifecycle_Environment_IDs \
--name "My_Rolling_Content_View" \
--organization "My_Organization" \
--repository-ids My_List_Of_Repository_IDs \
--rolling
-
You cannot publish or promote your rolling content view. Instead, continue by adding it to your activation key. For more information, see Creating an activation key by using Hammer CLI.
-
To register a host to your rolling content view, see Registering hosts to Foreman in Managing hosts.
9.7.4. Assigning a rolling content view to lifecycle environments by using Foreman web UI
Assign a rolling content view to lifecycle environments to limit which Library content is synchronized to Smart Proxy servers.
To consume rolling content views, you must assign them to one or more lifecycle environments. By doing so, you expose a subset of Library content to those lifecycle environments. Foreman community does not recommend assigning a rolling content view to the Library environment itself because it creates duplicate content within Library. By using environments other than Library, you can synchronize your rolling content views from Foreman server to any Smart Proxy servers that are configured to consume the relevant lifecycle environments without the need to synchronize all of Library to Smart Proxy servers.
-
A rolling content view exists in your organization.
-
At least one lifecycle environment other than Library exists in your organization.
-
In the Foreman web UI, navigate to Content > Lifecycle > Content Views.
-
Select your rolling content view.
-
Select the Details tab.
-
In the Lifecycle Environments field, assign your rolling content view to your lifecycle environments.
-
Click Save Environments to submit your changes to Foreman.
-
Synchronize lifecycle environments to Smart Proxy servers. For more information, see Adding lifecycle environments to Smart Proxy servers by using Foreman web UI in Managing content.
9.7.5. Assigning a rolling content view to lifecycle environments by using Hammer CLI
Assign a rolling content view to lifecycle environments to limit which Library content is synchronized to Smart Proxy servers.
To consume rolling content views, you must assign them to one or more lifecycle environments. By doing so, you expose a subset of Library content to those lifecycle environments. Foreman community does not recommend assigning a rolling content view to the Library environment itself because it creates duplicate content within Library. By using environments other than Library, you can synchronize your rolling content views from Foreman server to any Smart Proxy servers that are configured to consume the relevant lifecycle environments without the need to synchronize all of Library to Smart Proxy servers.
-
A rolling content view exists in your organization.
-
At least one lifecycle environment other than Library exists in your organization.
-
List all content views:
$ hammer content-view list \
--fields "content view id,name" \
--organization "My_Organization"
-
Assign your rolling content view to lifecycle environments:
$ hammer content-view update \
--id My_Rolling_Content_View_ID \
--lifecycle-environment-ids My_List_Of_Lifecycle_Environment_IDs \
--organization "My_Organization"
If you want to remove your rolling content view from all lifecycle environments, pass an empty list.
-
Synchronize lifecycle environments to Smart Proxy servers. For more information, see Synchronizing a content view to a Smart Proxy server in Managing content.
9.8. Managing content view environments
A content view environment combines a lifecycle environment and a content view into a single entity. You can assign hosts to content view environments, control multi-environment access, and set content view priority.
9.8.1. Content view environments overview
By default, you can assign multiple content view environments to hosts and activation keys. This is controlled by the Allow multiple content views setting.
Hosts registered with multiple activation keys handle content view environment assignments based on the order of activation keys and order of content view environments.
When you disable Allow multiple content views, multi-environment hosts remain assigned to multiple content view environments and retain access to all their content. Existing multi-environment activation keys remain associated with multiple content view environments, and both multi-environment hosts and activation keys remain visible in the Foreman web UI and accessible through the Hammer CLI. However, registration fails if you attempt to assign a host to multiple content view environments or use a multi-environment activation key during host registration. Assigning multiple content view environments to a host or activation key results in an error.
When you disable Allow multiple content views, you can still reassign a multi-environment host to a single content view environment. You can also reassign a multi-environment activation key to a single content view environment or remove all content view environments from the key.
9.8.2. Content view environment categories
Foreman labels content view environments according to the lifecycle environment and content view they represent.
The content view environments available in your organization fall into the following categories:
- Library environment
-
Foreman assigns the Library environment to represent the Library lifecycle environment and the Default Organization View content view. Foreman labels this environment as
Library. - Unpromoted content views
-
For each content view that you publish but do not promote to a lifecycle environment, Foreman creates a content view environment. Foreman labels these environments using the format:
Library/<content_view_label>. - Promoted content views
-
For each content view that you promote to a specific lifecycle environment, Foreman creates a corresponding content view environment. Foreman labels these environments using the format:
<lifecycle_environment_label>/<content_view_label>.
9.8.3. Content view environment ordering and priority
The order of content view environments on a host or activation key determines which repository version the host uses when the same repository exists in multiple content view environments.
During host registration, an activation key assigns content view environments in the order they are stored.
A host pulls content from the first assigned content view environment that contains the repository.
If Library is first in the list, it overrides other content view environments because it contains all repositories.
The order of the content view environments is critical when repository conflicts occur.
A repository conflict occurs when multiple content view environments contain a repository with the same label.
For example:
A host assigned to the content view environments Library/cv1, dev/cv1 uses the following configuration:
$ hammer host update \
--content-view-environments "Library/cv1,dev/cv1" \
--name "server.example.com" \
--organization-id My_Organization_ID
Both content view environments include the foreman-client repository.
Log in as a root user, then run subscription-manager repos to inspect the available repositories on the host.
The output reflects the Library/cv1 content view environment:
# subscription-manager repos
This results in the following output:
+----------------------------------------------------------+
    Available Repositories in /etc/yum.repos.d/redhat.repo
+----------------------------------------------------------+
Repo ID:   foreman-client
Repo Name: Foreman Client
Repo URL:  https://foreman.example.com/pulp/content/My_Organization/Library/cv1/content/dist/layered/foreman-client/x86_64/My_Product/My_Repository_ID/os
Enabled: 0|
Note
|
The |
To change priority, reorder the content view environments.
To prioritize dev/cv1 over Library/cv1, update the host settings:
$ hammer host update \
--content-view-environments "dev/cv1,Library/cv1" \
--name "server.example.com" \
--organization-id My_Organization_ID
After reordering, inspecting the repositories again shows the dev/cv1 content view environment:
# subscription-manager repos
This results in the following output:
+----------------------------------------------------------+
    Available Repositories in /etc/yum.repos.d/redhat.repo
+----------------------------------------------------------+
Repo ID:   foreman-client
Repo Name: Foreman Client
Repo URL:  https://foreman.example.com/pulp/content/My_Organization/dev/cv1/content/dist/layered/foreman-client/x86_64/My_Product/My_Repository_ID/os
Enabled:   0
The Repo URL now reflects the dev/cv1 content view environment, meaning the system uses content from dev/cv1 and ignores Library/cv1.
9.8.4. Assigning content view environments to hosts in bulk
Assign content view environments to multiple hosts at once to provide the same content for those hosts.
-
If you want to assign multiple content view environments, the Allow multiple content views setting must be enabled. For more information, see Content view environments overview.
-
In the Foreman web UI, navigate to Hosts > All Hosts.
-
Select the hosts to which you want to assign content view environments.
-
Click the hosts table menu icon and select Manage content > Content view environments.
-
Edit the content view environments as needed.
-
Click Remove to remove a content view environment.
-
Click Add content view environment to assign an additional content view environment.
-
Drag and drop the content view environments to change their order.
-
-
Click Save.
9.8.5. Assigning content view environments to a host by using Foreman web UI
Assign content view environments to a host to provide content access for that host.
-
If you want to assign multiple content view environments, the Allow multiple content views setting must be enabled. For more information, see Content view environments overview.
-
In the Foreman web UI, navigate to Hosts > All Hosts.
-
Click the name of the host to which you want to assign content view environments.
-
On the the Content view environments card, click Assign content view environments.
-
Edit the content view environments as needed.
-
Click Remove to remove a content view environment.
-
Click Assign another content view environment to assign another content view environment.
-
Drag and drop the content view environments to change their order.
-
-
Optional: Select Update the host immediately via remote execution to update the host immediately.
-
Click Save.
9.8.6. Assigning content view environments to a host by using Hammer CLI
Assign content view environments to a host to provide content access for that host. Use Hammer CLI when you automate configuration.
To assign content view environments to a host, specify the entire list in order. There is no interface in Hammer or the API to add, remove, or insert individual content view environments. The current content view environments on the host are replaced with the new list you provide.
-
If you want to assign multiple content view environments, the Allow multiple content views setting must be enabled. For more information, see Content view environments overview.
-
List available content view environments in your organization:
$ hammer content-view-environment list --organization "My_Organization"
Record the labels of the environments you want to assign to the host.
-
Assign the content view environments to the host:
$ hammer host update \
--content-view-environments="Library/along_cv,LCE_XYZ/CV1" \
--name "server.example.com" \
--organization-id My_Organization_ID
9.8.7. Assigning content view environments to a host by using Subscription Manager
Assign content view environments to a host to provide content access for that host. Use Subscription Manager when you configure content access from the host rather than from Foreman.
-
If you want to assign multiple content view environments, the Allow multiple content views setting must be enabled in Foreman. For more information, see Content view environments overview.
-
You have a Foreman username and password, which Subscription Manager requires to list available environments.
-
List available content view environments:
# subscription-manager environments --list
Record the names of the environments you want to assign to the host.
-
Assign the content view environments to the host:
# subscription-manager environments --set My_Content_View_Environment_1,My_Content_View_Environment_2
-
List the assigned content view environments:
# subscription-manager environments --list-enabled
9.9. Comparison of content view environments and composite content views
Compare composite content views and content view environments to decide how hosts access content from more than one content view. The differences include access timing, conflict resolution, and version selection.
Composite content views provide an alternative method for granting hosts access to content from multiple content views. You can use composite content views, multiple content view environments, or a combination of both. The key differences between these methods include the following:
- Access timing
-
Hosts assigned to composite content views gain access to the combined content only after you publish the composite content view. Hosts assigned to multiple content view environments immediately access the combined content from all assigned environments.
- Conflict resolution
-
Composite content views resolve conflicts at the time of publishing by merging duplicate repositories. For hosts assigned to multiple content view environments, repository conflicts are resolved based on the order of content view environments.
- Version selection
-
Composite content views allow you to select specific versions of a content view, including older versions. With multiple content view environments, the host receives the version of the content view that is currently promoted to the selected lifecycle environment.
Choose the approach that best suits your requirements based on these differences.
10. Recovering corrupted content
When content corruption causes synchronization failures or checksum mismatches, you can resynchronize repositories, verify checksums, and republish metadata to restore repository integrity and ensure hosts can reliably access packages.
10.1. Recovering a corrupted repository by using Foreman web UI
Recover a corrupted repository with optimized or complete advanced sync, and optionally verify content checksums to confirm packages match upstream sources.
-
In the Foreman web UI, navigate to Content > Products.
-
Select the product containing the corrupted repository.
-
Select the name of a repository you want to synchronize.
-
To perform optimized sync or complete sync, select Advanced Sync from the Select Action menu.
-
Select the required option and click Sync.
-
Optional: To verify the checksum for a Yum repository, click Verify Content Checksum from the Select Action menu.
10.2. Recovering a corrupted repository by using Hammer CLI
Recover a corrupted repository by using optimized sync, complete sync, or validate-content synchronization when packages or metadata no longer match expected content.
-
Obtain a list of repository IDs:
$ hammer repository list \
--organization "My_Organization"
-
Synchronize a corrupted repository using the necessary option:
-
For the optimized synchronization:
$ hammer repository synchronize \
--id My_ID
-
For the complete synchronization:
$ hammer repository synchronize \
--id My_ID \
--skip-metadata-check true
-
For validating content of a Yum repository:
$ hammer repository synchronize \
--id My_ID \
--validate-contents true
-
10.3. Recovering corrupted content on a Smart Proxy server by using Foreman web UI
Verify checksums for a lifecycle environment or content view on your Smart Proxy server when hosts cannot consume content and you need to repair corrupted files on the Smart Proxy server.
-
In the Foreman web UI, navigate to Infrastructure > Smart Proxies.
-
Select your Smart Proxy server.
-
Recover corrupted content on your Smart Proxy server.
-
To repair content in a lifecycle environment, click the options menu icon next to your lifecycle environment and select Verify Content Checksum.
-
To repair content in a content view, click the options menu icon next to your content view and select Verify Content Checksum.
-
-
In the Foreman web UI, navigate to Monitor > Foreman Tasks > Tasks.
-
Search for
Verify checksum for content. -
Verify that the task completed successfully.
10.4. Recovering corrupted content on a Smart Proxy server by using CLI
Verify checksums on your Smart Proxy server for a repository, content view, lifecycle environment, or all Smart Proxy server content when hosts cannot consume synchronized packages.
-
The lifecycle environment, content view, or repository that you want to repair is available on the Smart Proxy server.
-
Display a list of all Smart Proxies:
$ hammer proxy list
Note the ID of your Smart Proxy server.
-
Recover corrupted content on your Smart Proxy server:
-
Repair content in a content view:
$ hammer proxy content verify-checksum \
--content-view-id My_Content_View_ID \
--id My_Smart_Proxy_Server_ID \
--organization-id My_Organization_ID
-
Repair content in a lifecycle environment:
$ hammer proxy content verify-checksum \
--id My_Smart_Proxy_Server_ID \
--lifecycle-environment-id My_Lifecycle_Environment_ID \
--organization-id My_Organization_ID
-
Repair content in a repository:
$ hammer proxy content verify-checksum \
--id My_Smart_Proxy_Server_ID \
--organization-id My_Organization_ID \
--repository-id My_Repository_ID
-
Repair all content on your Smart Proxy server:
$ hammer proxy content verify-checksum \
--id My_Smart_Proxy_Server_ID
-
-
Verify that the task completed successfully:
$ hammer task list --search "Verify checksum for content"
10.5. Republishing repository metadata by using Foreman web UI
Republish repository metadata when published metadata does not match repository contents.
|
Warning
|
Foreman community recommends a complete repository sync or publishing a new content view version to repair broken metadata instead. |
-
The mirroring policy of the repository is not set to Complete Mirroring.
This action is not available for repositories that use the Complete Mirroring policy because the metadata is copied verbatim from the upstream source of the repository.
-
In the Foreman web UI, navigate to Content > Products.
-
Select the product that includes the repository for which you want to republish metadata.
-
On the Repositories tab, select a repository.
-
To republish metadata for the repository, click Republish Repository Metadata from the Select Action menu.
10.6. Republishing repository metadata by using CLI
Republish repository metadata when published metadata does not match repository contents.
|
Warning
|
Foreman community recommends a complete repository sync or publishing a new content view version to repair broken metadata in favor of republishing repository metadata. |
-
The mirroring policy of the repository is not set to Complete Mirroring.
This action is not available for repositories that use the Complete Mirroring policy because the metadata is copied verbatim from the upstream source of the repository.
-
Republish metadata for your repository:
$ hammer repository verify-checksum \
--name "My_Repository_Name" \
--organization-id My_Organization_ID \
--product "My_Product_Name"
-
Verify that the task completed successfully:
$ hammer task list --search "Metadata generate repository"
10.7. Republishing content view metadata by using Foreman web UI
Republish content view version metadata when hosts report checksum mismatches. Foreman can regenerate metadata for repositories that do not use complete mirroring.
Republishing regenerates metadata for all repositories in the content view version that do not adhere to the Complete Mirroring policy.
-
The content view version includes repositories that do not use the Complete Mirroring policy.
-
In the Foreman web UI, navigate to Content > Lifecycle > Content Views.
-
Select a content view.
-
On the Versions tab, select a content view version.
-
To republish metadata for the content view version, click Republish repository metadata from the options icon.
10.8. Republishing content view metadata by using CLI
Republish content view version metadata when hosts report checksum mismatches. Foreman can regenerate metadata for repositories that do not use complete mirroring.
Republishing regenerates metadata for all repositories in the content view version that do not adhere to the Complete Mirroring policy.
-
The content view version includes repositories that do not use the Complete Mirroring policy.
-
Republish metadata for your content view version:
$ hammer content-view version verify-checksum --id My_Content_View_Version_ID
-
Verify that the task completed successfully:
$ hammer task list --search "Verify checksum of repositories in"
11. Synchronizing content between Foreman servers
In multi-server Foreman deployments, use Inter-Server Synchronization to deliver content from upstream to downstream Foreman servers over a network or through export and import, including the Library environment, content view versions, and individual repositories.
11.1. Inter-Server Synchronization configurations
Depending on network connectivity between upstream and downstream Foreman servers, you can synchronize content over HTTPS with network sync or by exporting and importing content when servers are air gapped.
There are two possible ISS configurations of Foreman, depending on how you deployed your infrastructure:
- ISS Network Sync
-
If your upstream server can communicate with the downstream server over a network, you can synchronize content over HTTPS.
Configure your Foreman to synchronize content over a network.
- ISS Export Sync
-
If your upstream and downstream servers are air gapped, you can synchronize content by using export and import.
Configure your Foreman to synchronize content by using export and import.
11.1.1. Configuring Foreman server to synchronize content over a network by using Foreman web UI
To synchronize content over a network, configure your downstream Foreman server to pull repositories from a connected upstream Foreman server.
-
A network connection exists between the upstream Foreman server and the downstream Foreman server.
-
You imported the same subscription manifest on both the upstream and downstream Foreman server.
-
On the upstream Foreman server, you enabled the required repositories for the organization.
-
The upstream user is an admin or has the following permissions:
-
view_organizations -
view_products -
export_content -
view_lifecycle_environments -
view_content_views
-
-
On the downstream Foreman server, you have imported the SSL certificate of the upstream Foreman server using the contents of
http://upstream-foreman.example.com/pub/katello-server-ca.crt. -
The downstream user is an admin or has the permissions to create product repositories and organizations.
-
Navigate to Content > Subscriptions.
-
Click Manage Manifest.
-
Navigate to the CDN Configuration tab.
-
Select the Network Sync tab.
-
In the URL field, enter the address of the upstream Foreman server.
-
In the Username, enter your username for upstream login.
-
In the Password, enter your password or personal access token for upstream login.
-
In the Organization label field, enter the label of the upstream organization.
-
Optional: In the Lifecycle Environment Label field, enter the label of the upstream lifecycle environment. Default is
Library. -
Optional: In the Content view label field, enter the label of the upstream content view. Default is
Default_Organization_View. -
From the SSL CA Content Credential menu, select a CA certificate used by the upstream Foreman server.
-
Click Update.
-
In the Foreman web UI, navigate to Content > Products.
-
Select the product that contains the repositories that you want to synchronize.
-
From the Select Action menu, select Sync Now to synchronize all repositories within the product.
You can also create a synchronization plan to ensure updates on a regular basis.
11.1.2. Configuring Foreman server to synchronize content over a network by using Hammer CLI
To synchronize content over a network, configure your downstream Foreman server to pull repositories from a connected upstream Foreman server.
-
A network connection exists between the upstream Foreman server and the downstream Foreman server.
-
You imported the same subscription manifest on both the upstream and downstream Foreman server.
-
On the upstream Foreman server, you enabled the required repositories for the organization.
-
The upstream user is an admin or has the following permissions:
-
view_organizations -
view_products -
export_content -
view_lifecycle_environments -
view_content_views
-
-
On the downstream Foreman server, you have imported the SSL certificate of the upstream Foreman server using the contents of
http://upstream-foreman.example.com/pub/katello-server-ca.crt. -
The downstream user is an admin or has the permissions to create product repositories and organizations.
-
Connect to your downstream Foreman server using SSH.
-
View information about the upstream CA certificate:
$ hammer content-credential show \
--name="My_Upstream_CA_Cert" \
--organization="My_Downstream_Organization"
Note the ID of the CA certificate for the next step.
-
Set CDN configuration to an upstream Foreman server:
$ hammer organization configure-cdn \
--name="My_Downstream_Organization" \
--type=network_sync \
--url https://upstream-foreman.example.com \
--username upstream_username --password upstream_password \
--ssl-ca-credential-id "My_Upstream_CA_Cert_ID" \
--upstream-organization-label="_My_Upstream_Organization" \
[--upstream-lifecycle-environment-label="My_Lifecycle_Environment"] \
[--upstream-content-view-label="My_Content_View"]
The default lifecycle environment label is
Library. The default content view label isDefault_Organization_View.
11.1.3. Configuring Foreman server to synchronize content through exports by using Foreman web UI
If you deployed your downstream Foreman server as air gapped, configure your Foreman server as such to avoid attempts to consume content from a network.
-
In the Foreman web UI, navigate to Content > Subscriptions.
-
Click Manage Manifest.
-
Switch to the CDN Configuration tab.
-
Select the Export Sync tab.
-
Click Update.
11.1.4. Configuring Foreman server to synchronize content through exports by using Hammer CLI
If you deployed your downstream Foreman server as air gapped, configure your Foreman server as such to avoid attempts to consume content from a network.
-
Log in to your Foreman server by using SSH.
-
Set CDN configuration to sync by using exports:
$ hammer organization configure-cdn \
--name="My_Organization" \
--type=export_sync
11.2. Synchronizing a repository
To synchronize repositories over a network, configure the repositories on the downstream Foreman server to synchronize from published URLs on the upstream server. Red Hat repositories do not require this configuration.
-
On the connected Foreman server, perform the following steps:
-
In the Foreman web UI, navigate to Content > Products.
-
Click on the custom product.
-
Click on the custom repository.
-
Copy the Published At: URL.
-
-
On the disconnected Foreman server, perform the following steps:
-
Download the
katello-server-ca.crtfile from the connected Foreman server:# curl http://foreman.example.com/pub/katello-server-ca.crt
-
Create an SSL Content Credential with the contents of
katello-server-ca.crt. -
In the Foreman web UI, navigate to Content > Products.
-
Create your custom product with the following:
-
Upstream URL: Paste the link that you copied earlier.
-
SSL CA Cert: Select the SSL certificate that was transferred from your connected Foreman server.
-
-
11.3. Content synchronization by using export and import
Export content from an upstream Foreman server and import it into a downstream server when network connectivity is limited or air gapped. Choose an approach based on what content you need to synchronize.
|
Note
|
Synchronizing content by using export and import requires the same major version of Foreman on both the downstream and upstream Foreman servers. When you are unable to match upstream and downstream Foreman versions, you can use:
|
11.3.1. Using an upstream Foreman server as a content store
Export Library content from an upstream Foreman server that serves as a content store and import it on the downstream server that manages content for isolated infrastructure.
-
On the upstream Foreman server, perform the following steps:
-
Ensure that repositories are using the Immediate download policy in one of the following ways:
-
For existing repositories using On Demand, change their download policy on the repository details page to Immediate.
-
For new repositories, ensure that the Default Red Hat Repository download policy setting is set to Immediate before enabling Red Hat repositories, and that the Default download policy is set to Immediate for custom repositories.
-
-
Enable the content that you want to synchronize.
If you want to sync custom content, first create a product and then synchronize repositories.
-
Synchronize the enabled content:
-
On the first export, perform a
completeLibrary export so that all the synchronized content is exported. This generates content archives that you can later import into one or more downstream Foreman servers. -
Export all future updates on the upstream Foreman server incrementally. This generates leaner content archives that contain only a recent set of updates. For example, if you enable and synchronize a new repository, the next exported content archive contains content only from the newly enabled repository.
-
-
-
On the downstream Foreman server, perform the following steps:
-
Bring the content exported from the upstream Foreman server over to the hard disk.
-
Place it inside a directory under
/var/lib/pulp/imports/. -
Import the content to an organization.
You can then manage content using content views or lifecycle environments as you require.
-
11.3.2. Using an upstream Foreman server to synchronize content view versions
Curate updates on the upstream Foreman server into content views and lifecycle environments, then export promoted content and import it on the downstream server that manages isolated infrastructure.
-
On the upstream Foreman server, perform the following steps:
-
Ensure that repositories are using the Immediate download policy in one of the following ways:
-
For existing repositories using On Demand, change their download policy on the repository details page to Immediate.
-
For new repositories, ensure that the Default Red Hat Repository download policy setting is set to Immediate before enabling Red Hat repositories, and that the Default download policy is set to Immediate for custom repositories.
-
Ensure that the Default download policy is set to Immediate for custom repositories.
-
-
Enable the content that you want to synchronize.
If you want to sync custom content, first create a product and then synchronize repositories.
-
Synchronize the enabled content:
-
For the first export, perform a
completeversion export on the content view version that you want to export. This generates content archives that you can import into one or more downstream Foreman servers. -
Export all future updates in the connected Foreman servers incrementally. This generates leaner content archives that contain changes only from the recent set of updates. For example, if your content view has a new repository, this exported content archive contains only the latest changes.
-
When you have new content, republish the content views that include this content before exporting the increment. This creates a new content view version with the appropriate content to export.
-
-
-
On the downstream Foreman server, perform the following steps:
-
Bring the content exported from the upstream Foreman server over to the hard disk.
-
Place it inside a directory under
/var/lib/pulp/imports/. -
Import the content to the organization that you want. This will create a content view version from the exported content archives and then import content appropriately.
-
11.3.3. Synchronizing a single repository
Export a single repository from the upstream Foreman server and import it on the downstream server when you need to synchronize only specific content between air-gapped servers.
-
On the upstream Foreman server, perform the following steps:
-
Ensure that the repository is using the Immediate download policy in one of the following ways:
-
For existing repositories using On Demand, change their download policy on the repository details page to Immediate.
-
For new repositories, ensure that the Default Red Hat Repository download policy setting is set to Immediate before enabling Red Hat repositories, and that the Default download policy is set to Immediate for custom repositories.
-
-
Enable the content that you want to synchronize.
If you want to sync custom content, first create a product and then synchronize product repositories.
-
Synchronize the enabled content:
-
On the first export, perform a
completerepository export so that all the synchronized content is exported. This generates content archives that you can later import into one or more downstream Foreman servers. -
Export all future updates on the upstream Foreman server incrementally. This generates leaner content archives that contain only a recent set of updates.
-
-
On the downstream Foreman server, perform the following steps:
-
Bring the content exported from the upstream Foreman server over to the hard disk.
-
Place it inside a directory under
/var/lib/pulp/imports/. -
Import the content to an organization.
You can then manage content using content views or lifecycle environments as you require.
-
11.4. Exporting content from Foreman server
When synchronizing content by using export and import, export the Library environment, content view versions, or individual repositories from the upstream Foreman server.
11.4.1. Exporting the Library environment
You can export all Library content for an organization to an archive file and recreate the same repositories on another Foreman server or organization.
The exported archive file contains the following data:
-
A JSON file containing content view version metadata.
-
An archive file containing all the repositories from the Library environment of the organization.
You can export the following content from Foreman server:
-
Ansible collections
-
Deb content
-
Docker content
-
Custom file type content
-
Kickstart repositories
-
Yum content
-
The export directory has enough free storage space to accommodate the export.
-
The
/var/lib/pulp/exports/directory has enough free storage space equivalent to the size of the repositories being exported for temporary files created during the export process. -
Download policy is set to Immediate for all repositories within the Library lifecycle environment you export.
-
Products that you export are synchronized to the required date.
-
The user exporting the content has the Content Exporter role.
-
Export the Library environment for your organization:
$ hammer content-export complete library --organization="My_Organization"
In many cases the exported archive might be several gigabytes in size. You might want to split it into chunks of a smaller size. You can use the
--chunk-size-gboption to split the export into smaller chunks, for example--chunk-size-gb=2to split the archive into 2 GB chunks. -
A new content view Export-Library is created in the organization. This content view contains all the repositories belonging to this organization. A new version of this content view is published and exported automatically.
-
Verify that the archive containing the exported version of a content view is located in the export directory:
# ls -lh /var/lib/pulp/exports/My_Organization/Export-Library/1.0/2021-03-02T03-35-24-00-00/
You need all three files, the
tar.gzarchive file, thetoc.jsonfile, and themetadata.jsonfile, to import the content successfully.
11.4.2. Exporting the Library environment in the syncable format
You can export content in the Library environment of an organization to a syncable format that you can use to create your custom CDN and synchronize the content from the custom CDN over HTTP/HTTPS.
You can use the generated content to create the same repository in another Foreman server or in another Foreman server organization by using content import. On import of the exported archive, a regular content view is created or updated on your importing Foreman server.
You can export the following content types in the syncable format from Foreman server:
-
Custom file type content
-
Kickstart repositories
-
Yum content
You cannot export Ansible collections, Deb content, or Docker content in the syncable format.
The export contains directories with the packages, listing files, and metadata of the repository in Yum format that can be used to synchronize in the importing Foreman server.
-
Exports are written to one of your allowed export paths. The default export path is
/var/lib/pulp/exports/. To configure additional paths, runforemanctl deploywith one or more--content-export-pathoptions. -
Download policy is set to Immediate for all repositories within the Library lifecycle environment you export.
-
Products that you export are synchronized to the required date.
-
The user exporting the content has the Content Exporter role.
-
Use the organization name or ID to export:
$ hammer content-export complete library \
--organization="My_Organization" \
--format=syncable
-
Optional: Verify that the exported content is located in the export directory:
# du -sh /var/lib/pulp/exports/My_Organization/Export-My_Repository/1.0/2021-03-02T03-35-24-00-00
11.4.3. Exporting the Library environment incrementally
You can export only Library content that changed since the last export to reduce archive size and system resource usage when full Library exports are too large.
Exporting Library content can be a very expensive operation in terms of system resources. Organizations that have multiple Enterprise Linux trees can occupy several gigabytes of space on Foreman server.
In such cases, you can create an incremental export which contains only pieces of content that have changed since the last export. Incremental exports typically result in smaller archive files than the full exports.
You can export the following content from Foreman server:
-
Ansible collections
-
Deb content
-
Docker content
-
Custom file type content
-
Kickstart repositories
-
Yum content
The example below shows incremental export of all repositories in the organization’s Library.
-
Create an incremental export:
$ hammer content-export incremental library \
--organization="My_Organization"
If you want to create a syncable export, add
--format=syncable. By default, Foreman creates an importable export.
-
Optional: View the exported data:
# find /var/lib/pulp/exports/My_Organization/Export-Library/
11.4.4. Exporting a content view version
You can export a content view version to an archive file and recreate the same version on another Foreman server. Foreman exports composite content views as regular content views.
The composite nature is not retained. On importing the exported archive, a regular content view is created or updated on your downstream Foreman server.
The exported archive file contains the following data:
-
A JSON file containing content view version metadata
-
An archive file containing all the repositories included into the content view version
You can export the following content from Foreman server:
-
Ansible collections
-
Deb content
-
Docker content
-
Custom file type content
-
Kickstart repositories
-
Yum content
Foreman does not export content view definitions and metadata such as package filters.
-
The export directory has enough free storage space to accommodate the export.
-
The
/var/lib/pulp/exports/directory has enough free storage space equivalent to the size of the repositories being exported for temporary files created during the export process. -
Download policy is set to Immediate for all repositories within the content view version you export.
-
Products that you export are synchronized to the required date.
-
The user exporting the content has the Content Exporter role.
-
List versions of the content view that are available for export:
$ hammer content-view version list \
--content-view="My_Content_View" \
--organization="My_Organization"
Note the version number that you want to export. In the following example, the version number is
1.0. -
Export the content view version:
$ hammer content-export complete version \
--content-view="Content_View_Name" \
--version=1.0 \
--organization="My_Organization"
In many cases, the exported archive might be several gigabytes in size. You might want to split it into smaller chunks of a smaller size. You can use the
--chunk-size-gboption to export the content view version into smaller chunks, for example--chunk-size-gb=2to split the archives into 2 GB chunks.
-
Verify that the archive containing the exported version of a content view is located in the export directory:
# ls -lh /var/lib/pulp/exports/My_Organization/Content_View_Name/1.0/2021-02-25T18-59-26-00-00/
You require all three files, the
tar.gzarchive file, thetoc.jsonfile, and themetadata.jsonfile, to import the content successfully.
11.4.5. Exporting a content view version in the syncable format
You can export a content view version in syncable format to serve from a custom CDN over HTTP/HTTPS or import on a matching Foreman version.
After you have exported the content view, you can do either of the following:
-
Synchronize the content from your custom CDN over HTTP/HTTPS.
-
Import the content using
hammer content-import. Note that this requires both the Export and Import servers to run Foreman nightly.
You can use the generated content to create the same repository in another Foreman server or in another Foreman server organization using content import. On importing the exported archive, a regular content view is created or updated on your downstream Foreman server. For more information, see Importing a content view version.
The export contains directories with the packages, listing files, and metadata of the repository in Yum format that can be used to synchronize in the importing Foreman server.
You can export the following content types in the syncable format from Foreman server:
-
Custom file type content
-
Kickstart repositories
-
Yum content
You cannot export Ansible collections, Deb content, or Docker content in the syncable format.
-
Exports are written to one of your allowed export paths. The default export path is
/var/lib/pulp/exports/. To configure additional paths, runforemanctl deploywith one or more--content-export-pathoptions. -
Download policy is set to Immediate for all repositories within the content view you export.
-
Products that you export are synchronized to the required date.
-
The user exporting the content has the Content Exporter role.
-
List versions of the content view that are available for export:
$ hammer content-view version list \
--content-view="My_Content_View_Name" \
--organization="My_Organization"
Note the version number that you want to export. In the following example, the version number is
1.0. -
Export the content view version in a syncable format:
$ hammer content-export complete version \
--content-view="My_Content_View_Name" \
--version=1.0 \
--organization="My_Organization" \
--format=syncable
-
Verify that the exported content is located in the export directory:
# ls -lh /var/lib/pulp/exports/My_Organization/My_Content_View_Name/1.0/2021-02-25T18-59-26-00-00/
11.4.6. Exporting a content view version incrementally
You can export only the content that changed in a content view version since the last export to reduce archive size when full exports are too resource-intensive.
Exporting complete content view versions can be a very expensive operation in terms of system resources. Content view versions that have multiple Enterprise Linux trees can occupy several gigabytes of space on Foreman server.
In such cases, you can create an incremental export which contains only pieces of content that have changed since the last export. Incremental exports typically result in smaller archive files than the full exports.
You can export the following content from Foreman server:
-
Ansible collections
-
Deb content
-
Docker content
-
Custom file type content
-
Kickstart repositories
-
Yum content
-
Create an incremental export:
$ hammer content-export incremental version \
--content-view="My_Content_View" \
--organization="My_Organization" \
--version="My_Content_View_Version"
If you want to create a syncable export, add
--format=syncable. By default, Foreman creates an importable export.
-
Optional: View the exported content view:
# find /var/lib/pulp/exports/My_Organization/My_Exported_Content_View/My_Content_View_Version/
-
You can import your exported content view version into Foreman server.
11.4.7. Exporting a repository
You can export a repository from the Library environment to an archive file and recreate the same repository on another Foreman server or organization.
You can export the following content from Foreman server:
-
Ansible collections
-
Deb content
-
Docker content
-
Custom file type content
-
Kickstart repositories
-
Yum content
The export contains the following data:
-
Two JSON files containing repository metadata.
-
One or more archive files containing the contents of the repository from the Library environment of the organization.
You need all the files, tar.gz, toc.json and metadata.json, to be able to import.
-
The export directory has enough free storage space to accommodate the export.
-
The
/var/lib/pulp/exports/directory has enough free storage space equivalent to the size of the repository that you export. -
Download policy is set to Immediate for the repository you export.
-
Products that you export are synchronized to the required date.
-
The user exporting the content has the Content Exporter role.
-
Export a repository:
$ hammer content-export complete repository \
--name="My_Repository" \
--product="My_Product" \
--organization="My_Organization"
NoteThe size of the exported archive depends on the number and size of the packages within the repository. If you want to split the exported archive into chunks, export your repository using the
--chunk-size-gbargument to limit the size by an integer value in gigabytes, for example--chunk-size-gb=2. -
Optional: Verify that the exported archive is located in the export directory:
# ls -lh /var/lib/pulp/exports/My_Organization/Export-My_Repository/1.0/2022-09-02T03-35-24-00-00/
11.4.8. Exporting a repository in the syncable format
You can export the content of a repository in the Library environment of an organization to a syncable format that you can use to create your custom CDN and synchronize the content from the custom CDN over HTTP/HTTPS.
You can use the generated content to create the same repository in another Foreman server or in another Foreman server organization using content import. On importing the exported archive, a regular content view is created or updated on your downstream Foreman server. For more information, see Importing a content view version.
The export contains directories with the packages, listing files, and metadata of the repository in Yum format that can be used to synchronize in the importing Foreman server.
You can export the following content types in the syncable format from Foreman server:
-
Custom file type content
-
Kickstart repositories
-
Yum content
You cannot export Ansible collections, Deb content, or Docker content in the syncable format.
-
Exports are written to one of your allowed export paths. The default export path is
/var/lib/pulp/exports/. To configure additional paths, runforemanctl deploywith one or more--content-export-pathoptions. -
Download policy is set to Immediate for the repository you export.
-
The user exporting the content has the Content Exporter role.
-
Export a repository using the repository name or ID:
$ hammer content-export complete repository \
--organization="My_Organization" \
--product="My_Product" \
--name="My_Repository" \
--format=syncable
-
Optional: Verify that the exported content is located in the export directory:
# du -sh /var/lib/pulp/exports/My_Organization/Export-My_Repository/1.0/2021-03-02T03-35-24-00-00
11.4.9. Exporting a repository incrementally
You can export only repository content that changed since the previous export to reduce archive size when full repository exports are too large.
Exporting a repository can be a very expensive operation in terms of system resources. A typical Enterprise Linux tree may occupy several gigabytes of space on Foreman server.
In such cases, you can use Incremental Export to export only pieces of content that changed since the previous export. Incremental exports typically result in smaller archive files than the full exports.
You can export the following content from Foreman server:
-
Ansible collections
-
Deb content
-
Docker content
-
Custom file type content
-
Kickstart repositories
-
Yum content
The example below shows incremental export of a repository in the Library lifecycle environment.
-
Create an incremental export:
$ hammer content-export incremental repository \
--name="My_Repository" \
--organization="My_Organization" \
--product="My_Product"
-
Optional: View the exported data:
# ls -lh /var/lib/pulp/exports/My_Organization/Export-My_Repository/3.0/2021-03-02T03-35-24-00-00/
total 172K
-rw-r--r--. 1 pulp pulp  20M Mar  2 04:22 export-436882d8-de5a-48e9-a30a-17169318f908-20210302_0422.tar.gz
-rw-r--r--. 1 pulp pulp  333 Mar  2 04:22 export-436882d8-de5a-48e9-a30a-17169318f908-20210302_0422-toc.json
-rw-r--r--. 1 root root  492 Mar  2 04:22 metadata.json
11.4.10. Exporting a repository incrementally in the syncable format
You can export only changed repository content in the syncable format to reduce transfer size when serving content from a custom CDN over HTTP/HTTPS.
Exporting a repository can be a very expensive operation in terms of system resources. A typical Enterprise Linux tree may occupy several gigabytes of space on Foreman server.
In such cases, you can use Incremental Export to export only pieces of content that changed since the previous export. Incremental exports typically result in smaller archive files than full exports.
You can export the following content types in the syncable format from Foreman server:
-
Custom file type content
-
Kickstart repositories
-
Yum content
You cannot export Ansible collections, Deb content, or Docker content in the syncable format.
The procedure below shows an incremental export of a repository in the Library lifecycle environment.
-
Exports are written to one of your allowed export paths. The default export path is
/var/lib/pulp/exports/. To configure additional paths, runforemanctl deploywith one or more--content-export-pathoptions.
-
Create an incremental export:
$ hammer content-export incremental repository \
--format=syncable \
--name="My_Repository" \
--organization="My_Organization" \
--product="My_Product"
-
Optional: View the exported data:
# find /var/lib/pulp/exports/Default_Organization/My_Product/2.0/2023-03-09T10-55-48-05-00/ -name "*.rpm"
11.4.11. Keeping track of your exports
Query and manage export records on the upstream Foreman server to organize incremental exports and track which content was exported to specific downstream servers.
-
Optional: Track the destinations of content exports. Use the
--destination-serverargument during export to indicate the target server. This option is available for allcontent-exportoperations.For example, specify the destination server when exporting a content view version:
$ hammer content-export complete version \
--content-view="My_Content_View_Name" \
--destination-server=My_Downstream_Server_1 \
--organization="My_Organization" \
--version=1.0
-
Query export records by listing the exports:
$ hammer content-export list \
--organization="My_Organization"
11.5. Importing exported content
When synchronizing content by using export and import, import exported content into the downstream Foreman server Library environment, content view versions, or individual repositories.
11.5.1. Importing exports in the syncable format
Import syncable exports from an allowed import path on your downstream Foreman server into the Library environment.
-
The syncable exports must be located in one of your allowed import paths. The default import paths are
/var/lib/pulp/imports/and/var/lib/pulp/sync_imports/. To configure additional paths, runforemanctl deploywith one or more--content-import-pathoptions. -
The importing organization must be configured to synchronize content through exports. For more information, see Configuring Foreman server to synchronize content through exports by using Foreman web UI.
-
Import the syncable exports into the Library environment of your organization:
$ hammer content-import library \
--organization="My_Organization" \
--path="My_Path_To_Syncable_Export"
11.5.2. Importing into the Library environment
You can import exported Library content into the Library environment of an organization on a downstream Foreman server.
-
The exported files must be in a directory under
/var/lib/pulp/imports. -
The importing organization must be configured to synchronize content through exports. For more information, see Configuring Foreman server to synchronize content through exports by using Foreman web UI.
-
If there are any Red Hat repositories in the exported content, the subscription manifest of the importing organization must contain subscriptions for the products contained within the export.
-
The user importing the content has the Content Importer role.
-
Copy the exported files to a subdirectory of
/var/lib/pulp/importson Foreman server where you want to import. -
Set the ownership of the import directory and its contents to
700:700:# chown -R 700:700 /var/lib/pulp/imports/2021-03-02T03-35-24-00-00/
The Pulp containers run as user ID
700and group ID700. The host does not require a namedpulpuser. -
Verify that the numeric ownership is set correctly:
# ls -lhn /var/lib/pulp/imports/2021-03-02T03-35-24-00-00/
-
Identify the Organization that you want to import into.
-
Import the Library content to Foreman server:
$ hammer content-import library \
--organization="My_Organization" \
--path=/var/lib/pulp/imports/2021-03-02T03-35-24-00-00/
You must specify the absolute path as in the example:
/var/lib/pulp/imports/2021-03-02T03-35-24-00-00/. Relative paths do not work. -
Verify that you imported the Library content by checking the contents of the product and repositories. A new content view called
Import-Libraryis created in the target organization. This content view is used to facilitate the Library content import.By default, this content view is not shown in the Foreman web UI.
Import-Libraryis not meant to be assigned directly to hosts. Instead, assign your hosts toDefault Organization Viewor another content view as you would normally.The importing Foreman server extracts the
/var/lib/pulp/importsdirectory to/var/lib/pulp/. -
Delete the import files after a successful import:
# rm -fr /var/lib/pulp/imports/2021-03-02T03-35-24-00-00/
11.5.3. Importing into the Library environment from a web server
You can import exported Library content directly from a web server into the Library environment on a downstream Foreman server when exports are in syncable format.
-
The exported files must be in the syncable format.
-
The exported files must be accessible through HTTP/HTTPS.
-
If there are any Red Hat repositories in the exported content, the subscription manifest of the importing organization must contain subscriptions for the products contained within the export.
-
The user importing the content has the Content Importer role.
-
Identify the Organization that you want to import into.
-
To import the Library content to Foreman server, enter the following command:
$ hammer content-import library \
--organization="My_Organization" \
--path=http://server.example.com/pub/exports/2021-02-25T21-15-22-00-00/
A new content view called
Import-Libraryis created in the target organization. This content view is used to facilitate the Library content import.By default, this content view is not shown in the Foreman web UI.
Import-Libraryis not meant to be assigned directly to hosts. Instead, assign your hosts toDefault Organization Viewor another content view.
11.5.4. Importing a content view version
You can import an exported content view version to recreate the same content in an organization on a downstream Foreman server.
When you import a content view version, it has the same major and minor version numbers and contains the same repositories with the same packages and errata. Custom repositories, products and content views are automatically created if they do not exist in the importing organization.
-
The exported files must be in a directory under
/var/lib/pulp/imports. -
The importing organization must be configured to synchronize content through exports. For more information, see Configuring Foreman server to synchronize content through exports by using Foreman web UI.
-
If there are any Red Hat repositories in the exported content, the subscription manifest of the importing organization must contain subscriptions for the products contained within the export.
-
The user importing the content view version has the Content Importer role.
-
Copy the exported files to a subdirectory of
/var/lib/pulp/importson Foreman server where you want to import. -
Set the ownership of the import directory and its contents to
700:700:# chown -R 700:700 /var/lib/pulp/imports/2021-02-25T21-15-22-00-00/
The Pulp containers run as user ID
700and group ID700. The host does not require a namedpulpuser. -
Verify that the numeric ownership is set correctly:
# ls -lhn /var/lib/pulp/imports/2021-02-25T21-15-22-00-00/
-
Import the content view version to Foreman server:
$ hammer content-import version \
--organization=My_Organization \
--path=/var/lib/pulp/imports/2021-02-25T21-15-22-00-00/
You must specify the absolute path as in the example:
/var/lib/pulp/imports/2021-02-25T21-15-22-00-00/. Relative paths do not work. -
Verify that you imported the content view version successfully by listing the content view versions for your organization:
$ hammer content-view version list \
--organization-id=My_Organization_ID
The importing Foreman server extracts the
/var/lib/pulp/importsdirectory to/var/lib/pulp/. -
Delete the import files after a successful import:
# rm -fr /var/lib/pulp/imports/2021-02-25T21-15-22-00-00/
11.5.5. Importing a content view version from a web server
You can import an exported content view version directly from a web server when the export is in syncable format and accessible over HTTP/HTTPS.
When you import a content view version, it has the same major and minor version numbers and contains the same repositories with the same packages and errata. Custom repositories, products, and content views are automatically created if they do not exist in the importing organization.
-
The exported files must be in a syncable format.
-
The exported files must be accessible through HTTP/HTTPS.
-
If there are any Red Hat repositories in the exported content, the importing organization’s manifest must contain subscriptions for the products contained within the export.
-
The user importing the content view version must have the Content Importer role.
-
Import the content view version into Foreman server:
$ hammer content-import version \
--organization=My_Organization \
--path=http://server.example.com/pub/exports/2021-02-25T21-15-22-00-00/
11.5.6. Importing a repository
You can import an exported repository into an organization on a downstream Foreman server to match content from the upstream server.
-
The exported files must be in a directory under
/var/lib/pulp/imports/. -
The importing organization must be configured to synchronize content through exports. For more information, see Configuring Foreman server to synchronize content through exports by using Foreman web UI.
-
If the export contains any Red Hat repositories, the subscription manifest of the importing organization must contain subscriptions for the products contained within the export.
-
The user importing the content has the Content Importer role.
-
Copy the exported files to a subdirectory of
/var/lib/pulp/importson Foreman server where you want to import. -
Set the ownership of the import directory and its contents to
700:700:# chown -R 700:700 /var/lib/pulp/imports/2021-03-02T03-35-24-00-00/
The Pulp containers run as user ID
700and group ID700. The host does not require a namedpulpuser. -
Verify that the numeric ownership is set correctly:
# ls -lhn /var/lib/pulp/imports/2021-03-02T03-35-24-00-00/
-
Identify the Organization that you want to import into.
-
Import the repository content into Foreman server:
$ hammer content-import repository \
--organization="My_Organization" \
--path=/var/lib/pulp/imports/2021-03-02T03-35-24-00-00/
You must specify the absolute path as in the example:
/var/lib/pulp/imports/2021-03-02T03-35-24-00-00. Relative paths do not work. -
Verify that you imported the repository by checking the contents of the product and repository. The importing Foreman server extracts the
/var/lib/pulp/importsdirectory to/var/lib/pulp/. -
Delete the import files after a successful import:
# rm -fr /var/lib/pulp/imports/2021-03-02T03-35-24-00-00/
11.5.7. Importing a repository from a web server
You can import an exported repository directly from a web server when the export is in syncable format and accessible over HTTP/HTTPS.
-
The exported files must be in a syncable format.
-
The exported files must be accessible through HTTP/HTTPS.
-
If the export contains any Red Hat repositories, the subscription manifest of the importing organization must contain subscriptions for the products contained within the export.
-
The user importing the content has the Content Importer role.
-
Select the organization into which you want to import.
-
Import the repository to Foreman server:
$ hammer content-import repository \
--organization="My_Organization" \
--path=http://server.example.com/pub/exports/2021-02-25T21-15-22-00-00/
11.6. Hammer CLI cheat sheet for exporting and importing content
Use these Hammer CLI commands as a quick reference when exporting and importing content between Foreman servers.
| Intent | Command |
|---|---|
Fully export an Organization’s Library |
|
Incrementally export an Organization’s Library (assuming you have exported something previously) |
|
Fully export a content view version |
|
Export a content view version promoted to the Dev Environment |
|
Export a content view in smaller chunks (2-GB slabs) |
|
Incrementally export a content view version (assuming you have exported something previously) |
|
Fully export a Repository |
|
Incrementally export a Repository (assuming you have exported something previously) |
|
List exports |
|
| Intent | Command |
|---|---|
Import into an Organization’s Library |
|
Import to a content view version |
|
Import a Repository |
|
12. Managing activation keys
Activation keys automate host configuration during registration to Foreman by assigning content view environments and enabling repositories. Create and configure your activation keys to scale consistent content access across many hosts.
You can use activation keys during host registration to improve the speed, simplicity and consistency of the process. Note that activation keys are used only when hosts are registered. If changes are made to an activation key, it is applicable only to hosts that are registered with the amended activation key in the future. The changes are not made to existing hosts.
Activation keys can define the following properties for hosts:
-
Available products and repositories
-
Content view environments
-
Host collection membership
-
System purpose
- Content view conflicts between host creation and registration
-
When you provision a host, Foreman uses provisioning templates and other content from the content view that you set in the host group or host settings. When the host is registered, the content view environments from the activation key overwrite the original content view from the host group or host settings. Then Foreman uses the content view environments from the activation key for every future task, for example, rebuilding a host.
When you rebuild a host, ensure that you set the content view that you want to use in the activation key and not in the host group or host settings.
- Using multiple activation keys with a host
-
A host can be associated with multiple activation keys that are combined to define the host settings. In case of conflicting settings, the last specified activation key takes precedence. You can specify the order of precedence by setting a host group parameter as follows:
$ hammer hostgroup set-parameter \
--hostgroup "My_Host_Group" \
--name "My_Activation_Key" \
--value "name_of_first_key", "name_of_second_key", ...
12.1. Best practices for activation keys
Plan dedicated activation keys per use case, use descriptive names, and automate key management with Hammer or Ansible to keep host content modular and consistent.
-
Create an activation key for each use case. This structures, modularizes, and simplifies content management on hosts.
-
Use a naming convention for activation keys to indicate the content and lifecycle environment, for example,
enterprise-linux-webserver. -
Automate activation key management by using a Hammer script or an Ansible Playbook.
12.2. Creating an activation key by using Foreman web UI
Create an activation key and associate content view environments and repository overrides for host registration.
-
In the Foreman web UI, navigate to Content > Lifecycle > Activation Keys.
-
Click Create Activation Key.
-
In the Name field, enter the name of the activation key.
-
If you want to set a limit, clear the Unlimited hosts checkbox, and in the Limit field, enter the maximum number of systems you can register with the activation key. If you want unlimited hosts to register with the activation key, ensure the Unlimited Hosts checkbox is selected.
-
Optional: In the Description field, enter a description for the activation key.
-
On the Content view environments card, click Assign content view environments.
-
Select a lifecycle environment.
-
Select a content view.
-
Optional: Click Assign another content view environment to assign additional content view environments to the activation key.
-
Optional: Drag and drop the content view environments to change the order of the content view environments.
-
Click Save to save the content view environments.
-
Click Save to save the activation key.
-
Optional: In the System Purpose section, you can configure the activation key to set system purpose attributes on hosts during registration. This helps determine which repositories are available on the host. It also helps with reporting in the Subscriptions service of the Red Hat Hybrid Cloud Console.
-
On the Repository Sets tab, override repositories to Enabled or Disabled as desired. For more information, see Enabling and disabling repositories on activation key.
-
Optional: On the Host Collections tab, click Add to view a list of available host collections. Select your host collection and click Add Selected. This ensures that hosts become part of your host collection during the host registration process.
12.3. Creating an activation key by using Hammer CLI
Create an activation key and associate content view environments and repository overrides for host registration.
-
Create the activation key:
$ hammer activation-key create \
--name "My_Activation_Key" \
--unlimited-hosts \
--description "Example Stack in the Development Environment" \
--content-view-environments "Development/Stack" \
--organization "My_Organization"
-
Optional: Configure the activation key with system purpose attributes to set on hosts during registration. This helps determine which repositories are available on the host. It also helps with reporting in the Subscriptions service of the Red Hat Hybrid Cloud Console.
$ hammer activation-key update \
--organization "My_Organization" \
--name "My_Activation_Key" \
--service-level "Standard" \
--purpose-usage "Development/Test" \
--purpose-role "Red Hat Enterprise Linux Server"
-
List the product content associated with the activation key:
$ hammer activation-key product-content \
--content-access-mode-all true \
--name "My_Activation_Key" \
--organization "My_Organization"
-
Override the default auto-enable status for the Foreman Client repository:
$ hammer activation-key content-override \
--name "My_Activation_Key" \
--content-label "My_Content_Label" \
--value 1 \
--organization "My_Organization"
For a repository, the content label consists of your organization label, product label, and repository label split by underscores. For example,
Example_Foreman_Client_Enterprise_Linux_9. For content from Red Hat, the content label is taken from the Red Hat manifest. For example,rhel-10-for-x86_64-baseos-rpms.The default status is set to disabled.
-
Optional: Assign a host collection to your activation key:
$ hammer activation-key add-host-collection \
--host-collection-id My_Host_Collection_ID \
--id _My_Activation_Key_ID \
--organization-id _My_Organization_ID
This ensures that hosts become part of your host collection during the host registration process.
12.4. Setting the service level by using Foreman web UI
Configure an activation key to set the default subscription service level that hosts inherit when they register with the activation key.
|
Note
|
You can only select a Premium service level if your Red Hat manifest contains premium support for any Red Hat products. |
-
In the Foreman web UI, navigate to Content > Lifecycle > Activation Keys.
-
Click the activation key name you want to edit.
-
Click the edit icon next to Service Level.
-
Select the required service level from the list. The list only contains service levels available to the activation key.
-
Click Save.
12.5. Setting the service level by using Hammer CLI
Configure an activation key to set the default subscription service level that hosts inherit when they register with the activation key.
|
Note
|
You can only select a Premium service level if your Red Hat manifest contains premium support for any Red Hat products. |
-
Set the service level to Premium on your activation key:
$ hammer activation-key update \
--name "My_Activation_Key" \
--organization "My_Organization" \
--service-level premium
12.6. Enabling and disabling repositories on activation key
Override repository set status on an activation key to control which repositories are enabled when hosts register with the activation key.
-
In the Foreman web UI, navigate to Content > Lifecycle > Activation Keys.
-
Select an activation key.
-
Select the Repository Sets tab.
-
Optional: Clear the Limit to Environment checkbox to view repositories that are available in the lifecycle environment of the activation key.
-
Optional: Use the Repository type dropdown menu to filter repositories by type.
-
Optional: Use the Status dropdown menu to filter repositories by status.
-
Select the desired repositories or click the Select All checkbox to select all repositories.
-
From the Select Action list, select Override to Enabled, Override to Disabled, or Reset to Default.
12.7. Activation keys and host registration
Use activation keys during provisioning or when registering existing Enterprise Linux hosts to apply subscription and content settings automatically.
|
Note
|
The |
You can use multiple activation keys when registering a host. For example, you can use one activation key to enable specific repositories and another to assign content view environments.
If there are conflicting settings in activation keys, the rightmost key takes precedence.
-
Settings that conflict: Service Level, Release Version, Environment, Content View, and Product Content.
-
Settings that do not conflict and the host gets the union of them: Host Collections.
-
Settings that influence the behavior of the key itself and not the host configuration: Content Host Limit.
12.8. Multiple activation keys and content view environments
When you register a host with multiple activation keys, Foreman merges their settings and resolves conflicts by key order and the Allow multiple content views setting.
When multiple activation keys assign the same attributes, Foreman decides how to resolve conflicts. In general, the host receives the union of non-conflicting settings and the setting from the last activation key for conflicting settings.
Conflicting settings, where the setting from the last activation key wins, include:
-
System purpose attributes
-
Release version
Non-conflicting settings, where the host receives the union of them, include:
-
Host collections
Activation key behavior regarding multiple content view environments depends on the Allow multiple content views setting. If you enable Allow multiple content views, content view environments are treated as non-conflicting. If you disable Allow multiple content views, content view environments are considered conflicting.
When you enable Allow multiple content views and register a host with multiple activation keys, the host receives all content view environments from each activation key, in the order they are passed.
Assuming that:
-
Activation key
ak_multiassigns content view environmentsdev/cv2,dev/cv3. -
Activation key
ak4assigns content view environmentsdev/cv4.
A host registered with activation keys ak_multi and ak4 receives content view environments dev/cv2, dev/cv3, and dev/cv4.
If the order is reversed, with ak4 followed by ak_multi, the host receives content view environments dev/cv4, dev/cv2, and dev/cv3.
When you disable Allow multiple content views and register a host with multiple activation keys, the host receives the content view environments from the last activation key with any content view environments. If any of the activation keys is a multi-environment activation key, registration fails with an error, regardless of the order.
Assuming that:
-
Activation key
ak_multiassigns content view environmentsdev/cv2,dev/cv3. -
Activation key
ak4assigns content view environmentdev/cv4. -
Activation key
ak5assigns content view environmentdev/cv5. -
Activation key
ak_noneassigns no content view environments.
If you attempt to register a host with activation keys ak_multi, ak4, registration fails because ak_multi is a multi-environment activation key.
If you register a host with activation keys ak4, ak5, the host receives dev/cv5, as ak5 is the last activation key with content view environments.
If you register a host with activation keys ak4, ak5, ak_none, the host receives dev/cv5 because ak5 is the last activation key with content view environments.
If you register a host with activation keys ak5, ak4, the host receives dev/cv4, as ak4 is the last activation key with content view environments.
12.9. Assigning content view environments to an activation key by using Foreman web UI
Assign content view environments to an activation key so registered hosts receive content from the content view environments you specify, in the order you define.
-
If you want to assign multiple content view environments, the Allow multiple content views setting must be enabled.
-
You have created an activation key.
-
In the Foreman web UI, navigate to Content > Lifecycle > Activation Keys.
-
Click the name of the activation key to which you want to assign content view environments.
-
On the the Content view environments card, click Assign content view environments.
-
Select a lifecycle environment.
-
Select a content view.
-
Optional: Click Assign another content view environment to assign additional content view environments to the activation key.
-
Optional: Drag and drop the content view environments to change the order of the content view environments.
-
Click Save.
-
The Details tab of the activation key displays the assigned content view environments in order.
12.10. Assigning content view environments to an activation key by using Hammer CLI
Assign content view environments to an activation key so registered hosts receive content from the content view environments you specify, in the order you define.
-
If you want to assign multiple content view environments, the Allow multiple content views setting must be enabled.
-
You have created an activation key.
-
Display the available content view environments to obtain their labels or IDs:
$ hammer content-view-environment list
-
Assign content view environments to an activation key:
-
By using their labels:
$ hammer activation-key update \
--id My_Activation_Key_ID \
--organization-id My_Organization_ID \
--content-view-environments "My_env1/My_cv1,My_env2/My_cv2"
-
By using their IDs:
$ hammer activation-key update \
--id My_Activation_Key_ID \
--organization-id My_Organization_ID \
--content-view-environment-ids [My_content_view_env_ID_1, My_content_view_env_ID_2]
-
12.11. Removing all content view environments from an activation key
Remove all content view environments from an activation key when you need to clear assignments before reconfiguring the activation key.
-
Remove all content view environments from the activation key by passing an empty array:
$ hammer activation-key update \
--content-view-environment-ids [] \
--name My_Activation_Key \
--organization-id My_Organization_ID
-
Remove all content view environments from an activation key by passing an empty string:
$ hammer activation-key update \
--content-view-environments "" \
--name My_Activation_Key \
--organization-id My_Organization_ID
13. Making errata available through content views
Use content views to manage how errata reach your hosts. Inspect synchronized advisories, filter what is published, and create incremental updates when errata are applicable but not yet installable.
There are three types of advisories, listed in order of importance:
- Security Advisory
-
Describes fixed security issues found in the package. The severity of the issue can be Low, Moderate, Important, or Critical.
- Bug Fix Advisory
-
Describes bug fixes for the package.
- Product Enhancement Advisory
-
Describes enhancements and new features added to the package.
Errata are labeled according to the most important advisory type they contain. Therefore, errata labeled as Product Enhancement Advisory can contain only enhancement updates, while Bug Fix Advisory errata can contain both bug fixes and enhancements, and Security Advisory can contain all three types.
Red Hat Enterprise Linux users receive errata for each release of official Red Hat RPMs. openSUSE/SUSE Linux Enterprise Server users receive errata for each release of official SUSE RPMs.
For Red Hat Enterprise Linux, Foreman imports errata information when synchronizing repositories from the Red Hat Content Delivery Network (CDN). For openSUSE/SUSE Linux Enterprise Server, Foreman imports errata information when synchronizing repositories from the SUSE Customer Center. For AlmaLinux and Rocky Linux, Foreman imports errata information when synchronizing repositories from the upstream repositories.
In Foreman, there are two keywords that describe the relationship of an erratum to hosts:
- Applicable
-
An erratum that applies to one or more hosts, which means it has updates for packages present on the host. Although these errata apply to hosts, until their state changes to Installable, the errata are not ready to be installed. Publish incremental content views to make applicable errata installable. Installable errata are always applicable.
- Installable
-
An erratum that applies to one or more hosts and is ready to be installed on the host. Installable errata are available to a host from its associated content view environments, but are not yet installed.
13.1. Best practices for errata
Apply these recommendations when managing errata so you patch security issues in a frozen set of content without unnecessarily updating unaffected packages.
-
Use errata to add patches for security issues to a frozen set of content without unnecessarily updating other unaffected packages.
-
Automate errata management by using a Hammer script or an Ansible Playbook.
-
Check the host details page to compare errata between the current content view environments and the Library content view environment, which contains the latest synchronized packages.
You can only apply errata included in the content view version of the lifecycle of your host. You can view applicable errata as a recommendation to create an incremental content view to provide errata to hosts. For more information, see Adding errata to an incremental content view by using Foreman web UI.
13.2. Errata email notifications
Configure email notifications in Foreman to receive summaries of applicable and installable errata, alerts after repository synchronization, and updates when content views are promoted.
13.3. Inspecting available errata by using Foreman web UI
View and filter available errata to find applicable or installable updates and review advisory metadata before promoting content or patching hosts.
-
In the Foreman web UI, navigate to Content > Content Types > Errata to view the list of available errata.
-
Use the filtering tools at the top of the page to limit the number of displayed errata:
-
Select the repository to be inspected from the list. All Repositories is selected by default.
-
The Applicable checkbox is selected by default to view only applicable errata in the selected repository. Select the Installable checkbox to view only errata marked as installable.
-
To search the table of errata, type the query in the Search field in the form of:
parameter operator value
Automatic suggestion works as you type. You can also combine queries with the use of and and or operators. For example, to display only security advisories related to the kernel package, type:
type = security and package_name = kernel
Press Enter to start the search.
-
-
Click the Errata ID of the erratum you want to inspect:
-
The Details tab contains the description of the updated package as well as documentation of important fixes and enhancements provided by the update.
-
On the Content Hosts tab, you can install installable errata on selected hosts.
-
The Repositories tab lists repositories that already contain the erratum. You can filter repositories by the environment and content view, and search for them by the repository name.
-
13.4. Inspecting available errata by using Hammer CLI
View and filter available errata to find applicable or installable updates and review advisory metadata before promoting content or patching hosts.
-
View errata that are available for all organizations:
$ hammer erratum list
-
View details of a specific erratum:
$ hammer erratum info --id erratum_ID
-
Search errata by entering the query with the
--searchoption. For the list of parameters available for search, see Parameters available for errata search. For example, search for applicable errata for the selected product that contains the specified bugs ordered so that the security errata are displayed on top:$ hammer erratum list \ --product-id 7 \ --search "bug = 1213000 or bug = 1207972" \ --errata-restrict-applicable 1 \ --order "type desc"
13.5. Creating a content view filter for errata by using Foreman web UI
Control which errata are published with a content view, so you can keep production systems at a known patch level while testing newer updates separately.
You can use content filters to limit errata by ID, date range, or type such as security, bug fix, or enhancement updates. For example, exclude errata after a certain date in production while you test compatibility of newer packages in a separate lifecycle environment.
-
You have created a content view with the repositories that contain the required errata. For more information, see Creating a content view by using Foreman web UI.
-
In the Foreman web UI, navigate to Content > Lifecycle > Content Views.
-
Select a content view that you want to use for applying errata.
-
On the Filters tab, click Create Filter.
-
In the Name field, enter
Errata Filter. -
From the Content Type list, select Errata – by date range.
-
Select Exclude filter.
-
Optional: In the Description field, enter
Exclude errata items from YYYY-MM-DD. -
Click Create filter.
-
For Errata Type, select the checkboxes of errata types you want to exclude. For example, select the Enhancement and Bugfix checkboxes and clear the Security checkbox to exclude enhancement and bugfix errata after certain date, but include all the security errata.
-
For Date Type, select one of two checkboxes:
-
Updated from for the date of the last update of the erratum.
-
Issued from for the issued date of the erratum.
-
-
Select the Start Date to exclude all errata on or after the selected date.
-
Leave the End Date field blank.
-
Click Save.
-
Click Publish New Version to publish the resulting repository.
-
Enter
Adding errata filterin the Description field. -
Click Save.
When the content view completes publication, notice the Content column reports a reduced number of packages and errata from the initial repository. This means the filter successfully excluded the all non-security errata from the last year.
-
Click the Versions tab.
-
Click Promote to the right of the published version.
-
Select the environments you want to promote the content view version to.
-
In the Description field, enter the description for promoting.
-
Click Promote Version to promote this content view version across the required environments.
13.6. Creating a content view filter for errata by using CLI
Control which errata are published with a content view, so you can keep production systems at a known patch level while testing newer updates separately.
-
Create a filter for the errata:
$ hammer content-view filter create \
--content-view "My_Content_View" \
--description "Exclude errata items from the YYYY-MM-DD" \
--name "My_Filter_Name" \
--organization "My_Organization" \
--type "erratum"
-
Create a filter rule to exclude all errata on or after a Start Date:
$ hammer content-view filter rule create \
--content-view "My_Content_View" \
--content-view-filter="My_Content_View_Filter" \
--organization "My_Organization" \
--start-date "YYYY-MM-DD" \
--types=security,enhancement,bugfix
-
Publish the content view:
$ hammer content-view publish \
--name "My_Content_View" \
--organization "My_Organization"
-
Promote the content view to the lifecycle environment so that the included errata are available to that lifecycle environment:
$ hammer content-view version promote \
--content-view "My_Content_View" \
--organization "My_Organization" \
--to-lifecycle-environment "My_Lifecycle_Environment"
13.7. Adding errata to an incremental content view by using Foreman web UI
Create an incremental content view version when errata are applicable but not installable, so you can publish the updates and make them available to hosts.
|
Important
|
If your content view version is old, you might encounter incompatibilities when incrementally adding enhancement errata. This is because enhancements are typically designed for the most current software in a repository. |
-
In the Foreman web UI, navigate to Content > Content Types > Errata.
-
From the Errata list, click the name of the errata that you want to apply.
-
Select the hosts that you want to apply the errata to, and click Apply to Hosts. This creates the incremental update to the content view.
-
Optional: Select the Enable dependency solving checkbox to include package dependencies in the incremental update. This significantly increases publish time. For more information, see Dependency solving for content views.
-
If you want to apply the errata to the host, select the Apply Errata to Content Hosts immediately after publishing checkbox.
-
Click Confirm to apply the errata.
13.8. Adding errata to an incremental content view by using Hammer CLI
Create an incremental content view version when errata are applicable but not installable, so you can publish the updates and make them available to hosts.
|
Important
|
If your content view version is old, you might encounter incompatibilities when incrementally adding enhancement errata. This is because enhancements are typically designed for the most current software in a repository. |
-
List the errata and its corresponding IDs:
$ hammer erratum list
-
List the different content-view versions and the corresponding IDs:
$ hammer content-view version list
-
Apply a single erratum to content-view version. You can add more IDs in a comma-separated list.
$ hammer content-view version incremental-update \
--content-view-version-id My_Content_View_Version_ID \
--errata-ids My_Erratum_ID_1,My_Erratum_ID_2
13.9. Adding errata to an incremental content view by using MCP
Use your AI application with the MCP server to create an incremental content view update when errata are applicable but not yet installable on your hosts.
|
Warning
|
Review the output generated by AI before using it in production. |
|
Important
|
The MCP server for Foreman is a Technology Preview feature only. Technology Preview features are not supported by Foreman community. Foreman community does not recommend using them in production. These features provide early access to upcoming product features, enabling customers to test functionality and provide feedback during the development process. |
-
Allow the MCP server to trigger content view actions:
$ podman run --interactive --tty --publish 127.0.0.1:8080:8080 \
  --volume Path_to_My_CA_Bundle:/app/ca.pem:ro,Z \
  quay.io/foreman/foreman-mcp-server:latest \
  --foreman-url https://foreman.example.com \
  --allowed-cv-actions "incremental_update"
For more information, see Deploying the MCP server for Foreman in Managing hosts.
-
Type a prompt in your AI application to list applicable errata:
Show a list of applicable errata on my Foreman. -
The MCP server will return a list of applicable errata to the AI application. Review the information.
-
The Foreman MCP server provides a prompt named
Add Errata to Content Views, which you can use to perform an incremental update of a content view. Refer to the documentation of your AI application to find more about how to use MCP server prompts. Review all the steps that the AI application performs.
|
Important
|
Foreman community recommends disabling and not using phased updates on hosts running Ubuntu. Phased updates obstruct Foreman from managing content on hosts. If enabled, Foreman cannot ensure updates and errata are deployed as intended to all hosts running Ubuntu. |
13.10. Disabling phased updates
Disable phased updates on Ubuntu hosts during provisioning or on existing systems so Foreman can install all package and security updates as intended.
-
On your host running Ubuntu, ensure that
aptis configured to always include all updates.-
You can disable phased updates during provisioning by adding the following section to your provisioning template:
<% if @host.operatingsystem.name == 'Ubuntu' -%> <%# Disable phased updates on Ubuntu -%> cat << EOF >/etc/apt/apt.conf.d/98phased-updates APT::Get::Always-Include-Phased-Updates "true"; EOF <% end -%> -
You can disable phased updates on hosts by using the Disable Phased Updates - SSH Default template.
-
13.11. Creating an incremental content view version by adding Deb packages
Add Deb packages to a content view version as an incremental update when you need to make specific packages installable on Debian/Ubuntu hosts.
To add errata to a content view version instead, see Adding errata to an incremental content view by using Foreman web UI.
-
Search for your lifecycle environment IDs:
$ hammer lifecycle-environment list
-
Search for your Deb package IDs:
$ hammer deb-package list --search "My_Search_Pattern"
-
List all available content views:
$ hammer content-view list
-
View information of the content view that you want to add packages to:
$ hammer content-view info --id My_Content_View_ID
-
Create an incremental content view version by adding Deb packages:
$ hammer content-view version incremental-update \
--content-view-version-id My_Content_View_Version_ID \
--debs My_Deb_Package_Name \
--lifecycle-environment-ids My_Lifecycle_Environment_ID
You can add multiple Deb package names in a comma-separated list.
13.12. Dependency resolution limitations for incremental errata updates
Incremental content view updates do not use dependency solving by default. If dependency solving is enabled for an incremental update, Foreman might pull newer dependency versions that conflict with packages already in the repository.
When a repository update becomes available with a new dependency and dependency solving is enabled, Foreman retrieves the newest version of the package to solve the dependency, even if there are older versions available in the existing repository package. This can create further dependency resolution problems when installing packages.
A repository on your client has the package example_repository-1.0 with the dependency example_repository-libs-1.0.
The repository also has another package example_tools-1.0.
A security erratum becomes available with the package example_tools-1.1.
The example_tools-1.1 package requires the example_repository-libs-1.1 package as a dependency.
After an incremental content view update, the example_tools-1.1, example_tools-1.0, and example_repository-libs-1.1 are now in the repository.
The repository also has the packages example_repository-1.0 and example_repository-libs-1.0.
Note that the incremental update to the content view did not add the package example_repository-1.1.
Because you can install all these packages by using the package manager of your host, no potential problem is detected.
However, when the client installs the example_tools-1.1 package, a dependency resolution problem occurs because both example_repository-libs-1.0 and example_repository-libs-1.1 cannot be installed.
There is currently no workaround that guarantees full dependency resolution. You can enable dependency solving for incremental updates, but this is a best-effort mechanism that significantly increases publish time and can introduce unwanted packages. The larger the time frame, and minor Y releases between the base set of packages and the errata being applied, the higher the chance of a problem with dependency resolution.
13.13. Parameters available for errata search
Use these parameters to search and filter errata by advisory ID, CVE, package name, severity, type, and issue or update date.
| Parameter | Description | Example |
|---|---|---|
bug |
Search by the Bugzilla number. |
bug = 1172165 |
cve |
Search by the CVE number. |
cve = CVE-2015-0235 |
id |
Search by the errata ID. The auto-suggest system displays a list of available IDs as you type. |
id = RHBA-2014:2004 |
issued |
Search by the issue date. You can specify the exact date, like "Feb16,2015", or use keywords, for example "Yesterday", or "1 hour ago". The time range can be specified with the use of the "<" and ">" operators. |
issued < "Jan 12,2015" |
package |
Search by the full package build name. The auto-suggest system displays a list of available packages as you type. |
package = glib2-2.22.5-6.el6.i686 |
package_name |
Search by the package name. The auto-suggest system displays a list of available packages as you type. |
package_name = glib2 |
severity |
Search by the severity of the issue fixed by the security update. Specify Critical, Important, or Moderate. |
severity = Critical |
title |
Search by the advisory title. |
title ~ openssl |
type |
Search by the advisory type. Specify security, bugfix, or enhancement. |
type = bugfix |
updated |
Search by the date of the last update.
You can use the same formats as with the |
updated = "6 days ago" |
14. Managing OSTree content
You can use OSTree to manage bootable, immutable, versioned file system trees.
OSTree makes it easy to install and update Linux-based operating systems on hosts and to switch between versions of operating systems on hosts. If a host update fails, you can easily revert the operating system on the host to the previous working version.
You can create an OSTree image by using an image builder and expose it in an OSTree repository on an HTTP server. Then you can use your Foreman to synchronize and manage OSTree branches from the exposed OSTree repository.
14.1. Enabling OSTree content
You can enable OSTree on your Foreman to synchronize and manage OSTree branches from the exposed OSTree repository.
-
On your Foreman server, enable OSTree content:
# foremanctl deploy --add-feature content/ostree
14.2. Importing OSTree content by using Foreman web UI
You can import and synchronize OSTree content from custom online sources over HTTPS by using Foreman web UI.
-
A published HTTP location, known as an upstream URL, for the OSTree to import.
-
In the Foreman web UI, navigate to Content > Products and click Create Product.
-
In the Name field, enter a name for your OSTree content. This automatically populates the Label field.
-
Optional: From the GPG Key list, select the GPG key for the product.
-
Optional: From the SSL CA Cert list, select the SSL CA certificate for the product.
-
Optional: From the SSL Client Cert list, select the SSL client certificate for the product.
-
Optional: From the SSL Client Key list, select the SSL client key for the product.
-
Optional: From the Sync Plan list, select an existing sync plan or click Create Sync Plan and create a sync plan for your product requirements.
-
Optional: In the Description field, enter a description of the product.
-
Click Save.
-
When the product creation completes, click New Repository.
-
In the Name field, enter a name for the repository. This automatically populates the Label field.
-
From the Type list, select
ostree. -
In the Upstream URL field, enter the URL of the external repository to use as a source. For example
http://www.example.com/rpm-ostree/. -
Optional: Select the Verify SSL checkbox if you want to verify that the upstream repository’s SSL certificates are signed by a trusted CA.
-
In the Upstream Username field, enter the user name for the upstream repository if required for authentication. Clear this field if the repository does not require authentication.
-
In the Upstream Password field, enter the corresponding password for the upstream repository.
-
In the Upstream Authentication Token field, enter the corresponding token for the upstream repository.
-
Optional: In the Exclude Refs field, enter a list of OSTree head refs separated with commas to exclude from importing to Foreman. The excludes are evaluated after the includes.
-
Optional: In the Include Refs field, enter a list of OSTree head refs separated with commas to include in importing to Foreman. For example
fedora/x86_64/coreos/stable. -
Optional: In the Depth field, enter the number of commits to traverse.
-
From the Mirroring Policy menu, select one of the following policies to mirror OSTree content for this repository:
-
Additive – new content available during sync will be added to the repository, and no content will be removed.
-
Mirror Content Only – any new content available during sync will be added to the repository and any content removed from the upstream repository will be removed from the local repository.
-
-
Optional: In the HTTP Proxy Policy field, select an HTTP proxy.
-
Optional: Disable the Unprotected checkbox to require a subscription entitlement certificate for accessing the published repository.
-
Optional: In the SSL CA Cert field, select the SSL CA Certificate for the repository.
-
Optional: In the SSL Client cert field, select the SSL Client Certificate for the repository.
-
Optional: In the SSL Client Key field, select the SSL Client Key for the repository.
-
Click Save.
-
When the repository creation completes, select the new repository and click Sync Now to start the synchronization process.
-
To view the synchronization status, navigate to Content > Sync Status and expand the entry that you want to view.
14.3. Importing OSTree content by using Hammer CLI
You can import and synchronize OSTree content from custom online sources over HTTPS by using Hammer CLI.
-
A published HTTP location, known as an upstream URL, for the OSTree to import.
-
Create a product for your OSTree content:
$ hammer product create \
--name "OSTree" \
--sync-plan "Example_Plan" \
--description "OSTree Content" \
--organization "My_Organization"
-
Create the repository for the OSTree:
$ hammer repository create \
--name "OSTree" \
--content-type "ostree" \
--url "http://www.example.com/rpm-ostree/" \
--product "OSTree Content" \
--organization "My_Organization"
-
Synchronize the repository:
$ hammer repository synchronize \
--name "OSTree" \
--product "OSTree Content" \
--organization "My_Organization"
14.4. Uploading OSTree content by using Hammer CLI
In deployments in which the Foreman server does not have internet access, you can upload OSTree image archives using Hammer CLI.
You can create images using the Image Builder or OSBuild tool.
You can also create an OSTree image archive by downloading a repository from an upstream URL, such as:
$ wget --no-parent -r https://repos.example.com/ostree/repo_name/
$ tar --exclude="index.html" -cvf "example_archive_repo.tar" -C repos.example.com/ostree "repo_name"
-
You have an OSTree image archive ready and present on your file system.
-
On your Foreman server, upload your OSTree archive:
$ hammer repository upload-content \
--content-type ostree_ref \
--id My_Repository_id \
--ostree-repository-name My_Repository_Name \
--path /path/to/image/file.tar
The value of
--ostree-repository-namemust match the name of the OSTree repository in the archive.
14.5. Managing OSTree content with content views by using Foreman web UI
Use content views to manage OSTree branches across the application lifecycle by using Foreman web UI. This process uses the same publication and promotion method as RPMs or Puppet modules.
-
You have created a product and added an OSTree repository to it.
-
In the Foreman web UI, navigate to Content > Lifecycle > Content Views.
-
Click Create content view.
-
In the Name field, enter a plain text name for the view. This automatically populates the Label field.
-
In the Description field, enter a description of the OSTree content view.
-
If you want to use a composite content view, select the Composite View checkbox.
-
Optional: If you want to solve dependencies automatically every time you publish this content view, select the Solve Dependencies checkbox. Dependency solving slows the publishing time and might ignore any content view filters you use.
-
Click Save to complete.
-
Navigate to the Repositories tab.
-
Select the OSTree repository that you want to use. Click Add Repository to add the OSTree content from this repository to the content view.
-
Click Publish new version.
-
Optional: In the Description field, enter a description for the version.
-
Optional: Enable the Promote switch to promote this content view across environments in the application lifecycle.
-
Click Next.
-
Review details and click Finish.
14.6. Managing OSTree content with content views by using Hammer CLI
Use content views to manage OSTree branches across the application lifecycle by using Hammer CLI. This process uses the same publication and promotion method as RPMs or Puppet modules.
-
You have created a product and added an OSTree repository to it.
-
Obtain a list of repository IDs:
$ hammer repository list --organization "My_Organization"
-
Create the content view and add the repository:
$ hammer content-view create \
--name "OSTree" \
--description "Example content view for the OSTree" \
--repository-ids My_Repository_IDs \
--organization "My_Organization"
-
Publish the content view:
$ hammer content-view publish \
--name "OSTree" \
--description "Example content view for the OSTree" \
--organization "My_Organization"
14.7. Installing OSTree content from Foreman server on hosts
OSTree content from Foreman on hosts is managed by Subscription Manager and can be accessed by using rpm-ostree.
-
You have synchronized or uploaded an OSTree head to Foreman. For more information, see Importing OSTree content by using Foreman web UI and Uploading OSTree content by using Hammer CLI.
-
On your hosts, view the available heads:
$ rpm-ostree remote list
-
Rebase to a new remote from Foreman:
$ rpm-ostree rebase --remote=My_Organization_OSTree_Content_OSTree
15. Managing container images
Import container image repositories, configure registry access and naming, and push or pull images to manage container content across lifecycle environments in Foreman.
15.1. Importing container image repositories
Import container image repositories into Foreman from Red Hat Registry or other image registries to synchronize external images and make them available through content views.
15.1.1. Discovering container image repositories in a registry
Discover container image repositories in an external registry from the Foreman web UI to quickly import multiple repositories without entering each repository URL manually.
-
If the container image registry requires authentication, you have valid credentials for the registry.
-
In the Foreman web UI, navigate to Content > Products and click Repo Discovery.
-
From the Repository Type list, select Container Images.
-
In the Registry to Discover field, enter the URL of the registry to import images from.
-
In the Registry Username field, enter the name that corresponds with your user name for the container image registry.
-
In the Registry Password field, enter the password that corresponds with the user name that you enter.
-
In the Registry Search Parameter field, enter any search criteria that you want to use to filter your search, and then click Discover.
-
Optional: To further refine the Discovered Repository list, in the Filter field, enter any additional search criteria that you want to use.
-
From the Discovered Repository list, select any repositories that you want to import, and then click Create Selected.
-
Optional: If you want to create a product, from the Product list, select New Product.
-
In the Name field, enter a product name.
-
Optional: In the Repository Name and Repository Label columns, you can edit the repository names and labels.
-
Click Run Repository Creation.
-
When repository creation is complete, you can click each new repository to view more information.
-
Optional: To filter the content you import to a repository, click a repository, and then navigate to Limit Sync Tags. Click to edit, and add any tags that you want to limit the content that synchronizes to Foreman.
-
In the Foreman web UI, navigate to Content > Products and select the name of your product.
-
Select the new repositories and then click Sync Now to start the synchronization process.
-
To view the progress of the synchronization, navigate to Content > Sync Status and expand the repository tree.
-
When the synchronization completes, you can click Container Image Manifests to list the available manifests. From the list, you can also remove any manifests that you do not require.
15.1.2. Importing a container image repository manually by using Foreman web UI
Manually import a container image repository in the Foreman web UI when you know the repository URL and want to add a single repository to a product.
-
A product exists in your organization.
-
In the Foreman web UI, navigate to Content > Products.
-
Click the name of the required product.
-
Click New repository.
-
From the Type list, select docker.
-
Enter the details for the repository, and click Save.
-
Select the new repository, and click Sync Now.
-
To view the progress of the synchronization, navigate to Content > Sync Status and expand the repository tree.
-
When the synchronization completes, you can click Container Image Manifests to list the available manifests. From the list, you can also remove any manifests that you do not require.
15.1.3. Importing a container image repository by using Hammer CLI
Import a container image repository by using the Hammer CLI to add and synchronize container content as part of automated Foreman administration.
-
Create the custom
Red Hat Container Catalogproduct:$ hammer product create \ --description "My_Description" \ --name "Red Hat Container Catalog" \ --organization "My_Organization" \ --sync-plan "My_Sync_Plan"
-
Create the repository for the container images:
$ hammer repository create \
--content-type "docker" \
--docker-upstream-name "rhel7" \
--name "RHEL7" \
--organization "My_Organization" \
--product "Red Hat Container Catalog" \
--url "http://registry.access.redhat.com/"
-
Synchronize the repository:
$ hammer repository synchronize \
--name "RHEL7" \
--organization "My_Organization" \
--product "Red Hat Container Catalog"
15.2. Configuring the Foreman container registry
Registry name patterns and authentication settings control how container images are named and who can access them in each lifecycle environment of the Foreman container registry.
15.2.1. Configuring container registry name patterns for a lifecycle environment
Set a registry name pattern for a lifecycle environment to override default container image names and to avoid naming conflicts when you pull images from Foreman.
When you use Foreman to create and manage your containers, as the container moves through content view versions and different stages of the Foreman lifecycle environment, the container name changes at each stage.
For example, if you synchronize a container image with the name ssh from an upstream repository, when you add it to a Foreman product and organization and then publish as part of a content view, the container image can have the following name: my_organization_production-custom_spin-my_product-custom_ssh.
This can create problems when you want to pull a container image because container registries can contain only one instance of a container name.
|
Warning
|
Proceed with caution when defining registry naming patterns for your containers. If you use a registry name pattern to manage container naming conventions, because registry naming patterns must generate globally unique names, you might experience naming conflict problems. For example:
|
-
In the Foreman web UI, navigate to Content > Lifecycle > Lifecycle Environments.
-
Create a lifecycle environment or select an existing lifecycle environment to edit.
-
In the Container Image Registry area, click the edit icon to the right of Registry Name Pattern area.
-
Use the list of variables and examples to determine which registry name pattern you require.
-
In the Registry Name Pattern field, enter the registry name pattern that you want to use. For example, to use the
repository.docker_upstream_name:<%= repository.docker_upstream_name %>
-
Click Save.
15.2.2. Controlling container registry access for a lifecycle environment
Control whether users must authenticate to pull container images from a lifecycle environment, for example to allow unauthenticated access in production.
By default, users must authenticate to access container images in Foreman.
You can specify whether users must authenticate to access container images in a lifecycle environment.
For example, you might want to permit users to access container images from the Production lifecycle environment without any authentication requirement and restrict access to the Development and QA environments to authenticated users.
-
In the Foreman web UI, navigate to Content > Lifecycle > Lifecycle Environments.
-
Select the lifecycle environment that you want to manage authentication for.
-
To permit unauthenticated access to the containers in this lifecycle environment, select the Unauthenticated Pull checkbox. To restrict unauthenticated access, clear the Unauthenticated Pull checkbox.
-
Click Save.
15.3. Using the Foreman container registry
Use Podman or Docker to push container images to the Foreman container registry or pull images that you publish and promote through content views.
The Foreman container registry follows the Open Containers Initiative (OCI) specification, so you can push content to Foreman by using the same methods that apply to other container registries.
- Container registries on Smart Proxies
-
On Smart Proxies with content, the Container Gateway Smart Proxy plugin acts as the container registry. It caches authentication information from Katello and proxies incoming requests to Pulp. The Container Gateway is available by default on Smart Proxies with content.
15.3.1. Considerations for using the Foreman container registry
Review naming, push, and pull limitations before you use the Foreman container registry so that container workflows succeed without unexpected errors.
-
You cannot push to repositories created by the general repositories endpoints, only to repositories created by the container push workflow.
-
You can only push content to Foreman server itself. If you need pushed content on Smart Proxy servers as well, use Smart Proxy syncing.
-
The pushed container registry name must contain only lowercase characters.
-
Unless pushed repositories are published in a content view version, they do not follow the registry name pattern. This is to ensure that users can push and pull from the same path.
-
Users are required to push and pull from the same path. If you use the label-based schema, pull using labels. If you use the ID-based schema, pull using IDs.
15.3.2. Configuring Podman to trust the certificate authority
Configure Podman to trust the Foreman certificate authority so that you can push and pull container images without disabling TLS verification.
Podman locates the CA file in the /etc/containers/certs.d/ path.
Copy the root CA file to that path, with the exact path determined by the server hostname, and name the file ca.crt.
In the following examples, replace hostname.example.com with foreman.example.com or smartproxy.example.com, depending on your use case.
-
You have the root CA certificate file for Foreman server or Smart Proxy server.
-
You have root or sudo access on the host where Podman is installed.
-
Create the relevant directory:
# mkdir --parents /etc/containers/certs.d/hostname.example.com
-
Copy the CA file to the directory:
# cp My_Root_CA.pem /etc/containers/certs.d/hostname.example.com/ca.crt
-
Verify that you no longer need to use the
--tls-verify=falseoption when logging in to the registry:$ podman login hostname.example.com
15.3.3. Configuring Docker to trust the certificate authority
Configure Docker to trust the Foreman certificate authority so that you can push and pull container images without disabling TLS verification.
Docker locates the CA file in the /etc/docker/certs.d/ path.
Copy the root CA file to that path, with the exact path determined by the server hostname, and name the file ca.crt.
In the following examples, replace hostname.example.com with foreman.example.com or smartproxy.example.com, depending on your use case.
-
You have the root CA certificate file for Foreman server or Smart Proxy server.
-
You have root or sudo access on the host where Docker is installed.
-
Create the relevant directory:
# mkdir --parents /etc/docker/certs.d/hostname.example.com
-
Copy the CA file to the directory:
# cp My_Root_CA.pem /etc/docker/certs.d/hostname.example.com/ca.crt
-
Verify that you no longer need to use the
--tls-verify=falseoption when logging in to the registry:$ docker login hostname.example.com
15.3.4. Pushing container images to Foreman
Push container images to the Foreman container registry to distribute custom images to hosts and lifecycle environments through Foreman content management.
-
You have reviewed Considerations for using the Foreman container registry.
-
If Foreman server uses a self-signed certificate, you have configured Podman or Docker to trust the Foreman certificate authority. For more information, see one of the following resources:
-
Your Foreman account has the
edit_productspermission. -
A product exists in your organization.
-
Your Foreman account has the
create_personal_access_tokenspermission. Foreman automatically generates a token when you runpodman login.
-
Log in to the container registry:
$ podman login foreman.example.com
-
Push a container image to the Foreman container registry. To indicate which organization, product, and repository the container image belongs to, include the organization and product in the container image path.
You can specify the container image destination by using one of the following schemas:
-
Push the container image by using the label-based schema:
$ podman push My_Container_Image_ID foreman.example.com/My_Organization_Label/My_Product_Label/My_Repository_Name[:My_Tag]
-
Push the container image by using the ID-based schema:
$ podman push My_Container_Image_ID foreman.example.com/id/My_Organization_ID/My_Product_ID/My_Repository_Name[:My_Tag]
The image tag is optional.
-
-
After the content push has completed, Foreman creates the repository.
15.3.5. Pulling container images from Foreman
Pull container images from the Foreman container registry by using Podman or Docker to deploy images that you publish in content views across lifecycle environments.
-
You have reviewed Considerations for using the Foreman container registry.
-
If Foreman server uses a self-signed certificate, you have configured Podman or Docker to trust the Foreman certificate authority. For more information, see one of the following resources:
-
Your Foreman account has the
view_lifecycle_environments,view_products, andview_content_viewspermissions, unless the lifecycle environment allows unauthenticated pull. -
Your Foreman account has the
create_personal_access_tokenspermission. Foreman automatically generates a token when you runpodman login.
-
Log in to the container registry:
$ podman login foreman.example.com
-
List container images:
$ podman search foreman.example.com/
-
Pull a container image:
$ podman pull foreman.example.com/My_Image_Path[:My_Tag]
Pull the image by using the same image path schema as the one used to push the image. The path schema can be either label-based or ID-based.
The image tag is optional. If you do not specify a tag,
podmanpulls the latest tag.
16. Managing Flatpak repositories in Foreman
Flatpak remotes in Foreman connect to external application indexes so you can scan available repositories, mirror them into products, and distribute desktop application content to hosts.
Flatpak repositories function similarly to other content repositories in Foreman. You can synchronize, manage access permissions, and assign repositories to specific lifecycle environments to control which applications are available to hosts. You can also use Hammer CLI to manage Flatpak remotes and repositories.
Flatpak repositories in Foreman have the docker content type.
You can export Flatpak repositories and import them into other Foreman instances.
16.1. Creating a Flatpak remote by using Foreman web UI
Add a Flatpak remote to your Foreman inventory to scan it, mirror selected repositories into your products, and distribute desktop application content to hosts.
-
Your Foreman account has a role that grants the
create_flatpak_remotespermission.
-
In the Foreman web UI, navigate to Content > Flatpak Remotes.
-
Click Create new.
-
In the Name field, enter a name for the Flatpak remote.
-
In the URL field, enter the URL of the Flatpak remote. For example, to use the Red Hat Flatpak index, enter:
https://flatpaks.redhat.io/rhel/. To use the Fedora Flatpak index, enter:https://registry.fedoraproject.org/. -
If the Flatpak remote requires authentication, enter the required credentials. For example, synchronizing Red Hat Flatpaks from
registry.redhat.iorequires authentication. For more information, see Creating Registry Service Accounts. -
Click Create.
16.2. Creating a Flatpak remote by using Hammer CLI
Add a Flatpak remote to your Foreman inventory to scan it, mirror selected repositories into your products, and distribute desktop application content to hosts.
-
Your Foreman account has a role that grants the
create_flatpak_remotespermission.
-
Create your Flatpak remote:
$ hammer flatpak-remote create \
--name My_Flatpak_Remote_Name \
--organization-id My_Organization_ID \
--url My_Flatpak_Remote_URL
For example, to use the Red Hat Flatpak index, enter:
https://flatpaks.redhat.io/rhel/. To use the Fedora Flatpak index, enter:https://registry.fedoraproject.org/.If the Flatpak remote requires authentication, enter the required credentials. For example, synchronizing Red Hat Flatpaks from
registry.redhat.iorequires authentication. For more information, see Creating Registry Service Accounts.
16.3. Scanning a Flatpak remote by using Foreman web UI
Scan a Flatpak remote to discover the repositories its index hosts before you mirror them into products. Rescan the remote when new repositories are added.
-
A Flatpak remote exists in Foreman.
-
Your Foreman account has a role that grants the
view_flatpak_remotesandedit_flatpak_remotespermissions.
-
In the Foreman web UI, navigate to Content > Flatpak Remotes.
-
Select the Flatpak remote that you want to scan.
-
Click Scan.
16.4. Scanning a Flatpak remote by using Hammer CLI
Scan a Flatpak remote to discover the repositories its index hosts before you mirror them into products. Rescan the remote when new repositories are added.
-
A Flatpak remote exists in Foreman.
-
Your Foreman account has a role that grants the
view_flatpak_remotesandedit_flatpak_remotespermissions.
-
Scan your Flatpak remote:
$ hammer flatpak-remote scan --id My_Flatpak_Remote_ID
16.5. Viewing Flatpak remote details by using Foreman web UI
Review the repositories a scanned Flatpak remote provides to decide which ones to mirror into your products.
-
The Flatpak remote has been scanned.
-
Your Foreman account has a role that grants the
view_flatpak_remotespermission.
-
In the Foreman web UI, navigate to Content > Flatpak Remotes.
-
Click the name of the Flatpak remote you want to view.
-
The page displays a list of repositories available from the scanned Flatpak remote.
16.6. Viewing Flatpak remote details by using Hammer CLI
Review the repositories a scanned Flatpak remote provides to decide which ones to mirror into your products.
-
The Flatpak remote has been scanned.
-
Your Foreman account has a role that grants the
view_flatpak_remotespermission.
-
View details of your Flatpak remote:
$ hammer flatpak-remote info --id My_Flatpak_Remote_ID
16.7. Mirroring remote Flatpak repositories to Foreman products by using Foreman web UI
Mirror a Flatpak repository from a scanned remote into an existing product so you can synchronize it and publish application content to hosts through content views.
This action creates a new repository inside the product you selected. You can now synchronize the repository to pull down its content. Flatpak repositories are container repositories and you can add them to content views like other container repositories.
Flatpak applications require a corresponding runtime environment, which the Flatpak remote also provides.
To make the Enterprise Linux 10 Mozilla Firefox Flatpak available to a host, ensure that the host can access the matching rhel10/flatpak-runtime repository.
-
The Flatpak remote has been scanned.
-
Your Foreman account has a role that grants the
view_flatpak_remotesandedit_flatpak_remotespermissions. -
You have created a product on Foreman.
-
Flatpak runtime repositories are available to hosts alongside application repositories. Flatpak applications, such as
rhel9/firefox-flatpak, depend on the runtime for installation.
-
In the Foreman web UI, navigate to Content > Flatpak Remotes.
-
In the list of Flatpak Remotes, click the name of the remote you want to mirror.
-
In the list of remote repositories, locate the repository you want to mirror.
-
Select the Mirror Action menu on the row of the repository.
-
In the Mirror window, select the existing product where you want to create the new repository.
-
Click Mirror.
16.8. Mirroring remote Flatpak repositories to Foreman products by using Hammer CLI
Mirror a Flatpak repository from a scanned remote into an existing product so you can synchronize it and publish application content to hosts through content views.
This action creates a new repository inside the product you selected. You can now synchronize the repository to pull down its content. Flatpak repositories are container repositories and you can add them to content views like other container repositories.
Flatpak applications require a corresponding runtime environment, which the Flatpak remote also provides.
To make the Enterprise Linux 10 Mozilla Firefox Flatpak available to a host, ensure that the host can access the matching rhel10/flatpak-runtime repository.
-
The Flatpak remote has been scanned.
-
Your Foreman account has a role that grants the
view_flatpak_remotesandedit_flatpak_remotespermissions. -
You have created a product on Foreman.
-
Flatpak runtime repositories are available to hosts alongside application repositories. Flatpak applications, such as
rhel9/firefox-flatpak, depend on the runtime for installation.
-
Mirror a Flatpak repository into your product:
$ hammer flatpak-remote remote-repository mirror \
--flatpak-remote-id My_Flatpak_Remote_ID \
--id My_Flatpak_Repository_ID \
--product-id My_Product_ID
17. Managing ISO images
You can use Foreman to store ISO images from the Red Hat Content Delivery Network or other sources for host provisioning and creating installation media. You can also upload other files, such as virtual machine images, and publish them in repositories.
|
Important
|
Foreman community does not support provisioning Enterprise Linux hosts using the minimal ISO image because it does not contain the |
17.1. Importing ISO images from Red Hat by using Foreman web UI
You can import ISO images for certain products from the Red Hat Content Delivery Network. The process is similar to enabling repositories for Yum content.
-
In the Foreman web UI, navigate to Content > Red Hat Repositories.
-
In the Search field, enter an image name, for example,
Red Hat Enterprise Linux 7 Server (ISOs). -
In the Available Repositories window, expand Red Hat Enterprise Linux 7 Server (ISOs).
-
For the x86_64 7.2 entry, click the Enable icon to enable the repositories for the image.
-
In the Foreman web UI, navigate to Content > Products and click Red Hat Enterprise Linux Server.
-
Click the Repositories tab of the Red Hat Enterprise Linux Server window, and click Red Hat Enterprise Linux 7 Server ISOs x86_64 7.2.
-
In the upper right of the Red Hat Enterprise Linux 7 Server ISO images x86_64 7.2 window, click Select Action and select Sync Now.
-
To view the synchronization status, navigate to Content > Sync Status and expand Red Hat Enterprise Linux Server.
17.2. Importing ISO images from Red Hat by using Hammer CLI
You can import ISO images for certain products from the Red Hat Content Delivery Network. The process is similar to enabling repositories for Yum content.
-
Locate the Red Hat Enterprise Linux Server product for
filerepositories:$ hammer repository-set list \ --product "Red Hat Enterprise Linux Server" \ --organization "My_Organization" | grep "file"
-
Enable the
filerepository for Red Hat Enterprise Linux 7.2 Server ISO:$ hammer repository-set enable \ --product "Red Hat Enterprise Linux Server" \ --name "Red Hat Enterprise Linux 7 Server (ISOs)" \ --releasever 7.2 \ --basearch x86_64 \ --organization "My_Organization"
-
Locate the repository in the product:
$ hammer repository list \
--product "Red Hat Enterprise Linux Server" \
--organization "My_Organization"
-
Synchronize the repository in the product:
$ hammer repository synchronize \
--name "Red Hat Enterprise Linux 7 Server ISOs x86_64 7.2" \
--product "Red Hat Enterprise Linux Server" \
--organization "My_Organization"
17.3. Importing an ISO image by using Foreman web UI
You can manually import an ISO image to Foreman server by using Foreman web UI. However, if the file size is larger than 15 MB, you must use the Hammer CLI to upload it to a repository.
-
In the Foreman web UI, navigate to Content > Products and click Create Product.
-
In the Name field, enter a name to identify the product. This name populates the Label field.
-
Optional: In the GPG Key field, enter a GPG Key for the product.
-
Optional: From the Sync Plan list, select a synchronization plan for the product.
-
Optional: In the Description field, enter a description of the product.
-
Click Save.
-
In the Products window, click the new product and then click Create Repository.
-
In the Name field, enter a name for the repository. This automatically populates the Label field.
-
From the Type list, select file.
-
In the Upstream URL field, enter the URL of the registry to use as a source. Add a corresponding user name and password in the Upstream Username and Upstream Password fields.
-
Click Save.
-
Select the new repository.
-
Navigate to Upload File and click Browse.
-
Select the
.isofile and click Upload.
17.4. Importing an ISO image by using Hammer CLI
You can manually import an ISO image to Foreman server by using Hammer CLI. You must use the Hammer CLI to upload files larger than 15 MB to a repository.
-
Create the product:
$ hammer product create \
--name "My_ISOs" \
--sync-plan "Example Plan" \
--description "My_Product" \
--organization "My_Organization"
-
Create the repository:
$ hammer repository create \
--name "My_ISOs" \
--content-type "file" \
--product "My_Product" \
--organization "My_Organization"
-
Upload the ISO file to the repository:
$ hammer repository upload-content \
--path ~/bootdisk.iso \
--id repo_ID \
--organization "My_Organization"
17.5. Preparing an offline installation medium for Oracle Linux 10
You can add an installation medium for Oracle Linux to Foreman to provision hosts in disconnected environments.
|
Note
|
This procedure describes distributing the ISO image through Foreman server. You can also use Smart Proxy servers or any arbitrary web server that is reachable from your Foreman server. If you use an alternative web server, adjust the path of the installation medium accordingly. |
-
You have obtained the ISO image for Oracle Linux 10.
-
You have created the necessary operating system entries in Foreman.
In the Foreman web UI, navigate to Hosts > Provisioning Setup > Installation Media and ensure there are entries for Oracle Linux 10.
-
You have installed
p7zipandp7zip-pluginson your Foreman server.
-
Copy the Oracle Linux 10 ISO image to your Foreman server:
$ scp oracle-linux-10.iso root@foreman.example.com:/tmp/
-
Create the directory for your Oracle Linux medium:
# mkdir --parents /var/www/html/pub/installation_media/oracle/10/
-
Extract the Oracle Linux 10 ISO image to the newly created directory:
# 7z x /tmp/oracle-linux-10.iso -o /var/www/html/pub/installation_media/oracle/10/
-
Ensure the permissions of your extracted files allow the
apacheuser to read them:# chmod -R go+X+r /var/www/html/pub/installation_media/oracle/10/*
-
Remove the Oracle Linux 10 ISO image from your Foreman server:
# rm --force /tmp/oracle-linux-10.iso
-
Navigate to
https://foreman.example.com/pub/installation_media/oracle/10/and verify that the extracted files are available.
17.6. Preparing an offline installation medium for SUSE Linux Enterprise Server 16.0
You can add an installation medium for SUSE Linux Enterprise Server to Foreman to provision hosts in disconnected environments.
|
Note
|
This procedure describes distributing the ISO image through Foreman server. You can also use Smart Proxy servers or any arbitrary web server that is reachable from your Foreman server. If you use an alternative web server, adjust the path of the installation medium accordingly. |
-
You have obtained the ISO image for SUSE Linux Enterprise Server 16.0.
-
You have created the necessary operating system entries in Foreman.
In the Foreman web UI, navigate to Hosts > Provisioning Setup > Installation Media and ensure there are entries for SUSE Linux Enterprise Server 16.0.
-
You have installed
p7zipandp7zip-pluginson your Foreman server.
-
Copy the SUSE Linux Enterprise Server 16.0 ISO image to your Foreman server:
$ scp suse-linux-enterprise-server-16-0.iso root@foreman.example.com:/tmp/
-
Create the directory for your SUSE Linux Enterprise Server medium:
# mkdir --parents /var/www/html/pub/installation_media/sles/16.0/
-
Extract the SUSE Linux Enterprise Server 16.0 ISO image to the newly created directory:
# 7z x /tmp/suse-linux-enterprise-server-16-0.iso -o /var/www/html/pub/installation_media/sles/16.0/
-
Ensure the permissions of your extracted files allow the
apacheuser to read them:# chmod -R go+X+r /var/www/html/pub/installation_media/sles/16.0/*
-
Remove the SUSE Linux Enterprise Server 16.0 ISO image from your Foreman server:
# rm --force /tmp/suse-linux-enterprise-server-16-0.iso
-
Navigate to
https://foreman.example.com/pub/installation_media/sles/16.0/and verify that the extracted files are available.
17.7. Setting up an installation medium for Oracle Linux 9
Set up an installation medium for Oracle Linux 9 to provision hosts in disconnected environments.
-
In the Foreman web UI, navigate to Hosts > Provisioning Setup > Installation Media.
-
Select your installation medium for Oracle Linux 9.
-
Enter the Path to the
BaseOSdirectory within the extracted installation medium. -
Click Submit to save your change.
17.8. Setting up an installation medium for Oracle Linux 8
Set up an installation medium for Oracle Linux 8 to provision hosts in disconnected environments.
-
In the Foreman web UI, navigate to Hosts > Provisioning Setup > Installation Media.
-
Select your installation medium for Oracle Linux 8.
-
Enter the Path to the
BaseOSdirectory within the extracted installation medium. -
Click Submit to save your change.
-
Navigate to Hosts > Provisioning Setup > Operating Systems.
-
Select your operating system entry for Oracle linux 8.
-
On the Parameters tab, enter the path to the
AppStreamrepository within the extracted installation medium. Set the variableadditional_mediaas typestringwith the value[{"url": "http://foreman.example.com/pub/installation_media/ol/8/AppStream/", "name": "AppStream"}]. -
On your Foreman server, create a symbolic link in the
/BaseOSpath for this version:# cd /var/www/html/pub/installation_media/ol/8/BaseOS/ # ln --symbolic ../images
This is required for Foreman to find the kernel and initrd files which are used for network based installations of hosts running Oracle Linux 8.
18. Managing Ansible content
Managing Ansible content in Foreman includes importing Ansible collections from different sources, synchronizing them, and distributing them to your hosts. This enables maintaining consistent automation across your infrastructure.
18.1. Synchronizing Ansible Collections
On Foreman, you can synchronize your Ansible Collections from any Ansible Galaxy and other Foreman instances to centrally manage and distribute automation content across your infrastructure. Ansible Collections will appear on Foreman as a new repository type in the Foreman web UI menu under Content after the sync.
-
In the Foreman web UI, navigate to Content > Products.
-
Select the required product name.
-
In the Products window, select the name of a product that you want to create a repository for.
-
Click the Repositories tab, and then click New Repository.
-
In the Name field, enter a name for the repository.
The Label field is populated automatically based on the name.
-
From the Type list, select ansible collection.
-
In the Upstream URL field, enter the URL for the upstream collections repository.
The URL can be any Ansible Galaxy endpoint. For example,
https://galaxy.ansible.com/. -
Optional: In the Requirements.yml field, you can specify the list of collections you want to sync from the endpoint and their versions.
If you do not specify a list of collections, Foreman synchronizes all Ansible collections from the endpoint.
---
collections:
- name: my_namespace.my_collection
  version: 1.2.3
For more information, see Installing roles and collections from the same requirements.yml file in the Galaxy User Guide.
-
Optional: Deselect Sync Dependencies if you do not want Foreman to resolve and synchronize dependencies. By default, Foreman synchronizes all required dependencies.
-
Authenticate:
-
To sync Ansible collections from Private Automation Hub:
-
Navigate to Connect to Hub. Click Load token.
-
Enter the token in the Auth Token field in the Foreman web UI.
-
-
To sync Ansible collections from
console.redhat.com:-
Navigate to Connect to Hub. Click Load token.
-
Enter the authentication token in the Auth Token field in the Foreman web UI.
-
Copy the SSO URL from the SSO URL section.
-
Enter the SSO URL in the Auth URL field in the Foreman web UI.
-
-
To sync Ansible collections from Foreman, leave both authentication fields blank.
-
-
Click Save.
-
Navigate to the Ansible Collections repository.
-
From the Select Action menu, select Sync Now.
18.2. Consuming content from an Ansible Collection repository
Configure hosts to consume content from an Ansible Collection repository on Foreman server or Smart Proxy server to ensure consistent automation content across your infrastructure. You can configure the Ansible Galaxy client to use your Foreman server or Smart Proxy server as a Galaxy server.
-
You have synchronized an Ansible Collection to a Foreman repository.
-
The
ansible-corepackage is installed on the host. This package is available in AppStream repositories.
-
On the host, configure the
ansible-galaxyclient to use Foreman server or Smart Proxy server as the Galaxy server. Add the required sections to anansible.cfgfile, for example:[galaxy] server_list = My_Library_Server, My_Promoted_CV_Server [galaxy_server.My_Library_Server] url = https://server.example.com/pulp_ansible/galaxy/My_Organization_Label/Library/custom/My_Product_Label/My_Repository_Label/api/ [galaxy_server.My_Promoted_CV_Server] url = https://server.example.com/pulp_ansible/galaxy/My_Organization_Label/My_Lifecycle_Environment_Label/My_Content_View_Label/custom/My_Product_Label/My_Repository_Label/api/
Replace
server.example.comwith the fully qualified domain name of your Foreman server or Smart Proxy server. -
Install an Ansible Collection from your Galaxy server. For example:
# ansible-galaxy collection install My_Namespace.My_Collection \
--server My_Library_Server
19. Managing file type content in Foreman
You can use file type repositories in products to store and distribute arbitrary files such as SSH keys, source code, or ISO images in Foreman.
You can upload files to the repository and synchronize files from an upstream Foreman server. When you add files to a file type repository, you can use the normal Foreman management functions such as adding a specific version to a content view to provide version control and making the repository of files available on various Smart Proxy servers.
You can create a file type repository in Foreman server only in a product, but there is flexibility in how you create the repository source. You can create an independent repository source in a directory on Foreman server, or on a remote HTTP server, and then synchronize the contents of that directory into Foreman. This method is useful when you have multiple files to add to a Foreman repository.
You can also use file type repositories to provide local installation media for Debian and Ubuntu in disconnected environments.
19.1. Creating a local source for a file type repository
When you have multiple files to import, you can prepare a directory on Foreman server as a local Pulp source. Then, synchronize files from this directory into a file type repository.
Configure a directory on the base system where Foreman is installed as the repository source. To create a file type repository in a directory on a remote server, see Creating a remote source for a file type repository.
-
On your Foreman server, install the Pulp Manifest package:
# dnf install pulp-manifest
-
Create a directory that you want to use as the file type repository, such as:
# mkdir -p /var/lib/pulp/local_repos/my_file_repo
-
Add the parent folder to allowed import paths:
# foremanctl deploy --content-import-path /var/lib/pulp/local_repos
To add multiple import paths, use the
--content-import-pathoption multiple times:# foremanctl deploy --content-import-path /var/lib/pulp/local_repo1 \ --content-import-path /var/lib/pulp/local_repo2
-
Add files to the directory or create a test file:
# touch /var/lib/pulp/local_repos/my_file_repo/test.txt
-
Create the Pulp Manifest:
# pulp-manifest /var/lib/pulp/local_repos/my_file_repo
-
Verify the manifest was created:
# ls /var/lib/pulp/local_repos/my_file_repo
PULP_MANIFEST test.txt
-
You can import your local source as a file type repository. Use the
file://URL scheme and the name of the directory to specify an Upstream URL, such asfile:///var/lib/pulp/local_repos/my_file_repo. For more information, see Creating a file type repository by using Foreman web UI.
19.2. Creating a remote source for a file type repository
You can prepare a directory on a remote HTTP server as a Pulp source and synchronize files into a file type repository on Foreman server.
Configure a directory on a remote server as the repository source. To create a file type repository in a directory on the base system where Foreman server is installed, see Creating a local source for a file type repository.
-
You have a server running Enterprise Linux 10 registered to your Foreman.
-
You have installed an HTTP server. For more information about configuring a web server, see Setting up the Apache HTTP web server in Red Hat Enterprise Linux 10 Deploying web servers and reverse proxies.
-
On your HTTP server, enable the required repositories:
# dnf config-manager --add-repo=https://yum.theforeman.org/pulpcore/3.105/el9/x86_64/
# echo "gpgkey=https://yum.theforeman.org/pulpcore/3.105/GPG-RPM-KEY-pulpcore" \
>> /etc/yum.repos.d/yum.theforeman.org_pulpcore_3.105_el9_x86_64_.repo
-
Install the Pulp Manifest package:
# dnf install pulp-manifest
-
Create a directory that you want to use as the file type repository in the HTTP server’s public folder:
# mkdir /var/www/html/pub/my_file_repo
-
Add files to the directory or create a test file:
# touch /var/www/html/pub/my_file_repo/test.txt
-
Create the Pulp Manifest:
# pulp-manifest /var/www/html/pub/my_file_repo
-
Verify the manifest was created:
# ls /var/www/html/pub/my_file_repo
PULP_MANIFEST test.txt
-
You can import your remote source as a file type repository. Use the path to the directory to specify an Upstream URL, such as
http://server.example.com/my_file_repo. For more information, see Creating a file type repository by using Foreman web UI.
19.3. Creating a file type repository by using Foreman web UI
You can add a file type repository to an existing product.
Select the file repository type and follow the same workflow as when you add other content.
-
In the Foreman web UI, navigate to Content > Products.
-
Select a product that you want to create a repository for.
-
On the Repositories tab, click New Repository.
-
In the Name field, enter a name for the repository. Foreman automatically completes the Label field based on the name.
-
Optional: In the Description field, enter a description for the repository.
-
From the Type list, select
fileas type of repository. -
Optional: In the Upstream URL field, enter the URL of the upstream repository to use as a source. If you do not enter an upstream URL, you can manually upload packages.
-
Select Verify SSL to verify that the SSL certificates of the repository are signed by a trusted CA.
-
Optional: In the Upstream Username field, enter the user name for the upstream repository if required for authentication. Clear this field if the repository does not require authentication.
-
Optional: In the Upstream Password field, enter the corresponding password for the upstream repository. Clear this field if the repository does not require authentication.
-
Optional: In the Upstream Authentication Token field, provide the token of the upstream repository user for authentication. Leave this field empty if the repository does not require authentication.
-
From the Download Policy list, select the type of synchronization Foreman server performs.
-
From the Mirroring Policy list, select the type of content synchronization Foreman server performs.
-
Optional: In the HTTP Proxy Policy field, select an HTTP proxy. By default, it uses the
Global DefaultHTTP proxy. -
Optional: You can clear the Unprotected checkbox to require a subscription entitlement certificate for accessing this repository. By default, the repository is published through HTTP.
-
Optional: In the SSL CA Cert field, select the SSL CA Certificate for the repository.
-
Optional: In the SSL Client Cert field, select the SSL Client Certificate for the repository.
-
Optional: In the SSL Client Key field, select the SSL Client Key for the repository.
-
Click Save to create the repository.
19.4. Creating a file type repository by using Hammer CLI
You can add a file type repository to an existing product.
Select the file repository type and follow the same workflow as when you add other content.
-
Create a product:
$ hammer product create \
--name "My_File_Product" \
--organization-id My_Organization_ID \
--sync-plan "My_Sync_Plan"
Table 34. Optional parameters for the hammer product createcommandOption Description --gpg-key-idgpg_key_idGPG key numeric identifier
--sync-plan-idsync_plan_idSync plan numeric identifier
--sync-plansync_plan_nameSync plan name to search by
-
Create a
filetype repository:$ hammer repository create \ --content-type file \ --name "My_Files" \ --organization-id My_Organization_ID \ --product "My_File_Product"
Table 35. Optional parameters for the hammer repository createcommandOption Description --checksum-typesha_versionRepository checksum (either
sha256,sha384, orsha512)--download-policypolicy_nameDownload policy for repositories (either
immediateoron_demand)--gpg-key-idgpg_key_idGPG key numeric identifier
--gpg-keygpg_key_nameKey name to search by
--mirror-on-syncbooleanMust this repo be mirrored from the source, and stale packages removed, when synced? Set to
trueorfalse,yesorno,1or0.--publish-via-httpbooleanMust this also be published using HTTP? Set to
trueorfalse,yesorno,1or0.--upstream-passwordrepository_passwordPassword for the upstream repository user
--upstream-usernamerepository_usernameUpstream repository user, if required for authentication
--urlMy_Repository_URLURL of the remote repository
--verify-ssl-on-syncbooleanVerify that the upstream SSL certificates of the remote repository are signed by a trusted CA? Set to
trueorfalse,yesorno,1or0.
19.5. Creating file type repositories for installation media for Debian 13
You can use file type repositories to provide local installation media for Debian. This allows you to provision hosts running Debian 13 in disconnected environments.
-
In the Foreman web UI, navigate to Content > Products.
-
Click Create Product.
-
Enter a Name for your product.
-
Optional: Select a sync plan from the Sync Plan drop down menu.
-
Click Save to create the product.
-
On the Repositories tab of the previously created product, click New Repository.
-
Enter a Name for the repository.
If you use the file type repository as installation medium for offline installations, Foreman community recommends adding
offline installation mediato indicate the offline installation capability, for example,Debian 13 offline installation media. -
Select
fileas Type. -
In the Upstream URL field, enter the URL of the file type repository that contains your Debian 13 installation medium.
-
Click Save to create the repository.
-
On the Repositories tab, select your previously created repository and click Sync Now.
-
After you have synchronized the repository, navigate to Content > Products.
-
Select the previously created product.
-
On the Repositories tab, select the previously created repository.
-
Copy the Published At URL.
-
Navigate to Hosts > Installation Media.
-
Click Create Medium.
-
Enter a Name for the installation media.
Foreman community recommends adding
localto indicate that the installation medium is stored on your Foreman locally. You can use this installation medium to provision hosts in disconnected environments. -
Enter the copied URL as Path.
-
Select the Operating System Family.
-
Click Submit to create the installation media.
19.6. Creating file type repositories for installation media for Ubuntu 26.04
You can use file type repositories to provide local installation media for Ubuntu. This allows you to provision hosts running Ubuntu 26.04 in disconnected environments.
To provision Ubuntu 26.04, you need to provide both the ISO image and the extracted ISO image on your Foreman server or the relevant Smart Proxy server. This example uses Foreman server.
-
In the Foreman web UI, navigate to Content > Products.
-
Click Create Product.
-
Enter a Name for your product.
-
Optional: Select a sync plan from the Sync Plan drop down menu.
-
Click Save to create the product.
-
On the Repositories tab of the previously created product, click New Repository.
-
Enter a Name for the repository.
If you use the file type repository as installation medium for offline installations, Foreman community recommends adding
offline installation mediato indicate the offline installation capability, for example,Ubuntu 26.04 offline installation media. -
Select
fileas Type. -
In the Upstream URL field, enter the URL of the file type repository that contains your Ubuntu 26.04 installation medium.
-
Click Save to create the repository.
-
On the Repositories tab, select your previously created repository and click Sync Now.
-
After you have synchronized the repository, navigate to Content > Products.
-
Select the previously created product.
-
On the Repositories tab, select the previously created repository.
-
Copy the Published At URL.
-
On your Foreman server, use the Published At URL from your synchronized file repository to download the ISO image:
$ wget --directory-prefix /tmp/ https://foreman.example.com/pulp/content/My_Organization_Label/Library/custom/My_Product/My_Repository/ubuntu-26.04-latest.iso
-
Mount the ISO image:
# mount ubuntu-26.04-latest.iso /mnt
-
Provide the ISO image and the extracted directory under foreman.example.com/pub:
# mkdir --parents /var/www/html/pub/installation_media/ubuntu/26.04-x86_64/
# cp ubuntu-26.04-latest.iso /var/www/html/pub/installation_media/ubuntu/26.04-x86_64.iso
# cp --archive /mnt/* /var/www/html/pub/installation_media/ubuntu/26.04-x86_64/
Ensure that the path in
/pub/matches the path in your Preseed default PXELinux Autoinstall template. -
Unmount and delete the ISO image:
# umount /mnt/
# rm --force ubuntu-26.04-latest.iso
-
Use
http://foreman.example.com/pub/installation_media/ubuntu/26.04-x86_64/to set up your installation media entry in Foreman.
20. Managing Python content in Foreman
Manage Python packages in Foreman by synchronizing repositories from upstream sources, uploading local packages, and reviewing content in Library before you distribute it through content views.
You can upload Python packages to Python type repositories and synchronize files from an upstream Foreman server. When you add Python packages to a Python type repository, you can use the normal Foreman management functions such as adding a specific version to a content view to provide version control and making the repository available on various Smart Proxy servers.
You can create an independent repository source in a directory on Foreman server, or on a remote HTTP server, and then synchronize the contents of that directory into Foreman. This method is useful when you have multiple Python packages to add to a repository.
20.1. Synchronizing Python repositories
Synchronize Python content to repositories in Foreman to distribute Python packages to your hosts. You can synchronize Python repositories from any mirror and other Foreman instances.
-
In the Foreman web UI, navigate to Content > Products.
-
Select your product.
-
On the Repositories tab, click New Repository.
-
In the Name field, enter a name for the repository.
The Label field is populated automatically based on the name.
-
From the Type list, select python.
-
In the Upstream URL field, enter the URL for the upstream content source, for example,
https://pypi.org. -
Optional: Clear Verify SSL if you do not want Foreman server to verify the SSL certificate of the upstream content source.
-
Optional: In the Upstream Username field, enter the user name for the upstream repository if required for authentication. Clear this field if the repository does not require authentication.
-
Optional: In the Upstream Password field, enter the corresponding password for the upstream repository. Clear this field if the repository does not require authentication.
-
Optional: In the Excludes field, enter a list of Python packages separated by newlines to exclude from synchronizing to Foreman.
-
Optional: In the Includes field, enter a list of Python packages separated by newlines to limit the synchronization only to the included packages.
-
Optional: In the Keep latest packages field, enter a number to limit the amount of Python package versions kept after synchronization. By default, Foreman keeps all package versions.
-
Optional: In the Package Types field, enter a list of package types separated by comma. You can enter
sdistto synchronize the source distribution orbdist_wheelto synchronize the built distribution. -
From the Mirroring Policy list, select the type of content synchronization Foreman server performs. For more information, see Mirroring policies overview.
-
Optional: In the HTTP Proxy Policy field, select an HTTP proxy.
-
Optional: You can clear the Unprotected checkbox to require a subscription entitlement certificate for accessing this repository. By default, the repository is published through HTTP.
-
Optional: In the SSL CA Cert field, select the SSL CA Certificate for the repository.
-
Optional: In the SSL Client cert field, select the SSL Client Certificate for the repository.
-
Optional: In the SSL Client Key field, select the SSL Client Key for the repository.
-
Click Save to create the repository.
-
Select your repository.
-
From the Select Action menu, select Sync Now.
20.2. Uploading content to a Python repository by using Foreman web UI
You can upload files from your local machine to a Python repository in Foreman when you need to distribute Python content that you cannot synchronize.
-
You have a
.whlpackage or.tar.gzarchive that contains Python packages.
-
In the Foreman web UI, navigate to Content > Products.
-
Select a product by name.
-
Select a Python type repository by name.
-
Click Browse to search and select the file you want to upload.
-
Click Upload to upload the selected file to Foreman server.
-
Visit the Published At URL to see the file.
20.3. Uploading content to a Python repository by using Hammer CLI
You can upload files from your local machine to a Python repository in Foreman when you need to distribute Python content that you cannot synchronize.
-
You have a
.whlpackage or.tar.gzarchive that contains Python packages.
-
Upload files to your Python repository:
$ hammer repository upload-content \
--id My_Repository_ID \
--organization-id My_Organization_ID \
--path Path_To_My_File
The
--pathoption can indicate a file, a directory of files, or a glob expression of files. Globs must be escaped by single or double quotes.
-
Visit the Published At URL to see the file.
20.4. Viewing available Python packages
Review Python packages in the Library lifecycle environment of Foreman to verify that the packages in your organization are available and up to date.
-
Python packages are synchronized or uploaded to your organization in Foreman.
-
In the Foreman web UI, navigate to Content > Content Types > Other Content Types.
-
In the Type menu, select Python Packages.
Appendix A: Required Red Hat repositories
Enable the Red Hat repositories for your release and host architecture so Foreman can synchronize content from the Red Hat CDN to manage Red Hat Enterprise Linux hosts. Enable matching Kickstart repositories when you provision hosts with the Anaconda installer.
To register and manage hosts with Foreman, you need the following repositories:
- For Red Hat Enterprise Linux 10 hosts
-
-
Red Hat Enterprise Linux 10 for x86_64 - BaseOS (RPMs)
-
Red Hat Enterprise Linux 10 for x86_64 - AppStream (RPMs)
-
- For Red Hat Enterprise Linux 9 hosts
-
-
Red Hat Enterprise Linux 9 for x86_64 - BaseOS (RPMs)
-
Red Hat Enterprise Linux 9 for x86_64 - AppStream (RPMs)
-
- For Red Hat Enterprise Linux 8 hosts
-
-
Red Hat Enterprise Linux 8 for x86_64 - BaseOS (RPMs)
-
Red Hat Enterprise Linux 8 for x86_64 - AppStream (RPMs)
-
- For Red Hat Enterprise Linux 7 hosts
-
-
Red Hat Enterprise Linux 7 Server (RPMs)
-
To provision hosts by using the Anaconda installer with Kickstart, you additionally need the following repositories:
- For Red Hat Enterprise Linux 10 hosts
-
-
Red Hat Enterprise Linux 10 for x86_64 - BaseOS (Kickstart)
-
Red Hat Enterprise Linux 10 for x86_64 - AppStream (Kickstart)
-
- For Red Hat Enterprise Linux 9 hosts
-
-
Red Hat Enterprise Linux 9 for x86_64 - BaseOS (Kickstart)
-
Red Hat Enterprise Linux 9 for x86_64 - AppStream (Kickstart)
-
- For Red Hat Enterprise Linux 8 hosts
-
-
Red Hat Enterprise Linux 8 for x86_64 - BaseOS (Kickstart)
-
Red Hat Enterprise Linux 8 for x86_64 - AppStream (Kickstart)
-
- For Red Hat Enterprise Linux 7 hosts
-
-
Red Hat Enterprise Linux 7 Server (Kickstart)
-
For other supported architectures, substitute your architecture for x86_64 in the repository names.
Appendix B: Troubleshooting synchronization errors
If you encounter the following errors during content synchronization, follow the steps to troubleshoot and resolve the problem.
- "[Errno 1] Operation not permitted: …" during repository syncing
-
# chown --recursive pulp:pulp /var/lib/pulp/media/
- 500 API error during syncing with "cryptography.fernet.InvalidToken" in /var/log/messages traceback
-
Run this command on your Foreman server and all Smart Proxy servers:
# sudo -u pulp PULP_SETTINGS='/etc/pulp/settings.py' pulpcore-manager datarepair-2327 --dry-run
If you see values greater than 0, repair the content:
# sudo -u pulp PULP_SETTINGS='/etc/pulp/settings.py' pulpcore-manager datarepair-2327
Appendix C: Store content on an NFS share
When local disk space on your Foreman server is insufficient for content storage, you can mount an NFS share at /var/lib/pulp to store synchronized content remotely.
|
Important
|
Use high-bandwidth, low-latency storage for the |
-
The NFS share exists and provides the appropriate permissions to Foreman server and its
apacheuser. This example uses a share atnfs.example.com:/Foreman/pulp.
-
Stop Foreman services on your Foreman server:
# systemctl stop foreman.target
-
Install the
nfs-utilspackage on your Foreman server:# dnf install nfs-utils
-
Copy the existing contents of
/var/lib/pulpto the NFS share.-
Mount the NFS share at a temporary location:
# mkdir /mnt/temp
# mount -o rw nfs.example.com:/Foreman/pulp /mnt/temp
-
Copy the existing contents of
/var/lib/pulpto the temporary location:# cp -r /var/lib/pulp/* /mnt/temp/.
-
Set the permissions for all files on the share to use the
pulpuser. -
Unmount the temporary storage location:
# umount /mnt/temp
-
-
Remove the existing contents of
/var/lib/pulp:# rm -rf /var/lib/pulp/*
-
Edit the
/etc/fstabfile and add the following line:nfs.example.com:/Foreman/pulp /var/lib/pulp nfs rw,hard,context="system_u:object_r:pulpcore_var_lib_t:s0"
This makes the mount persistent across system reboots. Ensure to include the SELinux context.
-
Enable the mount:
# mount -a
-
Verify the NFS share provides the content:
-
Confirm the NFS share mounts to
/var/lib/pulp:# df Filesystem 1K-blocks Used Available Use% Mounted on ... nfs.example.com:/Foreman/pulp 309506048 58632800 235128224 20% /var/lib/pulp ...
-
Confirm the content exists at the mount on
/var/lib/pulp:# ls /var/lib/pulp
-
-
Start Foreman services on your Foreman server:
# systemctl start foreman.target